Enable vUART Configurations
About vUART
A virtual universal asynchronous receiver/transmitter (vUART) can be a console port or a communication port.
A vUART can exchange data between the hypervisor and a VM or between two VMs. Typical use cases of a vUART include:
Access the console of a VM from the hypervisor or another VM. A VM console, when enabled by the OS in that VM, typically provides logs and a shell to log in and execute commands. (vUART console)
Exchange user-specific, low-speed data between two VMs. (vUART communication)
To the VMs, the vUARTs are presented in a 8250-compatible manner.
To exchange high-speed (for example, megabytes or gigabytes per second) data between two VMs, you can use the inter-VM shared memory feature (IVSHMEM) instead.
Dependencies and Constraints
Consider the following dependencies and constraints:
The OSes of the VMs need an 8250-compatible serial driver.
To access the hypervisor shell, you must have a physical UART.
Although a vUART is available to all kinds of VMs, you should not enable a vUART to access the console of or exchange data with a real-time VM. Exchanging data via a vUART imposes a performance penalty that could delay the response of asynchronous events in real-time VMs.
A VM can have one console vUART and multiple communication vUARTs.
A single vUART connection cannot support both console and communication.
Configuration Overview
The ACRN Configurator Tool lets you configure vUART connections. The following documentation is a general overview of the configuration process.
To configure access to the console of a VM from the hypervisor, go to the VM Basic Parameters > Console virtual UART type, and select a COM port.

To configure communication between two VMs, go to the Hypervisor Global Settings > Basic Parameters > InterVM Virtual UART Connection. Click + to add the first vUART connection.

For the connection:
Select the two VMs to connect.
Select the vUART type, either Legacy or PCI.
If you select Legacy, the tool displays a virtual I/O address field for each VM. If you select PCI, the tool displays a virtual Board:Device.Function (BDF) address field for each VM. In both cases, you can enter an address or leave it blank. If the field is blank, the tool provides an address when the configuration is saved.
To add another connection, click + on the right side of an existing connection. Or click - to delete a connection.
Note
The release v3.0+ ACRN Configurator assigns COM2 (I/O address
0x2F8) to the S5 feature. A conflict will occur if you assign0x2F8to another connection. In our example, we’ll use COM3 (I/O address0x3E8).
Example Configuration
The following steps show how to configure and verify a vUART connection between two VMs. The example extends the information provided in the Getting Started Guide.
In the ACRN Configurator, create a shared scenario with a Service VM and one post-launched User VM.
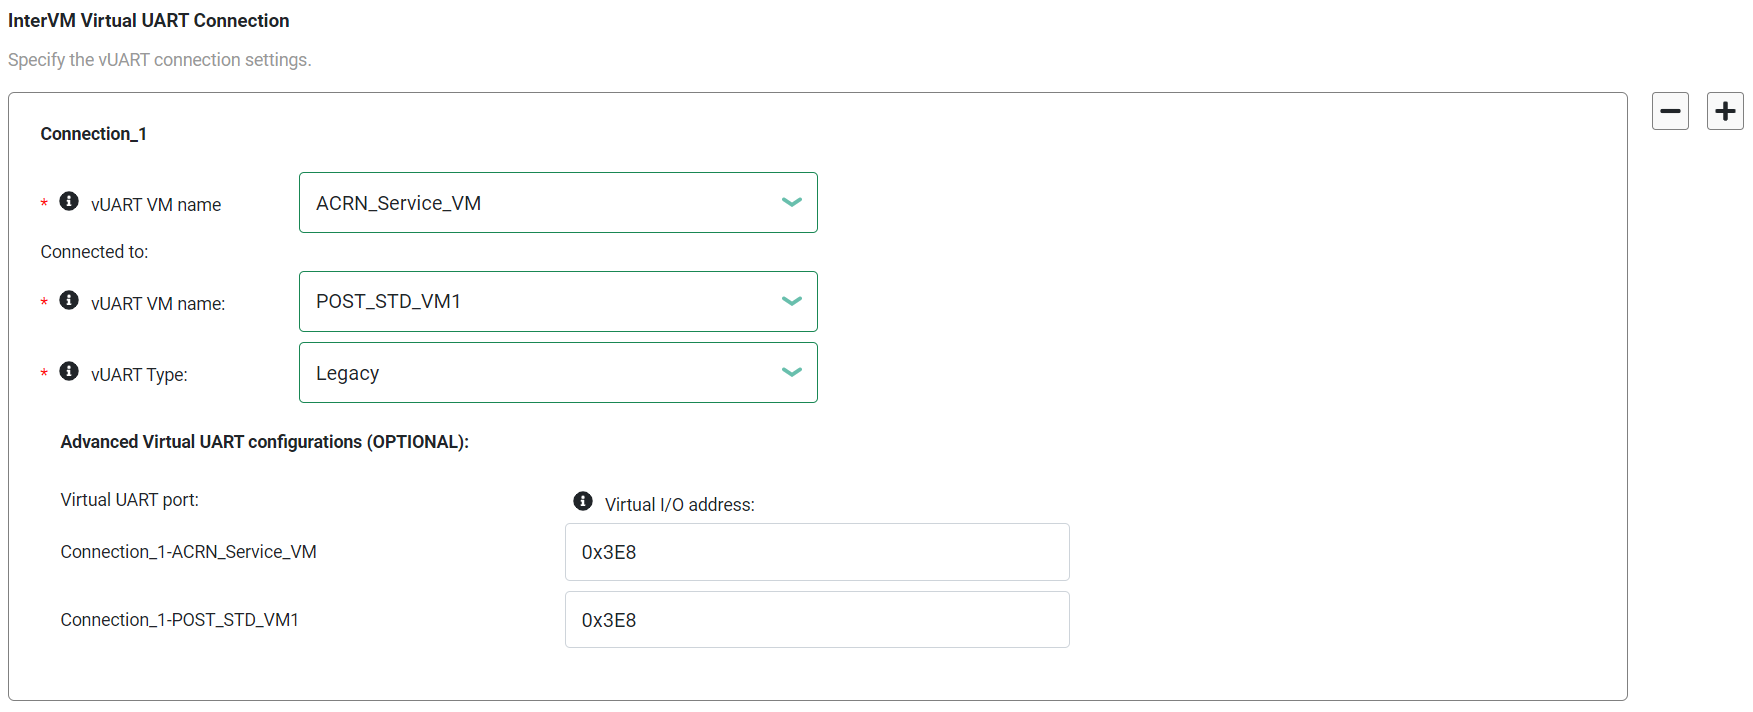
Go to Hypervisor Global Settings > Basic Parameters > InterVM Virtual UART Connection.
Click + to add a vUART connection.
Select the Service VM (ACRN_Service_VM) and the post-launched User VM (POST_STD_VM1).
For the vUART type, this example uses
Legacy.For the virtual I/O address, this example uses
0x3E8.
Save the scenario and launch script.
Build ACRN, copy all the necessary files from the development computer to the target system, and launch the Service VM and post-launched User VM.
To verify the connection:
In the Service VM, check the communication port via the
dmesg | grep
tty
command. In this example, we know the port isttyS1because the I/O address matches the address in the ACRN Configurator.root@10239146120sos-dom0:~# dmesg |grep tty [ 0.000000] Command line: root=/dev/nvme0n1p2 idle=halt rw rootwait console=ttyS0 console=tty0 earlyprintk=serial,ttyS0,115200 cons_timer_check consoleblank=0 no_timer_check quiet loglevel=3 i915.nuclear_pageflip=1 nokaslr i915.force_probe=* i915.enable_guc=0x7 maxcpus=16 hugepagesz=1G hugepages=26 hugepagesz=2M hugepages=388 root=PARTUUID=25302f3f-5c45-4ba4-a811-3de2b64ae6f6 [ 0.038630] Kernel command line: root=/dev/nvme0n1p2 idle=halt rw rootwait console=ttyS0 console=tty0 earlyprintk=serial,ttyS0,115200 cons_timer_check consoleblank=0 no_timer_check quiet loglevel=3 i915.nuclear_pageflip=1 nokaslr i915.force_probe=* i915.enable_guc=0x7 maxcpus=16 hugepagesz=1G hugepages=26 hugepagesz=2M hugepages=388 root=PARTUUID=25302f3f-5c45-4ba4-a811-3de2b64ae6f6 [ 0.105303] printk: console [tty0] enabled [ 0.105319] printk: console [ttyS0] enabled [ 1.391979] 00:03: ttyS0 at I/O 0x3f8 (irq = 4, base_baud = 115200) is a 16550A [ 1.649819] serial8250: ttyS1 at I/O 0x3e8 (irq = 5, base_baud = 115200) is a 16550A [ 3.394543] systemd[1]: Created slice system-serial\x2dgetty.slice.
Test vUART communication:
In the Service VM, run the following command to write
acrnto the communication port:root@10239146120sos-dom0:~/kino# echo "acrn" > /dev/ttyS1
In the User VM, read the communication port to confirm that
acrnwas received:$ root@intel-corei7-64:~# cat /dev/ttyS1 acrn
Learn More
ACRN supports multiple inter-VM communication methods. For a comparison, see ACRN Inter-VM Communication.
For details on ACRN vUART high-level design, see: