Sample Application User Guide
This sample application shows how to create two VMs that are launched on your target system running ACRN. These VMs communicate with each other via inter-VM shared memory (IVSHMEM). One VM is a real-time VM running cyclictest, an open source application commonly used to measure latencies in real-time systems. This real-time VM (RT_VM) uses inter-VM shared memory (IVSHMEM) to send data to a second Human-Machine Interface VM (HMI_VM). The HMI_VM formats and presents the collected data as a histogram on a web page shown by a browser. This guide shows how to configure, create, and launch the two VM images that make up this application.
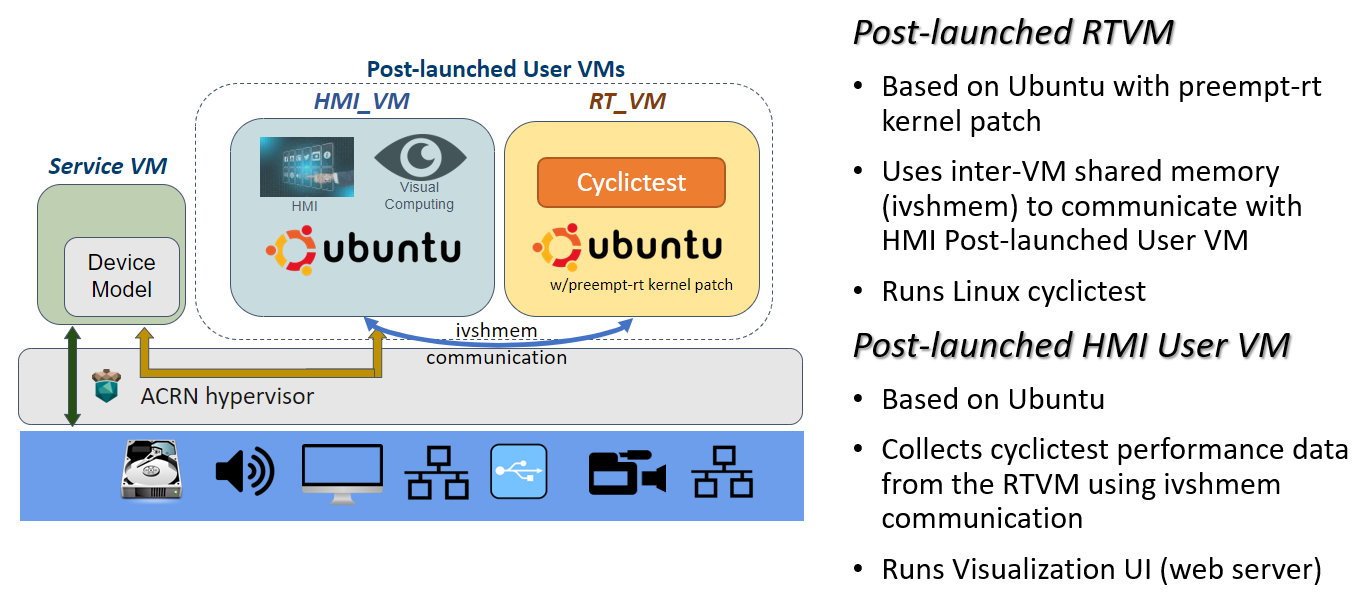
Figure 7 Sample Application Overview
We build these two VM images on your development computer using scripts in the ACRN source code. Once we have the two VM images, we follow similar steps shown in the Getting Started Guide to define a new ACRN scenario with two post-launched user VMs with their IVSHMEM connection. We build a Service VM image and the Hypervisor image based on the scenario configuration (as we did in the Getting Started Guide). Finally, we put this all together on the target system, launch the sample application VMs on ACRN from the Service VM, run the application parts in each VM, and view the cyclictest histogram results in a browser running on our HMI VM (or development computer).
While this sample application uses the cyclictest to generate data about performance latency in the RTVM, we aren’t doing any configuration optimization in this sample to get the best RT performance.
Prerequisites Environment and Images
Before beginning, use the df command on your development computer and
verify there’s at least 30GB free disk space for building the ACRN
sample application. You may see a different Filesystem name and sizes:
$ df -h /

Filesystem     Size   Used Avail Use% Mounted on
/dev/sda5      109G    42G  63G   41% /
Prepare the ACRN Development and Target Environment
Important
Before building the sample application, it’s important that you complete the Getting Started Guide instructions and leave the development and target systems with the files created in those instructions.
The Getting Started Guide instructions get all the tools and packages installed on your development and target systems that we’ll also use to build and run this sample application.
After following the Getting Started Guide, you’ll have a directory
~/acrn-work on your development computer containing directories with the
acrn-hypervisor and acrn-kernel source code and build output. You’ll
also have the board XML file that’s needed by the ACRN Configurator to
configure the ACRN hypervisor and set up the VM launch scripts for this sample
application.
Preparing the Target System
On the target system, reboot and choose the regular Ubuntu image (not the Ubuntu-ACRN Board Inspector choice created when following the Getting Started Guide).
Log in as the acrn user. We’ll be making ssh connections to the target system later in these steps, so install the ssh server on the target system using:
sudo apt install -y openssh-server
We’ll need to know the IP address of the target system later. Use the
hostname -Icommand and look at the first IP address mentioned. You’ll likely see a different IP address than shown in this example:hostname -I | cut -d ' ' -f 1 10.0.0.200
Make the Sample Application
On your development computer, build the applications used by the sample. The
rtApp app in the RT VM reads the output from the cyclictest program and
sends it via inter-VM shared memory (IVSHMEM) to another regular HMI VM where
the userApp app receives the data and formats it for presentation using the
histapp.py Python app.
As a normal (e.g., acrn) user, follow these steps:
Install some additional packages in your development computer used for building the sample application:
sudo apt install -y cloud-guest-utils schroot kpartx qemu-utils
Check out the
acrn-hypervisorsource code branch (already cloned from theacrn-hypervisorrepo when you followed the Getting Started Guide). We’ve tagged a specific version of the hypervisor that you should use for the sample app’s HMI VM:cd ~/acrn-work/acrn-hypervisor git fetch --all git checkout release_3.3
Build the ACRN sample application source code:
cd misc/sample_application/
make all
This builds the
histapp.py,userApp, andrtAppused for the sample application.
Make the HMI_VM Image
Make the HMI VM image. This script runs for about 10 minutes total and will prompt you to input the passwords for the acrn and root user in the HMI_VM image:
cd ~/acrn-work/acrn-hypervisor/misc/sample_application/image_builder
./create_image.sh hmi-vm
After the script is finished, the
hmi_vm.imgimage file is created in thebuilddirectory. You should see a final message from the script that looks like this:2022-08-18T09:53:06+08:00 [ Info ] VM image created at /home/acrn/acrn-work/acrn-hypervisor/misc/sample_application/image_builder/build/hmi_vm.img.If you don’t see such a message, look back through the output to see what errors are indicated. For example, there could have been a network error while retrieving packages from the Internet. In such a case, simply trying the
create_image.shcommand again might work.The HMI VM image is a configured Ubuntu desktop image ready to launch as an ACRN user VM with the HMI parts of the sample app installed.
Make the RT_VM Image
Check out the
acrn-kernelsource code branch (already cloned from theacrn-kernelrepo when you followed the Getting Started Guide). We use preempt-rt branch ofacrn-kernelfor the sample app’s RT VM:cd ~/acrn-work/acrn-kernel git fetch --all git checkout -b sample_rt origin/5.15/preempt-rt
Build the preempt-rt patched kernel used by the RT VM:
make mrproper
cp kernel_config .config
make olddefconfig
make -j $(nproc) deb-pkg
The kernel build can take 15 minutes on a fast computer but could take two to three hours depending on the performance of your development computer. When done, the build generates four Debian packages in the directory above the build root directory, as shown by this command:
ls ../*rtvm*.deb
You will see rtvm Debian packages for linux-headers, linux-image (normal and debug), and linux-libc-dev (your file names might look a bit different):
linux-headers-5.15.71-rt46-acrn-kernel-rtvm+_5.15.71-rt46-acrn-kernel-rtvm+-1_amd64.deb
linux-image-5.15.71-rt46-acrn-kernel-rtvm+-dbg_5.15.71-rt46-acrn-kernel-rtvm+-1_amd64.deb
linux-image-5.15.71-rt46-acrn-kernel-rtvm+_5.15.71-rt46-acrn-kernel-rtvm+-1_amd64.deb
linux-libc-dev_5.15.71-rt46-acrn-kernel-rtvm+-1_amd64.deb
Make the RT VM image:
cd ~/acrn-work/acrn-hypervisor/misc/sample_application/image_builder
./create_image.sh rt-vm
After the script is finished, the
rt_vm.imgimage file is created in thebuilddirectory. The RT VM image is a configured Ubuntu image with a preempt-rt patched kernel used for real-time VMs.
Create and Configure the ACRN Scenario
Now we turn to building the hypervisor based on the board and scenario configuration for our sample application. We’ll use the board XML file and ACRN Configurator already on your development computer when you followed the Getting Started Guide.
Use the ACRN Configurator to define a new scenario for our two VMs and generate new launch scripts for this sample application.
On your development computer, launch the ACRN Configurator:
cd ~/acrn-work
acrn-configurator
Under Start a new configuration, confirm that the working folder is
/home/acrn/acrn-work/MyConfiguration. Click Use This Folder. (If prompted, confirm it’s OK to overwrite an existing configuration.)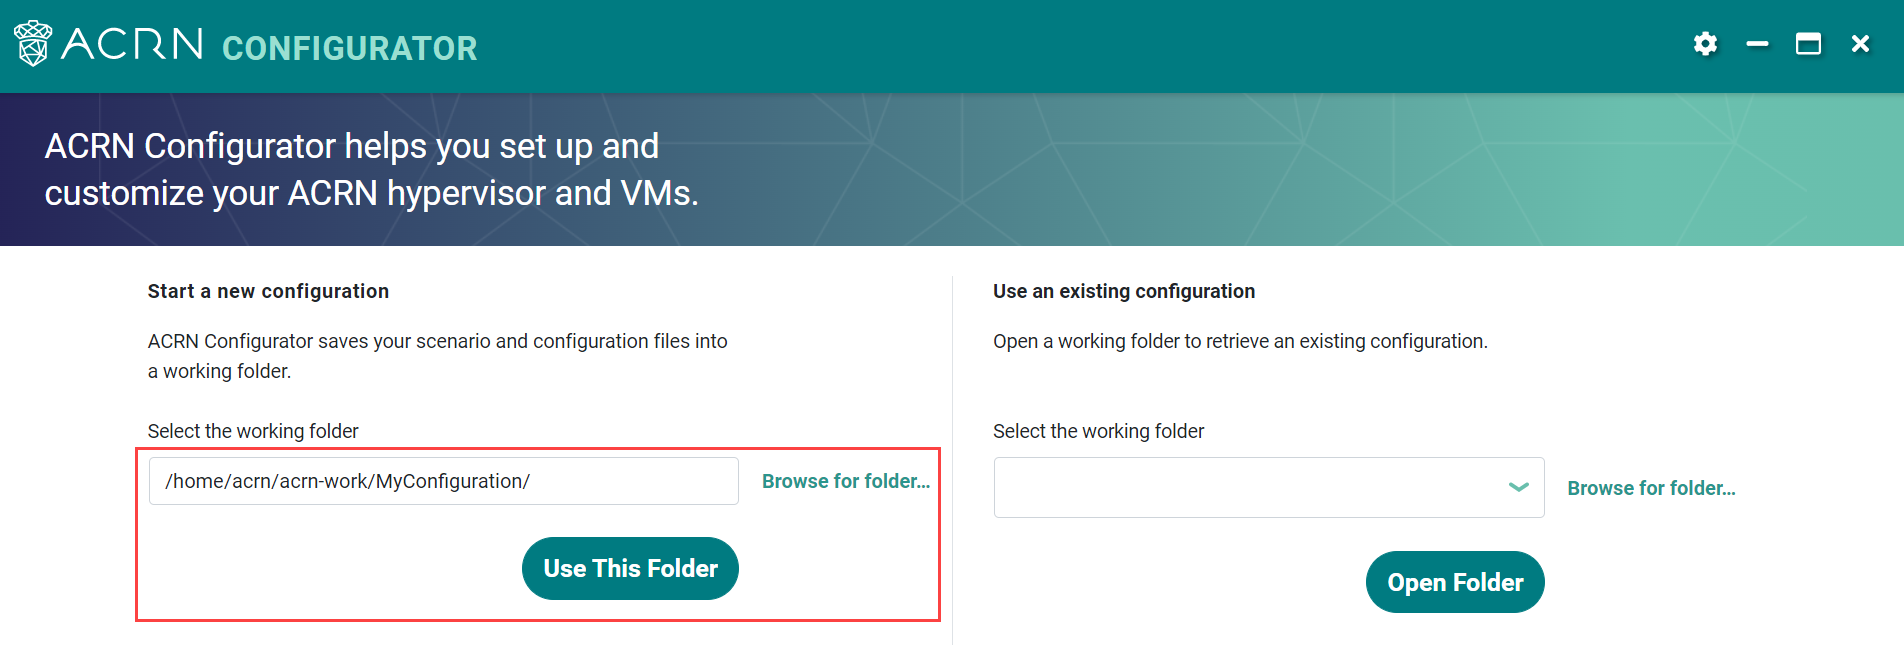
Import your board configuration file as follows:
In the 1. Import a board configuration file panel, click Browse for file.
Browse to
/home/acrn/acrn-work/my_board.xmland click Open. Then click Import Board File.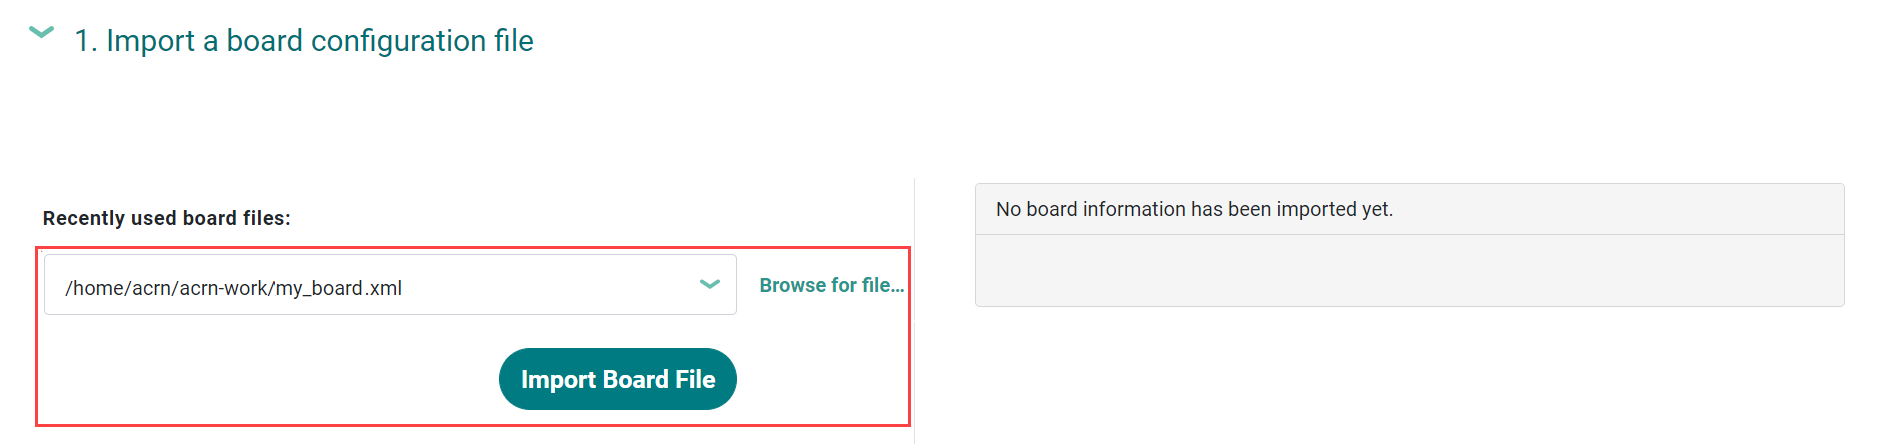
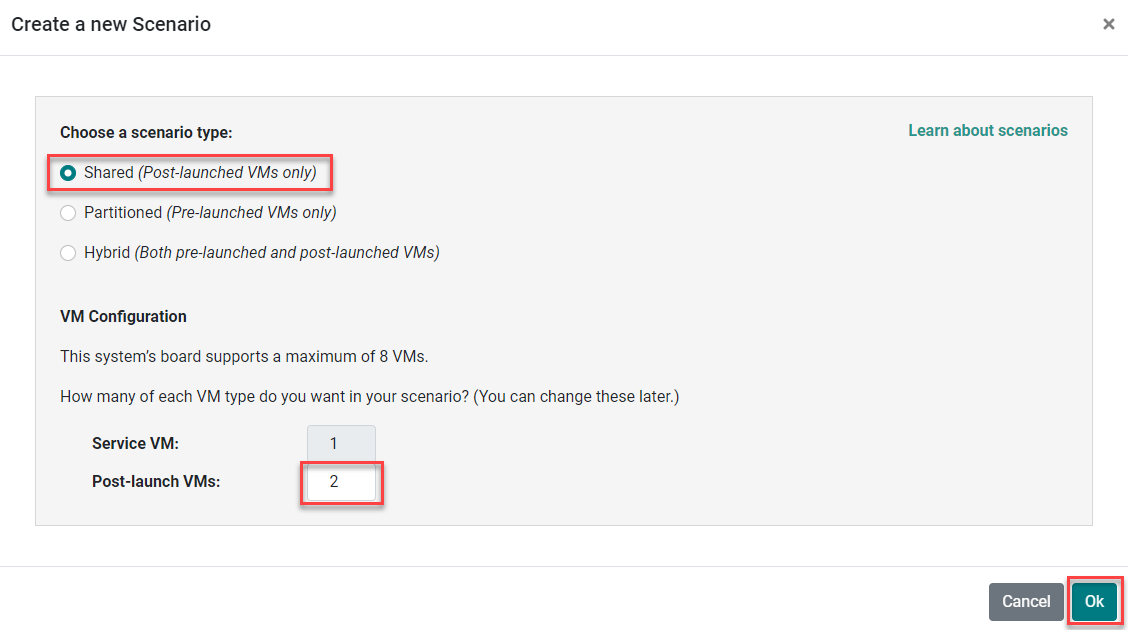
Create a new scenario: select a shared scenario type with a Service VM and two post-launched VMs. Click OK.
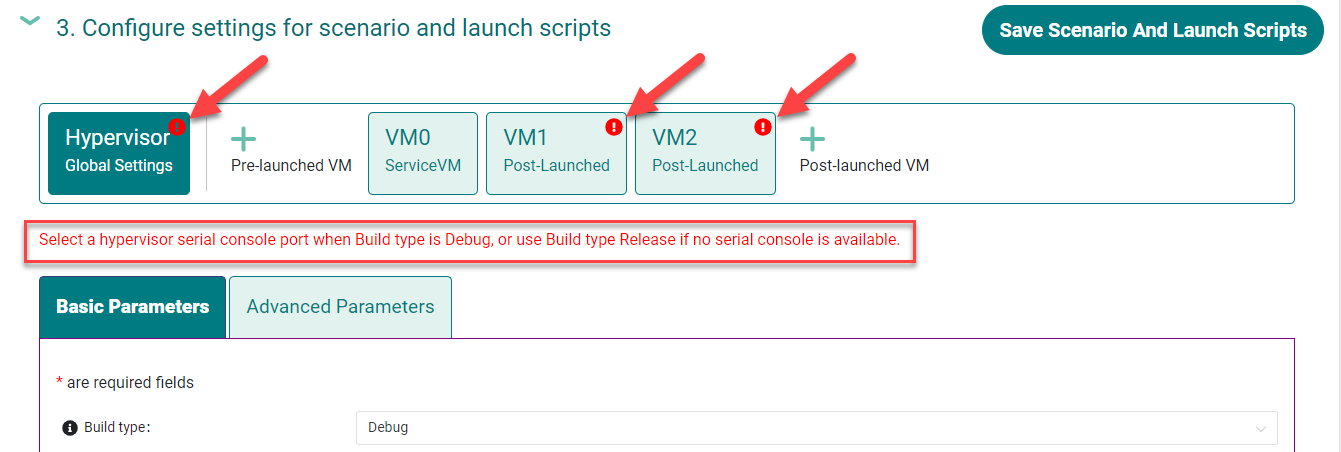
The ACRN Configurator will report some problems with the initial scenario configuration that we’ll resolve as we make updates. (Notice the error indicators on the settings tabs and above the parameters tabs.) The ACRN Configurator verifies the scenario when you open a saved scenario and when you click the Save Scenario And Launch Scripts button.
Select the VM0 (Service VM) tab and set the Console virtual UART type to
COM Port 1. Edit the Basic Parameters > Kernel command-line parameters by appending the existing parameters withi915.modeset=1 3(to disable the GPU driver loading for Intel GPU device).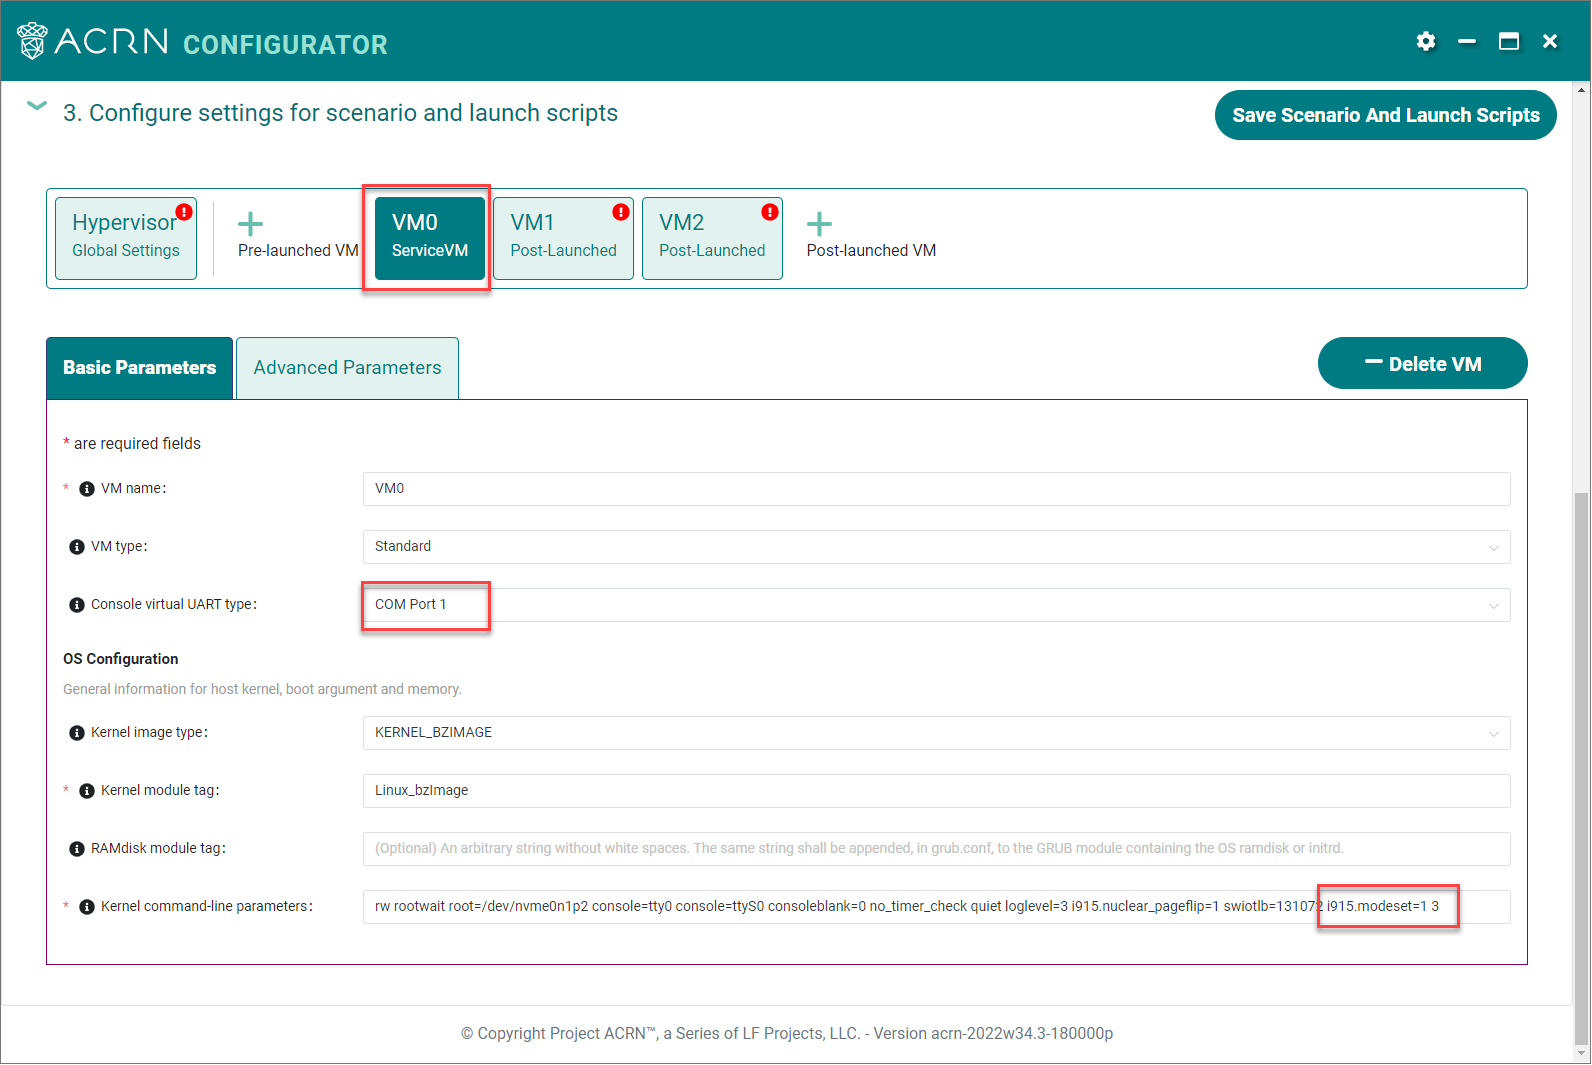
Select the VM1 tab and change the VM name to HMI_VM. Configure the Console virtual UART type to
COM Port 1, set the Memory size to2048, and add the physical CPU affinity to pCPU0and1(click the + button to create the additional affinity setting), as shown below:
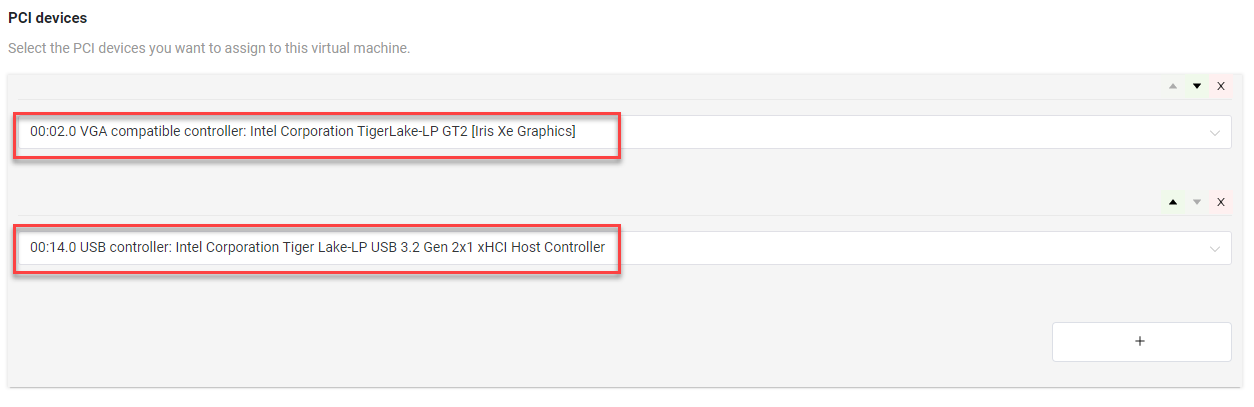
Enable GVT-d configuration by clicking the + within the PCI device setting options and selecting the VGA compatible controller. Click the + button again to add the USB controller to passthrough to the HMI_VM.
Configure the HMI_VM’s virtio console devices and virtio network devices by clicking the + button in the section and setting the values as shown here (note the Network interface name must be
tap0):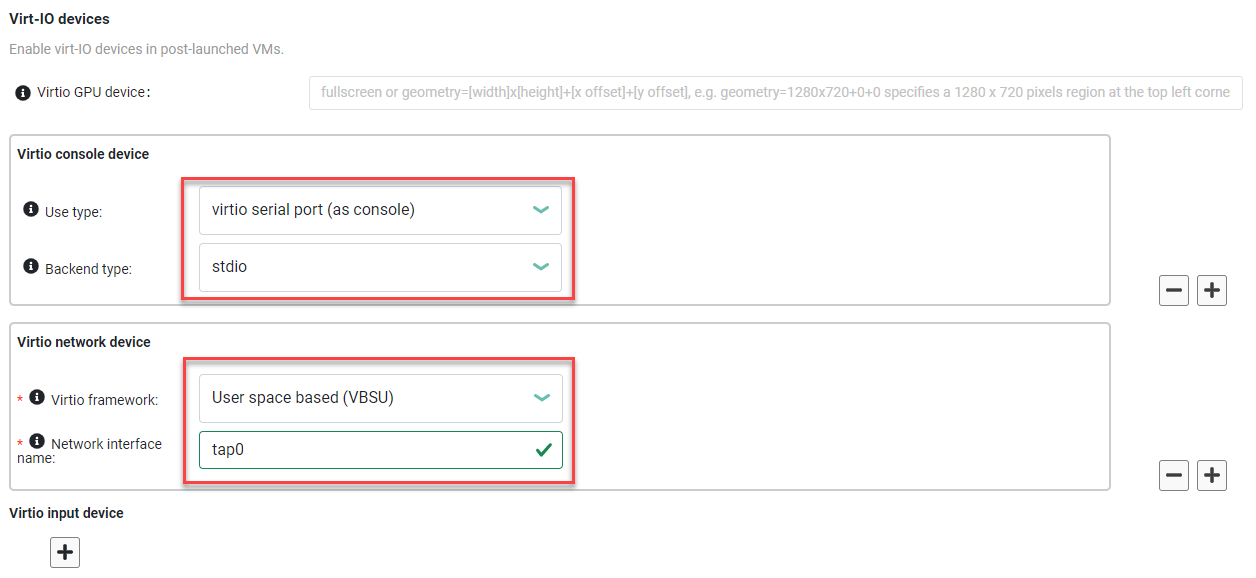
Configure the HMI_VM virtio block device. Add the absolute path of your
hmi_vm.imgon the target system (we’ll copy the generatedhmi_vm.imgto this directory in a later step):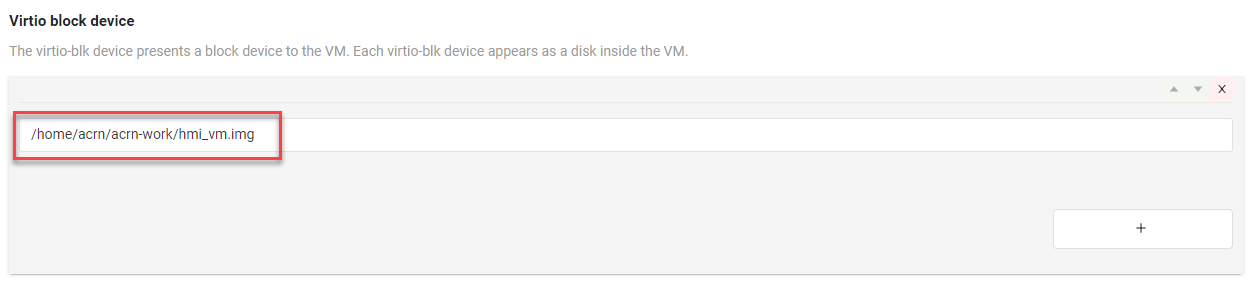
That completes the HMI_VM settings.
Next, select the VM2 tab and change the VM name to RT_VM, change the VM type to
Real-time, set the Console virtual UART type toCOM port 1, set the memory size to1024, set pCPU affinity to IDs2and3, and check the Real-time vCPU box for pCPU ID 2, as shown below: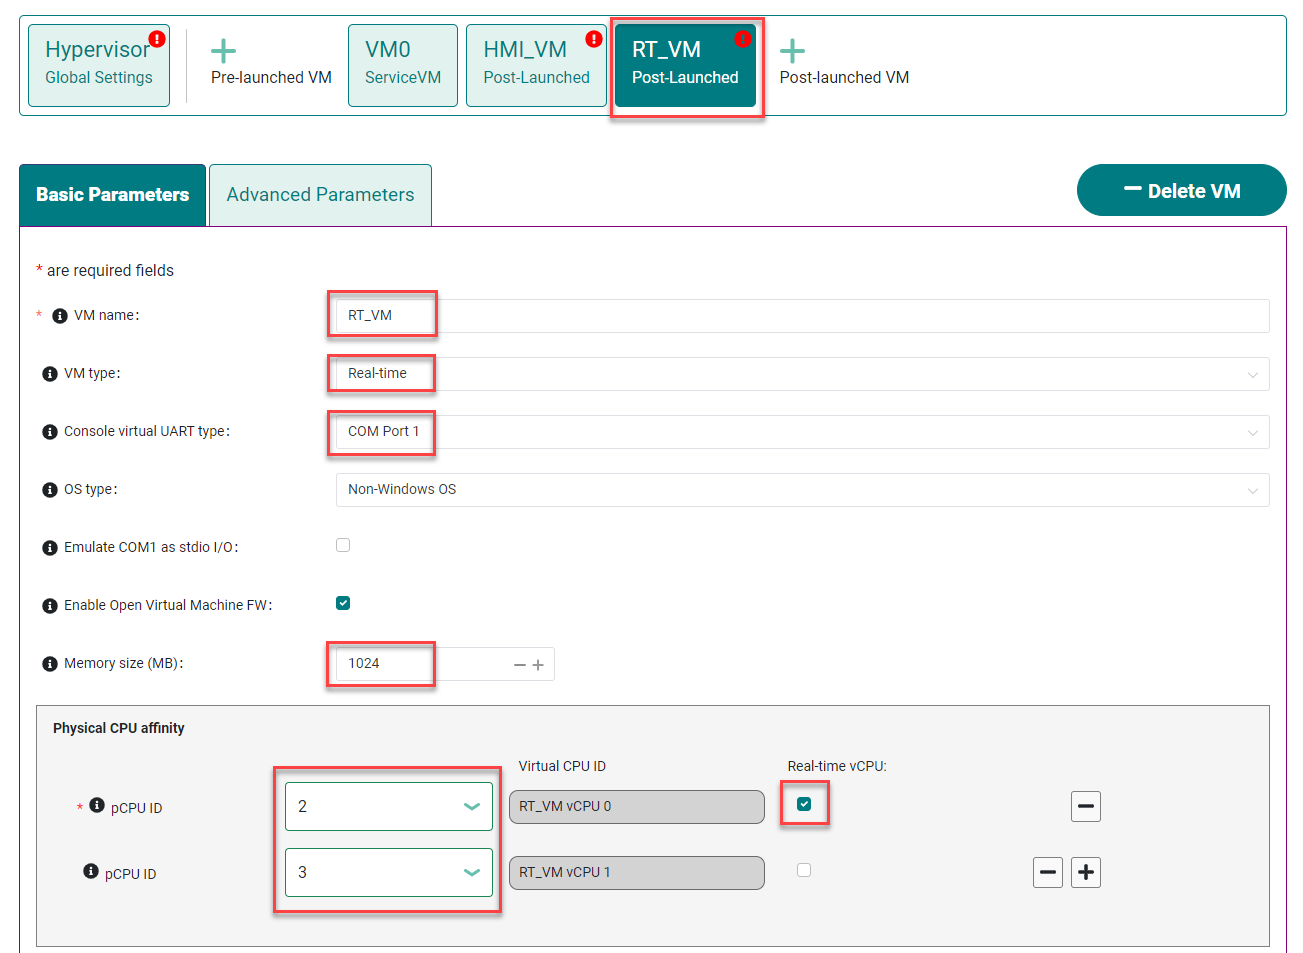
Configure the virtio console device for the RT_VM (unlike the HMI_VM, we don’t use a virtio network device for this RT_VM):

Add the absolute path of your
rt_vm.imgon the target system (we’ll copy thert_vm.imgfile we generated earlier to this directory in a later step):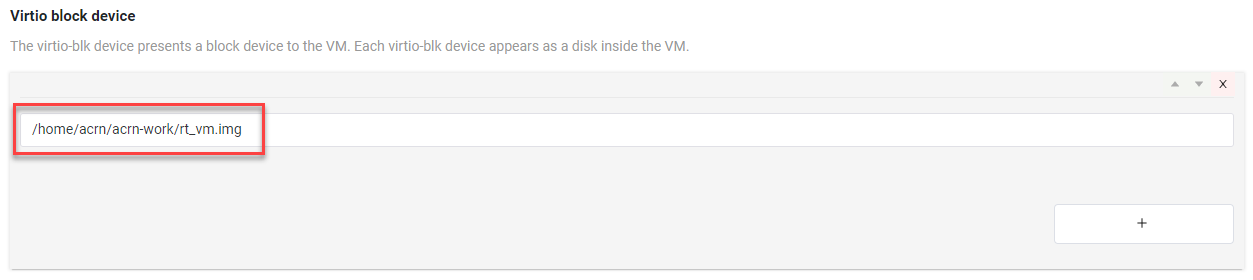
Select the Hypervisor tab: Verify that the build type is
Debug, define the InterVM shared memory region settings as shown below, adding the HMI_VM and RT_VM as the VMs doing the sharing of this region. (The missing Virtual BDF values will be supplied by the ACRN Configurator when you save the configuration.)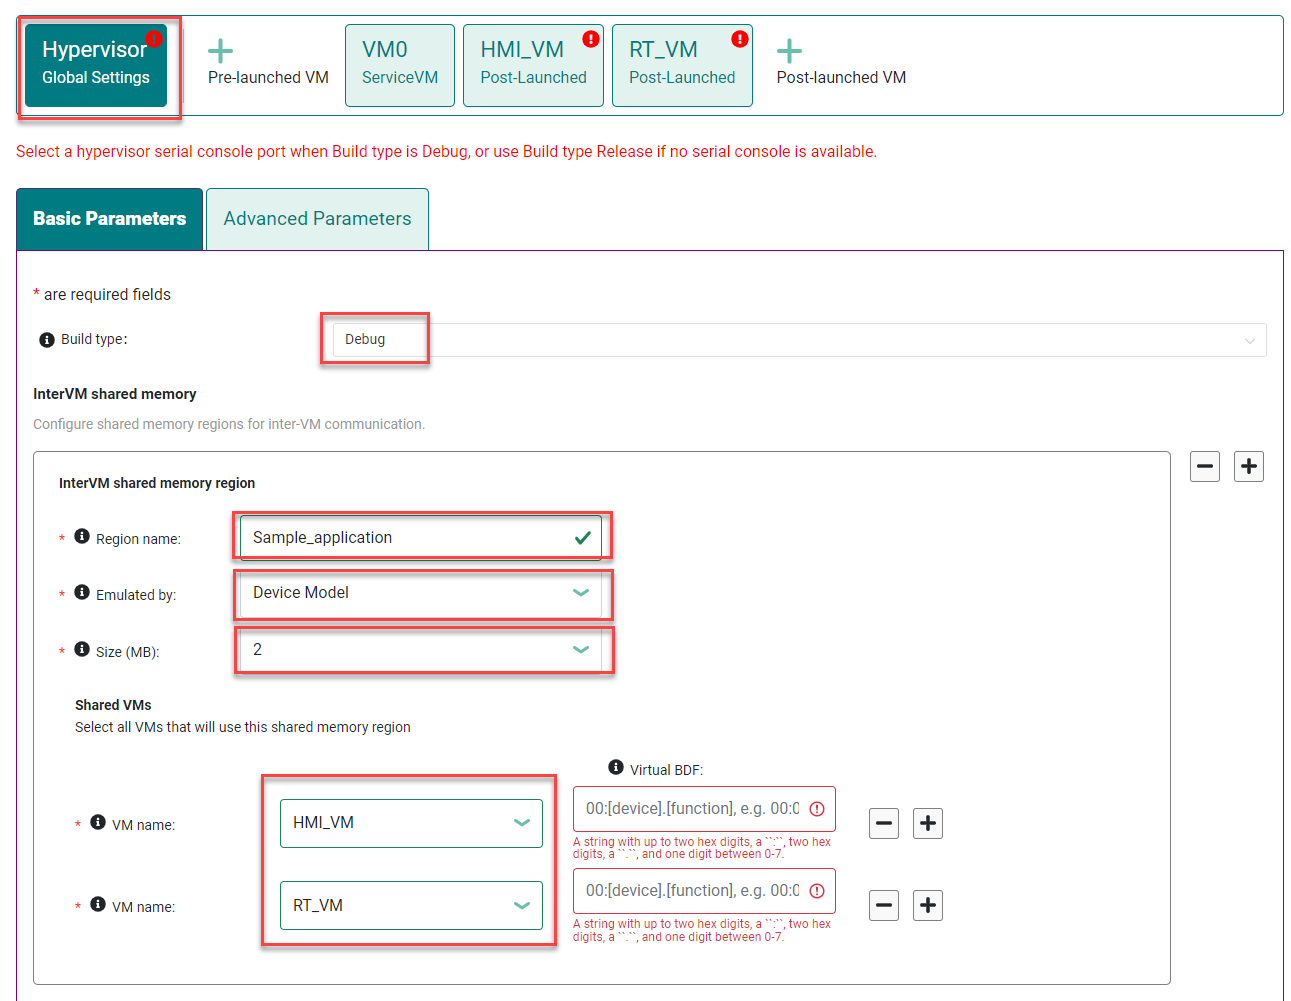
In the Debug options, set the Serial console port to
/dev/ttyS0, as shown below (this will resolve the message about the missing serial port configuration):
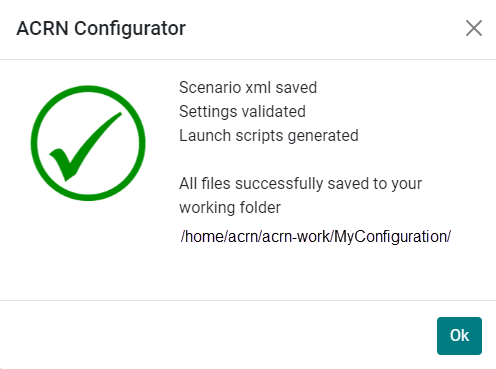
Click the Save Scenario and Launch Scripts to validate and save this configuration and launch scripts. You should see a dialog box saying the scenario is saved and validated, launch scripts are generated, and all files successfully saved. Click OK.
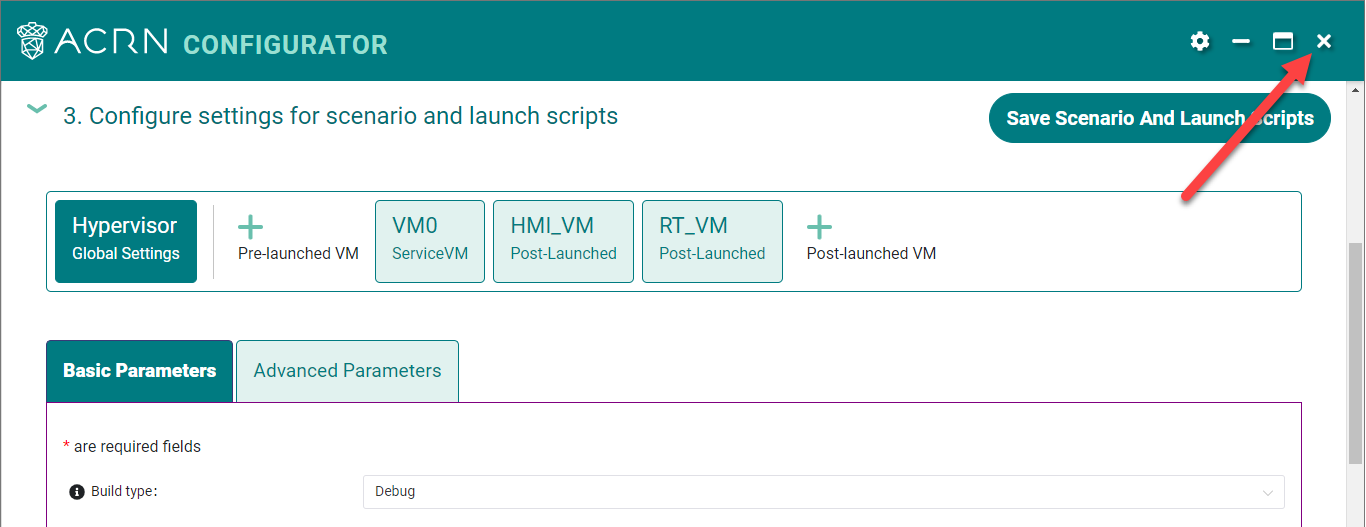
We’re done configuring the sample application scenario. When you saved the scenario, the ACRN Configurator did a re-verification of all the option settings and found no issues, so all the error indicators are now cleared.
Exit the ACRN Configurator by clicking the X in the top right corner.
You can see the saved scenario and launch scripts in the working directory:
$ ls MyConfiguration

launch_user_vm_id1.sh launch_user_vm_id2.sh scenario.xml myboard.board.xml
You’ll see the two VM launch scripts (id1 for the HMI_VM, and id2 for the RT_VM) and the scenario XML file for your sample application (as well as your board XML file).
Build the ACRN Hypervisor and Service VM Images
On the development computer, build the ACRN hypervisor using the board XML and the scenario XML file we just generated:
cd ~/acrn-work/acrn-hypervisor

make clean
debian/debian_build.sh clean && debian/debian_build.sh -c ~/acrn-work/MyConfiguration
The build typically takes about a minute. When done, the build generates several Debian packages in the build directory. Only one with your board and working folder name among these Debian packages is different from genetated in the Getting Started Guide. So we only need to copy and reinstall one Debian package to the target system.
This Debian package contains the ACRN hypervisor and tools for installing ACRN on the target.
Use the ACRN kernel for the Service VM already on your development computer when you followed the Getting Started Guide (the sample application requires the same version of the Service VM as generated in the Getting Started Guide, so no need to generate it again).
Copy Files from the Development Computer to Your Target System
Copy all the files generated on the development computer to the target system. This includes the sample application executable files, HMI_VM and RT_VM images, Debian packages for ACRN Hypervisor, and the launch scripts.
Use
scpto copy files from your development computer to the~/acrn-workdirectory on the target (replace the IP address used in this example with the target system’s IP address you found earlier):cd ~/acrn-work scp acrn-hypervisor/misc/sample_application/image_builder/build/*_vm.img \ acrn-hypervisor*.deb \ MyConfiguration/launch_user_vm_id*.sh \ acrn@10.0.0.200:~/acrn-work
Install and Run ACRN on the Target System
On the target system, configure your network according to instruction of below link:
https://www.ubuntupit.com/how-to-configure-and-use-network-bridge-in-ubuntu-linux/
On your target system, install the ACRN Debian package and ACRN kernel Debian packages using these commands:
cd ~/acrn-work
cp ./acrn-hypervisor*.deb ./*acrn-service-vm*.deb /tmp
sudo apt purge acrn-hypervisor
sudo apt install /tmp/acrn-hypervisor*.deb  /tmp/*acrn-service-vm*.deb
Enable networking services for sharing with the HMI User VM:
Warning
The IP address of Service VM may change after executing the following command.
cp /usr/share/doc/acrnd/examples/* /etc/systemd/network
sudo systemctl enable --now systemd-networkd
Reboot the system:
rebootThe target system will boot automatically into the ACRN hypervisor and launch the Service VM.
Log in to the Service VM (using the target’s keyboard and HDMI monitor) using the
acrnusername.Find the Service VM’s IP address (the first IP address shown by this command):
$ hostname -I | cut -d ' ' -f 1
10.0.0.200
From your development computer, ssh to your target system’s Service VM using that IP address:
ssh acrn@10.0.0.200
In that ssh session, launch the HMI_VM by using the
launch_user_vm_id1.shlaunch script:sudo chmod +x ~/acrn-work/launch_user_vm_id1.sh sudo ~/acrn-work/launch_user_vm_id1.sh
The launch script will start up the HMI_VM and show an Ubuntu login prompt in your ssh session (and a graphical login on your target’s HDMI monitor).
Log in to the HMI_VM as root user (not acrn) using your development computer’s ssh session:
ubuntu login: root
Password:
Welcome to Ubuntu 22.04.1 LTS (GNU/Linux 5.15.0-52-generic x86_64)

. . .

(acrn-guest)root@ubuntu:~#
Find the HMI_VM’s IP address:
(acrn-guest)root@ubuntu:~# hostname -I | cut -d ' ' -f 1
10.0.0.100
If no IP address is reported, run this command to request an IP address and check again:
dhclientRun the HMI VM sample application
userApp(in the background):sudo /root/userApp &
and then the
histapp.pyapplication:pip install "numpy<2" sudo python3 /root/histapp.py
At this point, the HMI_VM is running and we’ve started the HMI parts of the sample application. Next, we will launch the RT_VM and its parts of the sample application.
On your development computer, open a new terminal window and start a new ssh connection to your target system’s Service VM:
ssh acrn@10.0.0.200
In this ssh session, launch the RT_VM by using the vm_id2 launch script:
sudo chmod +x ~/acrn-work/launch_user_vm_id2.sh
sudo ~/acrn-work/launch_user_vm_id2.sh
The launch script will start up the RT_VM. Lots of system messages will go by and end with an Ubuntu login prompt.
Log in to the RT_VM as root user (not acrn) in this ssh session:
ubuntu login: root
Password:
Welcome to Ubuntu 22.04.1 LTS (GNU/Linux 5.15.71-rt46-acrn-kernel-rtvm+ x86_64)

. . .

(acrn-guest)root@ubuntu:~#
Run the cyclictest in this RT_VM (in the background):
cyclictest -p 80 --fifo="./data_pipe" -q &
and then the rtApp in this RT_VM:
sudo /root/rtApp
Now the two parts of the sample application are running:
The RT_VM is running cyclictest, which generates latency data, and the rtApp sends this data via IVSHMEM to the HMI_VM.
In the HMI_VM, the userApp receives the cyclictest data and provides it to the histapp.py Python application that is running a web server.
We can view this data displayed as a histogram:
- Option 1: Use a browser on your development computer
Open a web browser on your development computer to the HMI_VM IP address that we found in an earlier step (e.g., http://10.0.0.100).
- Option 2: Use a browser on the HMI VM using the target system console
Log in to the HMI_VM on the target system’s console. (If you want to log in as root, click the “Not listed?” link under the username choices you do see and enter the root username and password.) Open the web browser to http://localhost.
Refresh the browser. You’ll see a histogram graph showing the percentage of latency time intervals reported by cyclictest. The histogram will update every time you refresh the browser. (Notice the count of samples increases as reported on the vertical axis label.)
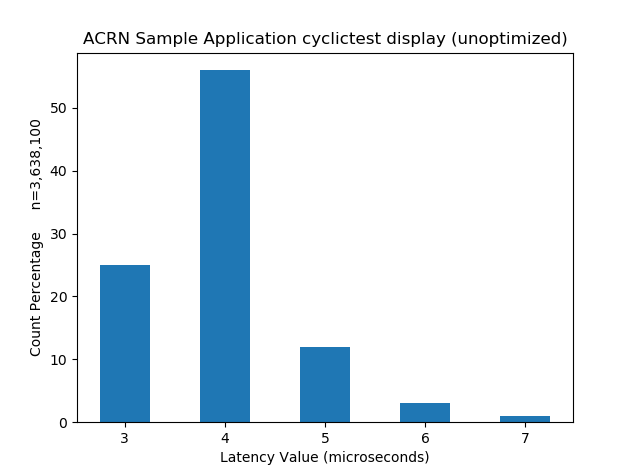
Figure 8 Example Histogram Output from Cyclictest as Reported by the Sample App
The horizontal axis represents the latency values in microseconds, and the vertical axis represents the percentage of occurrences of those values.
Congratulations
That completes the building and running of this sample application. You
can view the application’s code in the
~/acrn-work/acrn-hypervisor/misc/sample_application directory on your
development computer (cloned from the acrn-hypervisor repo).
Note
As mentioned at the beginning, while this sample application uses the cyclictest to generate data about performance latency in the RT_VM, we haven’t done any configuration optimization in this sample to get the best real-time performance.