Enable ACRN Secure Boot With GRUB
This document shows how to enable ACRN secure boot with GRUB including:
Validation Environment:
Hardware Platform: Tiger Lake, supported hardware described in Supported Hardware.
ACRN Scenario: Shared
Service VM: Yocto & Ubuntu
GRUB: 2.04
Note
Note that GRUB may stop booting in case of problems, make sure you know how to recover a bootloader on your platform.
ACRN Secure Boot Sequence
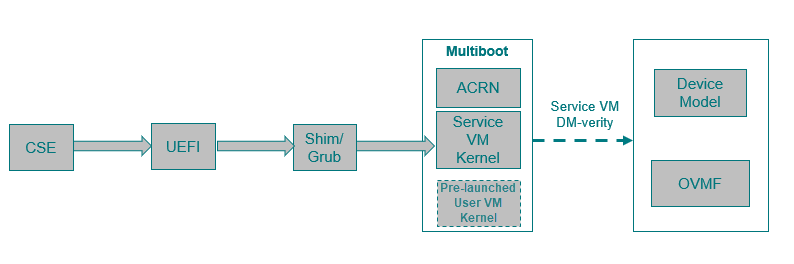
ACRN can be booted by a multiboot compatible bootloader. The following diagram illustrates the boot sequence of ACRN with GRUB:
For details on enabling GRUB on ACRN, see Using GRUB to Boot ACRN.
From a secure boot point of view:
UEFI firmware verifies shim/GRUB
GRUB verifies ACRN, Service VM kernel, and pre-launched User VM kernel
Service VM OS kernel verifies the Device Model (
acrn-dm) and User VM OVMF bootloader (with the help ofacrn-dm)User VM virtual bootloader (e.g., OVMF) starts the guest side verified boot process
This document shows you how to enable GRUB to
verify ACRN binaries such as acrn.bin, Service VM kernel (bzImage), and
if present, a pre-launched User VM kernel image.
Generate GPG Key
GRUB supports loading GPG signed files only if digital signatures are enabled. Here’s an example of generating a GPG signing key:
mkdir --mode 0700 keys
gpg --homedir keys  --gen-key
gpg --homedir keys --export > boot.key
The gpg --gen-key generates a public and private key pair. The private key is used to sign GRUB configuration files and ACRN binaries. The public key will be embedded in GRUB and is used to verify GRUB configuration files or binaries GRUB tries to load.
Setup Standalone GRUB EFI Binary
Prepare Initial GRUB Configuration grub.init.cfg
Create file grub.init.cfg to store the following minimal GRUB
configuration. The environment variable check_signatures=enforce
tells GRUB to enable digital signatures:
set check_signatures=enforce
export check_signatures

search --no-floppy --fs-uuid --set=root ESP_UUID
configfile /grub.cfg
echo /grub.cfg did not boot the system, rebooting in 10 seconds.
sleep 10
reboot
Replace the ESP_UUID with the UUID of your EFI system partition (found
by running the lsblk -f. In the example output below,
the UUID is 24FC-BE7A:
sda
├─sda1 vfat   ESP    24FC-BE7A                            /boot/efi
├─sda2 vfat   OS     7015-557F
├─sda3 ext4   UBUNTU e8640994-b2a3-45ad-9b72-e68960fb22f0 /
└─sda4 swap          262d1113-64be-4910-a700-670b9d2277cc [SWAP]
Enable Authentication in GRUB
With authentication enabled, a user/password is required to restrict
access to the GRUB shell, where arbitrary commands could be run.
A typical GRUB configuration fragment (added to grub.init.cfg) might
look like this:
set superusers="root"
export superusers
password_pbkdf2 root GRUB_PASSWORD_HASH
Replace the GRUB_PASSWORD_HASH with the result of the grub-mkpasswd-pbkdf2
with your custom passphrase.
Use this command to sign the grub.init.cfg file with your private
GPG key and create the grub.init.cfg.sig:
gpg --homedir keys --detach-sign grub.init.cfg
Create Standalone GRUB EFI Binary
Use the grub-mkstandalone tool to create a standalone GRUB EFI binary
file with the buit-in modules and the signed grub.init.cfg file.
The --pubkey option adds a GPG public key that will be used for
verification. The public key boot.key is no longer required.
Note
You should make a backup copy of your current GRUB image
(grubx64.efi) before replacing it with the new signed GRUB image.
This would allow you to restore GRUB in case of errors updating it.
Here’s an example sequence to do this build:
#!/bin/bash
#

TARGET_EFI='path/to/grubx64.efi'

# GRUB doesn't allow loading new modules from disk when secure boot is in
# effect, therefore pre-load the required modules.

MODULES="all_video archelp boot bufio configfile crypto echo efi_gop efi_uga ext2 extcmd  \
 fat font fshelp gcry_dsa gcry_rsa gcry_sha1 gcry_sha512 gettext gfxterm linux ls \
 memdisk minicmd mmap mpi normal part_gpt part_msdos password_pbkdf2 pbkdf2 reboot relocator \
 search search_fs_file search_fs_uuid search_label sleep tar terminal verifiers video_fb"

grub-mkstandalone \
 --directory /usr/lib/grub/x86_64-efi \
 --format x86_64-efi \
 --modules "$MODULES" \
 --pubkey ./boot.key \
 --output ./grubx64.efi  \
 "boot/grub/grub.cfg=./grub.init.cfg" \
 "boot/grub/grub.cfg.sig=./grub.init.cfg.sig"

echo "writing signed grub.efi to '$TARGET_EFI'"
sudo cp ./grubx64.efi "$TARGET_EFI"
Prepare grub.cfg
Define the menu entry for your system in a new GRUB configuration grub.cfg.
For example:
# @/boot/efi/grub.cfg for grub secure boot
set timeout_style=menu
set timeout=5
set gfxmode=auto
set gfxpayload=keep
terminal_output gfxterm

menuentry "ACRN Multiboot Ubuntu Service VM" --users "" --id ubuntu-service-vm {

search --no-floppy --fs-uuid --set 3df12ea1-ef12-426b-be98-774665c7483a

echo 'loading ACRN...'
multiboot2 /boot/acrn/acrn.bin  root=PARTUUID="c8ee7d92-8935-4e86-9e12-05dbeb412ad6"
module2 /boot/bzImage Linux_bzImage
}
Use the output of the blkid to find the right values for the
UUID (--set) and PARTUUID (root=PARTUUID= parameter) of the root
partition (e.g., /dev/nvme0n1p2) according to your hardware.
Copy this new grub.cfg to your ESP (e.g., /boot/efi/EFI/).
Sign grub.cfg and ACRN Binaries
The grub.cfg and all ACRN binaries that will be loaded by GRUB
must be signed with the same GPG key.
Here’s a sequence example of signing the individual binaries:
gpg --homedir keys --detach-sign path/to/grub.cfg
gpg --homedir keys --detach-sign path/to/acrn.bin
gpg --homedir keys --detach-sign path/to/service_vm_kernel/bzImage
Now, you can reboot and the system will boot with the signed GRUB EFI binary. GRUB will refuse to boot if any files it attempts to load have been tampered with.
Enable UEFI Secure Boot
Creating UEFI Secure Boot Key
Generate your own keys for Secure Boot:
openssl req -new -x509 -newkey rsa:2048 -subj "/CN=PK/"  -keyout PK.key  -out PK.crt  -days 7300 -nodes -sha256
openssl req -new -x509 -newkey rsa:2048 -subj "/CN=KEK/" -keyout KEK.key -out KEK.crt -days 7300 -nodes -sha256
openssl req -new -x509 -newkey rsa:2048 -subj "/CN=db/"  -keyout db.key  -out db.crt  -days 7300 -nodes -sha256
Convert
*.crtkeys to the ESL format understood for UEFI:cert-to-efi-sig-list PK.crt PK.esl cert-to-efi-sig-list KEK.crt KEK.esl cert-to-efi-sig-list db.crt db.esl
Sign ESL files:
sign-efi-sig-list -k PK.key -c PK.crt PK PK.esl PK.auth
sign-efi-sig-list -k PK.key -c PK.crt KEK KEK.esl KEK.auth
sign-efi-sig-list -k KEK.key -c KEK.crt db db.esl db.auth
Convert to DER format:
openssl x509 -outform DER -in PK.crt -out PK.der
openssl x509 -outform DER -in KEK.crt -out KEK.der
openssl x509 -outform DER -in db.crt -out db.der
The keys to be enrolled in UEFI firmware: PK.der, KEK.der, db.der.
The keys to sign bootloader image: grubx64.efi, db.key , db.crt.
Sign GRUB Image With db Key
Command example:
sbsign --key db.key --cert db.crt path/to/grubx64.efi
grubx64.efi.signed will be created, it will be your bootloader.
Enroll UEFI Keys to UEFI Firmware
Enroll PK (PK.der), KEK (KEK.der) and db
(db.der) in Secure Boot Configuration UI, which depends on your
platform UEFI firmware. In UEFI configuration menu UI, follow the steps
in this section that shows how to enroll UEFI
keys, using your own key files. From now on, only EFI binaries
signed with any db key (grubx64.efi.signed in this case) can
be loaded by UEFI firmware.