ACRN Documentation Generation
These instructions will walk you through generating the Project ACRN’s documentation and publishing it to https://projectacrn.github.io. You can also use these instructions to generate the ACRN documentation on your local system.
Documentation Overview
Project ACRN content is written using the reStructuredText markup
language (.rst file extension) with Sphinx extensions, and processed
using Sphinx to create a formatted stand-alone website. Developers can
view this content either in its raw form as .rst markup files, or you
can generate the HTML content and view it with a web browser directly on
your workstation.
You can read details about reStructuredText, and Sphinx from their respective websites.
The project’s documentation contains the following items:
ReStructuredText source files used to generate documentation found at the https://projectacrn.github.io website or via the redirect at https://docs.projectacrn.org. All of the reStructuredText sources are found in the
acrn-hypervisor/docfolder, or pulled in from sibling folders (such asmisc/) by the build scripts.Doxygen-generated material used to create all API-specific documents found at http://projectacrn.github.io/latest/api/. The documentation build process uses doxygen to scan source files in the hypervisor and device-model folders (as explained later).

The reStructuredText files are processed by the Sphinx documentation system and use the breathe extension for including the doxygen-generated API material.
Set Up the Documentation Working Folders
You’ll need git installed to get the working folders set up:
For an Ubuntu development system use:
sudo apt install git
We use the source header files to generate API documentation and we use
github.io for publishing the generated documentation. Here’s the
recommended folder setup for documentation contributions and generation:
The parent projectacrn folder is there because, if you have repo publishing
rights, we’ll also be creating a publishing area later in these steps.
In the following steps, you’ll create a fork of the upstream acrn-hypervisor
repo to your personal GitHub account, clone your personal fork to your local
development computer, and then link that to the upstream repo as well:
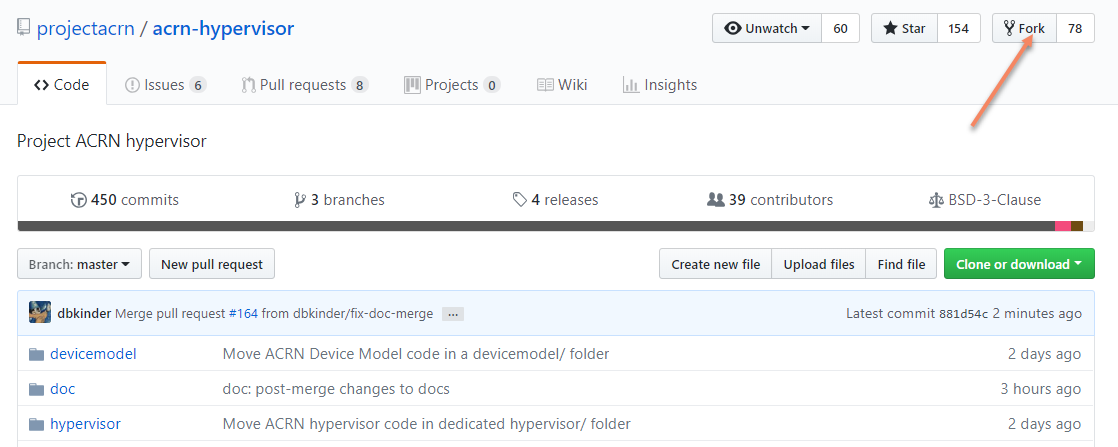
Use your browser to visit https://github.com/projectacrn and do a fork of the acrn-hypervisor repo to your personal GitHub account.)
At a command prompt, create a working folder on your development computer and clone your personal acrn-hypervisor repository:
cd ~
mkdir projectacrn && cd projectacrn
git clone https://github.com/<github-username>/acrn-hypervisor.git
For the cloned local repo, tell git about the upstream repo:
cd acrn-hypervisor
git remote add upstream https://github.com/projectacrn/acrn-hypervisor.git
After that, you’ll have
originpointing to your cloned personal repo andupstreampointing to the project repo.If you haven’t done so already, be sure to configure git with your name and email address for the
signed-off-byline in your commit messages:git config --global user.name "David Developer" git config --global user.email "david.developer@company.com"
Install the Documentation Tools
Our documentation processing has been tested to run with Python 3.8.10 and later, and these other tools:
breathe version: 4.34.0 (>=4.2.3)
sphinx version: 5.3.0 (>=3.2.1, <6.0)
docutils version: 0.16.1 (>=0.16, <=0.17.1)
sphinx-rtd-theme version: 1.0.0
sphinx-tabs version: 3.4.0 (>=1.3.0, <=3.4.0)
doxygen version: 1.8.17 (Ubuntu 20.04) and 1.9.1 (Ubuntu 22.04)
Depending on your Linux version, install the needed tools. You may get a
different (newer) version of doxygen (installed using apt) than shown here,
that may also work.
For Ubuntu use:
sudo apt install doxygen python3-pip \
  python3-wheel make graphviz xsltproc
Then use pip3 to install the remaining Python-based tools specified in the
doc/scripts/requirements.txt file:
cd ~/projectacrn/acrn-hypervisor/doc
pip3 install --user -r scripts/requirements.txt
Use this command to add $HOME/.local/bin to the front of your PATH so the system will
find expected versions of these Python utilities such as sphinx-build and
breathe (you should first check whether this directory is already on your path):
printf "\nexport PATH=\$HOME/.local/bin:\$PATH" >> ~/.bashrc
Important
You will need to open a new terminal for this change to take effect.
Adding this to your ~/.bashrc file ensures it is set by default.
And with that you’re ready to generate the documentation.
Note
We’ve provided a script you can run to show what versions of the documentation building tools are installed and compare with the tool versions shown above. This tool will also verify you’re using tool versions known to work together:
doc/scripts/show-versions.py
for example:
~/projectacrn/acrn-hypervisor/doc$ scripts/show-versions.py

doc build tool versions found on your system...

 breathe                   version: 4.34.0
 sphinx                    version: 5.3.0
 docutils                  version: 0.17.1
 sphinx-rtd-theme          version: 1.0.0
 sphinx-tabs               version: 3.4.0
 doxygen                   version: 1.9.1
Extra Tools for Generating PDF
While the primary output for ACRN documentation is for an HTML website, you can also generate a PDF version of the documentation. A few extra tools are needed only if you want to create PDF output. For Ubuntu users add these additional packages:
sudo apt install texlive-latex-recommended texlive-fonts-recommended \
  texlive-latex-extra latexmk texlive-xetex xindy
Documentation Presentation Theme
Sphinx supports easy customization of the generated HTML documentation
appearance through the use of themes. Replace the theme files and do
another make html and the output layout and style is changed. The
sphinx build system creates document cache information that attempts to
expedite documentation rebuilds, but occasionally can cause an unexpected error or
warning to be generated. Doing a make clean to create a clean
generation environment and a make html again generally fixes these issues.
The read-the-docs theme is installed as part of the
requirements.txt list above. Tweaks to the standard
read-the-docs appearance are added by using CSS
and JavaScript customization found in doc/static, and
theme template overrides found in doc/_templates.
Run the Documentation Processors
The acrn-hypervisor/doc directory has all the .rst source files, extra
tools, and Makefile for generating a local copy of the ACRN technical
documentation. (Some additional .rst files and other material is extracted
or generated from the /misc folder as part of the Makefile.)
cd ~/projectacrn/acrn-hypervisor/doc
make html
Depending on your development system, it will take less than two minutes to
collect and generate the HTML content. When done, you can view the HTML
output with your browser started at
~/projectacrn/acrn-hypervisor/doc/_build/html/index.html. You can
also cd to the _build/html folder and run a local web server
with the command:
cd _build/html
python3 -m http.server
and use your web browser to open the URL: http://localhost:8000.
Generate PDF Output
After the HTML content is generated, it leaves artifacts behind that you can
use to generate PDF output using the Sphinx latex builder. This
builder initially creates LaTeX output in the _build/latex folder and then
uses the latexmk tool to create the final acrn.pdf file in the same
folder. This process automatically makes a few passes over the content to create the index
and resolve intra-document hyperlinks, and produces plenty of progress messages along the
way. The Sphinx-generated output for tables and code blocks also yields many “underfill”
and “overfill” messages from the latex builder that can’t be easily
suppressed or fixed. Because of that, we recommend running this PDF generation
with the -silent options, like this (after you’ve run make html:
make latexpdf LATEXMKOPTS="-silent -f"
For convenience, we’ve also created a make target called pdf that will
generate the HTML content and then make the PDF file in one step:
make pdf
This make target runs quietly, and then verifies that no unexpected message from
the build process are produced (using the message filtering process explained below. Either way, when the build completes, the
generated PDF file is in _build/latex/acrn.pdf.
Publish Content
If you have merge rights to the projectacrn repo called
projectacrn.github.io, you can update the public project documentation
found at https://projectacrn.github.io and redirected from
https://docs.projectacrn.org.
You’ll need to do a one-time clone of the upstream repo (we publish directly to the upstream repo rather than to a personal forked copy):
cd ~/projectacrn
git clone https://github.com/projectacrn/projectacrn.github.io.git
Then, after you’ve verified the generated HTML from make html looks
good, you can push directly to the publishing site with:
make publish
This uses git commands to synchronize the new content with what’s already published and will delete files in the publishing repo’s latest folder that are no longer needed. New or changed files from the newly-generated HTML content are added to the GitHub pages publishing repo. The public site at https://projectacrn.github.io will be updated by the GitHub pages system, typically within a few minutes.
Document Versioning
The https://projectacrn.github.io site has a document version selector
at the top of the left nav panel. The contents of this version
selector are defined in the conf.py sphinx configuration file,
specifically:
html_context = {
   'current_version': current_version,
   'docs_title': docs_title,
   'is_release': is_release,
   'versions': ( ("latest", "/latest/"),
                 ("2.7", "/2.7/"),
                 ("2.6", "/2.6/"),
                 ("2.5", "/2.5/"),
                 ("2.0", "/2.0/"),
                 ("1.6.1", "/1.6.1/"),
                 ("1.0", "/1.0/"),   # keep 1.0
               )
    }
As new versions of ACRN documentation are added, update this
versions selection list to include the version number and publishing
folder. Note that there’s no direct selection to go to a newer version
from an older one, without going to latest first.
By default, documentation build and publishing both assume we’re generating
documentation for the main branch and publishing to the /latest/
area on https://projectacrn.github.io. When we’re generating the
documentation for a tagged version (e.g., 2.7), check out that version
of the repo, and add some extra flags to the make commands:
cd ~/projectacrn/acrn-hypervisor/doc
git checkout v2.7
make clean
make DOC_TAG=release RELEASE=2.7 html
make DOC_TAG=release RELEASE=2.7 publish
Filter Expected Warnings
Alas, there are some known issues with the doxygen/Sphinx/Breathe processing that generates warnings for some constructs, in particular around unnamed structures in nested unions or structs. While these issues are being considered for fixing in Sphinx/Breathe, we’ve added a post-processing filter on the output of the documentation build process to check for “expected” messages from the generation process output.
The output from the Sphinx build is processed by the Python script
scripts/filter-known-issues.py together with a set of filter
configuration files in the .known-issues/doc folder. (This
filtering is done as part of the Makefile.)
If you’re contributing components included in the ACRN API
documentation and run across these warnings, you can include filtering
them out as “expected” warnings by adding or editing a conf file in the
.known-issues/doc folder, following the example of other conf files
found there.