Virtio-Net
Virtio-net is the para-virtualization solution used in ACRN for networking. The ACRN Device Model emulates virtual NICs for User VM and the frontend virtio network driver, simulating the virtual NIC and following the virtio specification. (Refer to What Is ACRN and Virtio Devices High-Level Design background introductions to ACRN and Virtio.)
Here are some notes about Virtio-net support in ACRN:
Legacy devices are supported, modern devices are not supported
Two virtqueues are used in virtio-net: RX queue and TX queue
Indirect descriptor is supported
TAP backend is supported
Control queue is not supported
NIC multiple queues are not supported
Network Virtualization Architecture
ACRN’s network virtualization architecture is shown below in Figure 200, and illustrates the many necessary network virtualization components that must cooperate for the User VM to send and receive data from the outside world.
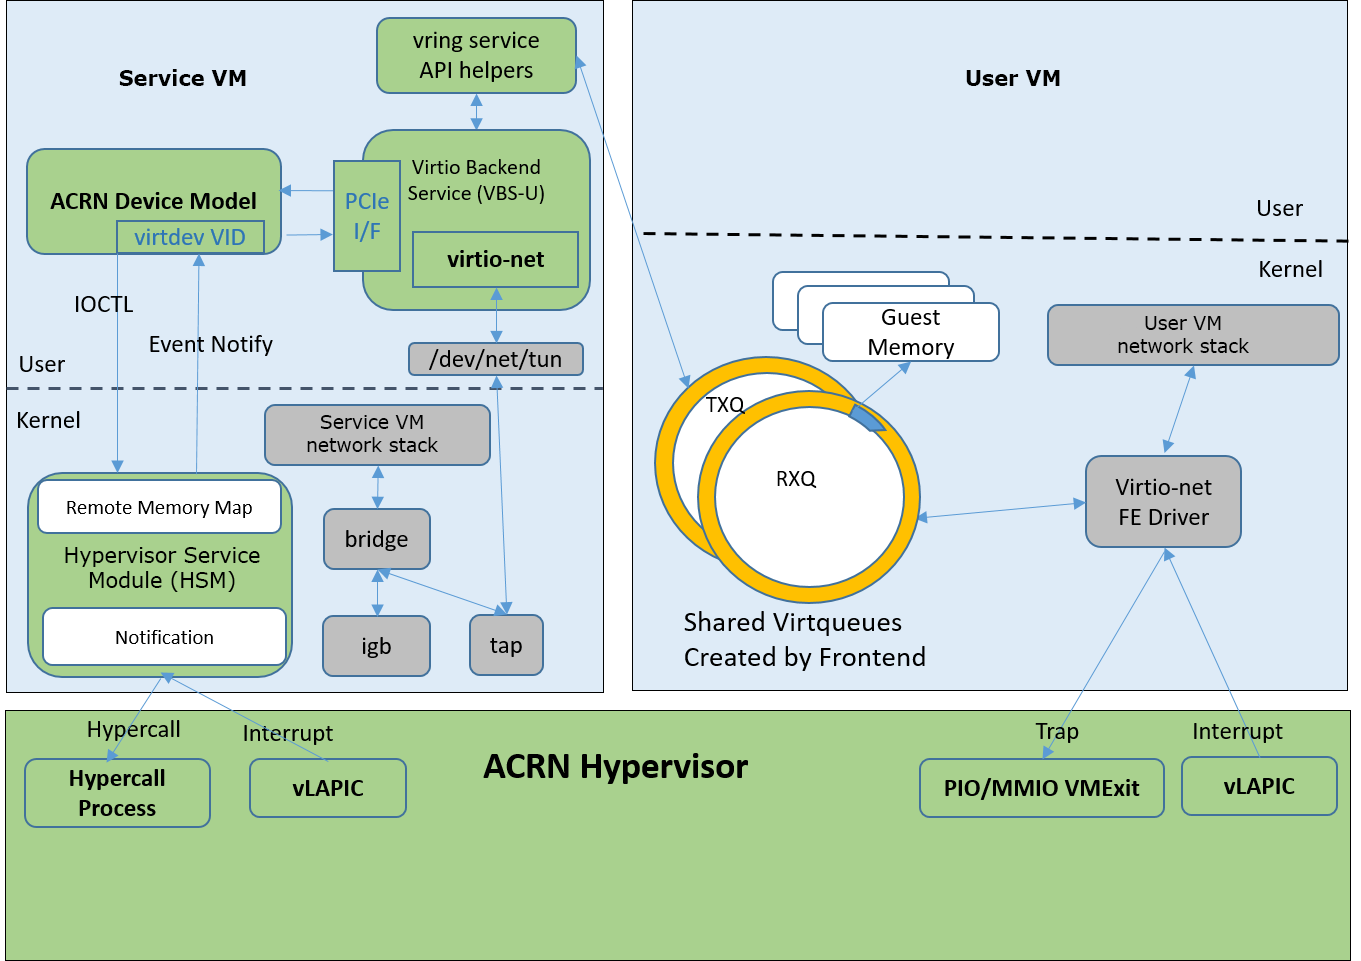
Figure 200 Network Virtualization Architecture
(The green components are parts of the ACRN solution, while the gray components are parts of the Linux kernel.)
Let’s explore these components further.
- Service VM/User VM Network Stack:
This is the standard Linux TCP/IP stack and the most feature-rich TCP/IP implementation.
- virtio-net Frontend Driver:
This is the standard driver in the Linux Kernel for virtual Ethernet devices. This driver matches devices with PCI vendor ID 0x1AF4 and PCI Device ID 0x1000 (for legacy devices in our case) or 0x1041 (for modern devices). The virtual NIC supports two virtqueues, one for transmitting packets and the other for receiving packets. The frontend driver places empty buffers into one virtqueue for receiving packets, and enqueues outgoing packets into another virtqueue for transmission. The size of each virtqueue is 1024, configurable in the virtio-net backend driver.
- ACRN Hypervisor:
The ACRN hypervisor is a type 1 hypervisor, running directly on the bare-metal hardware, and suitable for a variety of IoT and embedded device solutions. It fetches and analyzes the guest instructions, puts the decoded information into the shared page as an IOREQ, and notifies or interrupts the HSM module in the Service VM for processing.
- HSM Module:
The Hypervisor Service Module (HSM) is a kernel module in the Service VM acting as a middle layer to support the Device Model and hypervisor. The HSM forwards a IOREQ to the virtio-net backend driver for processing.
- ACRN Device Model and virtio-net Backend Driver:
The ACRN Device Model (DM) gets an IOREQ from a shared page and calls the virtio-net backend driver to process the request. The backend driver receives the data in a shared virtqueue and sends it to the TAP device.
- Bridge and TAP Device:
Bridge and TAP are standard virtual network infrastructures. They play an important role in communication among the Service VM, the User VM, and the outside world.
- IGB Driver:
IGB is the physical Network Interface Card (NIC) Linux kernel driver responsible for sending data to and receiving data from the physical NIC.
The virtual network card (NIC) is implemented as a virtio legacy device
in the ACRN Device Model (DM). It is registered as a PCI virtio device
to the guest OS (User VM) and uses the standard virtio-net in the Linux kernel as
its driver (the guest kernel should be built with
CONFIG_VIRTIO_NET=y).
The virtio-net backend in DM forwards the data received from the frontend to the TAP device, then from the TAP device to the bridge, and finally from the bridge to the physical NIC driver, and vice versa for returning data from the NIC to the frontend.
ACRN Virtio-Network Calling Stack
Various components of ACRN network virtualization are shown in the architecture diagram shows in Figure 200. In this section, we will use User VM data transmission (TX) and reception (RX) examples to explain step-by-step how these components work together to implement ACRN network virtualization.
Initialization in Device Model
virtio_net_init
Present frontend for a virtual PCI based NIC
Setup control plan callbacks
Setup data plan callbacks, including TX, RX
Setup TAP backend
Initialization in Virtio-Net Frontend Driver
virtio_pci_probe
Construct virtio device using virtual PCI device and register it to virtio bus
virtio_dev_probe –> virtnet_probe –> init_vqs
Register network driver
Setup shared virtqueues
ACRN User VM TX FLOW
The following shows the ACRN User VM network TX flow, using TCP as an example, showing the flow through each layer:
User VM TCP Layer
tcp_sendmsg -->
    tcp_sendmsg_locked -->
        tcp_push_one -->
            tcp_write_xmit -->
                tcp_transmit_skb -->
User VM IP Layer
ip_queue_xmit -->
    ip_local_out -->
        __ip_local_out -->
            dst_output -->
                ip_output -->
                    ip_finish_output -->
                        ip_finish_output2 -->
                            neigh_output -->
                                neigh_resolve_output -->
User VM MAC Layer
dev_queue_xmit -->
    __dev_queue_xmit -->
        dev_hard_start_xmit -->
            xmit_one -->
                netdev_start_xmit -->
                    __netdev_start_xmit -->
User VM MAC Layer virtio-net Frontend Driver
start_xmit -->                   // virtual NIC driver xmit in virtio_net
    xmit_skb -->
        virtqueue_add_outbuf --> // add out buffer to shared virtqueue
            virtqueue_add -->

    virtqueue_kick -->           // notify the backend
        virtqueue_notify -->
            vp_notify -->
                iowrite16 -->    // trap here, HV will first get notified
ACRN Hypervisor
vmexit_handler -->                      // vmexit because VMX_EXIT_REASON_IO_INSTRUCTION
    pio_instr_vmexit_handler -->
        emulate_io -->                  // ioreq cant be processed in HV, forward it to HSM
            acrn_insert_request_wait -->
                fire_hsm_interrupt -->  // interrupt Service VM, HSM will get notified
HSM Module
hsm_intr_handler -->                          // HSM interrupt handler
    tasklet_schedule -->
        io_req_tasklet -->
            acrn_ioreq_distribute_request --> // ioreq can't be processed in HSM, forward it to device DM
                acrn_ioreq_notify_client -->
                    wake_up_interruptible --> // wake up DM to handle ioreq
ACRN Device Model / virtio-net Backend Driver
handle_vmexit -->
    vmexit_inout -->
        emulate_inout -->
            pci_emul_io_handler -->
                virtio_pci_write -->
                    virtio_pci_legacy_write -->
                        virtio_net_ping_txq -->       // start TX thread to process, notify thread return
                            virtio_net_tx_thread -->  // this is TX thread
                                virtio_net_proctx --> // call corresponding backend (tap) to process
                                    virtio_net_tap_tx -->
                                        writev -->    // write data to tap device
Service VM TAP Device Forwarding
do_writev -->
    vfs_writev -->
        do_iter_write -->
            do_iter_readv_writev -->
                call_write_iter -->
                    tun_chr_write_iter -->
                        tun_get_user -->
                            netif_receive_skb -->
                                netif_receive_skb_internal -->
                                    __netif_receive_skb -->
                                        __netif_receive_skb_core -->
Service VM Bridge Forwarding
br_handle_frame -->
    br_handle_frame_finish -->
        br_forward -->
            __br_forward -->
                br_forward_finish -->
                    br_dev_queue_push_xmit -->
Service VM MAC Layer
dev_queue_xmit -->
    __dev_queue_xmit -->
        dev_hard_start_xmit -->
            xmit_one -->
                netdev_start_xmit -->
                    __netdev_start_xmit -->
Service VM MAC Layer IGB Driver
igb_xmit_frame --> // IGB physical NIC driver xmit function
ACRN User VM RX FLOW
The following shows the ACRN User VM network RX flow, using TCP as an example. Let’s start by receiving a device interrupt. (Note that the hypervisor will first get notified when receiving an interrupt even in passthrough cases.)
Hypervisor Interrupt Dispatch
vmexit_handler -->                          // vmexit because VMX_EXIT_REASON_EXTERNAL_INTERRUPT
    external_interrupt_vmexit_handler -->
        dispatch_interrupt -->
            common_handler_edge -->
               ptdev_interrupt_handler -->
                  ptdev_enqueue_softirq --> // Interrupt will be delivered in bottom-half softirq
Hypervisor Interrupt Injection
do_softirq -->
    ptdev_softirq -->
        vlapic_intr_msi -->     // insert the interrupt into Service VM

start_vcpu -->                  // VM Entry here, will process the pending interrupts
Service VM MAC Layer IGB Driver
do_IRQ -->
    ...
    igb_msix_ring -->
        igbpoll -->
            napi_gro_receive -->
                napi_skb_finish -->
                    netif_receive_skb_internal -->
                        __netif_receive_skb -->
                            __netif_receive_skb_core --
Service VM Bridge Forwarding
br_handle_frame -->
    br_handle_frame_finish -->
        br_forward -->
            __br_forward -->
                br_forward_finish -->
                    br_dev_queue_push_xmit -->
Service VM MAC Layer
dev_queue_xmit -->
    __dev_queue_xmit -->
        dev_hard_start_xmit -->
            xmit_one -->
                netdev_start_xmit -->
                    __netdev_start_xmit -->
Service VM MAC Layer TAP Driver
tun_net_xmit --> // Notify and wake up reader process
ACRN Device Model / virtio-net Backend Driver
virtio_net_rx_callback -->       // the tap fd get notified and this function invoked
    virtio_net_tap_rx -->        // read data from tap, prepare virtqueue, insert interrupt into the User VM
        vq_endchains -->
            vq_interrupt -->
                pci_generate_msi -->
HSM Module
hsm_dev_ioctl -->                // process the IOCTL and call hypercall to inject interrupt
    hcall_inject_msi -->
ACRN Hypervisor
vmexit_handler -->               // vmexit because VMX_EXIT_REASON_VMCALL
    vmcall_vmexit_handler -->
        hcall_inject_msi -->     // insert interrupt into User VM
            vlapic_intr_msi -->
User VM MAC Layer virtio_net Frontend Driver
vring_interrupt -->              // virtio-net frontend driver interrupt handler
    skb_recv_done -->            // registered by virtnet_probe-->init_vqs-->virtnet_find_vqs
        virtqueue_napi_schedule -->
            __napi_schedule -->
                virtnet_poll -->
                    virtnet_receive -->
                        receive_buf -->
User VM MAC Layer
napi_gro_receive -->
    napi_skb_finish -->
        netif_receive_skb_internal -->
            __netif_receive_skb -->
                __netif_receive_skb_core -->
User VM IP Layer
ip_rcv -->
    ip_rcv_finish -->
        dst_input -->
            ip_local_deliver -->
                ip_local_deliver_finish -->
User VM TCP Layer
tcp_v4_rcv -->
    tcp_v4_do_rcv -->
        tcp_rcv_established -->
            tcp_data_queue -->
                tcp_queue_rcv -->
                    __skb_queue_tail -->

                sk->sk_data_ready --> // application will get notified
How to Use TAP Interface
The network infrastructure shown in Figure 201 needs to be prepared in the Service VM before we start. We need to create a bridge and at least one TAP device (two TAP devices are needed to create a dual virtual NIC) and attach a physical NIC and TAP device to the bridge.

Figure 201 Network Infrastructure in Service VM
You can use Linux commands (e.g. ip, brctl) to create this network. In
our case, we use systemd to automatically create the network by default.
You can check the files with prefix 50- in the Service VM
/usr/lib/systemd/network/:
When the Service VM is started, run ifconfig to show the devices created by
this systemd configuration:
acrn-br0 Link encap:Ethernet HWaddr B2:50:41:FE:F7:A3
   inet addr:10.239.154.43 Bcast:10.239.154.255 Mask:255.255.255.0
   inet6 addr: fe80::b050:41ff:fefe:f7a3/64 Scope:Link
   UP BROADCAST RUNNING MULTICAST MTU:1500 Metric:1
   RX packets:226932 errors:0 dropped:21383 overruns:0 frame:0
   TX packets:14816 errors:0 dropped:0 overruns:0 carrier:0
   collisions:0 txqueuelen:1000
   RX bytes:100457754 (95.8 Mb) TX bytes:83481244 (79.6 Mb)

tap0 Link encap:Ethernet HWaddr F6:A7:7E:52:50:C6
   UP BROADCAST MULTICAST MTU:1500 Metric:1
   RX packets:0 errors:0 dropped:0 overruns:0 frame:0
   TX packets:0 errors:0 dropped:0 overruns:0 carrier:0
   collisions:0 txqueuelen:1000
   RX bytes:0 (0.0 b) TX bytes:0 (0.0 b)

enp3s0 Link encap:Ethernet HWaddr 98:4F:EE:14:5B:74
   inet6 addr: fe80::9a4f:eeff:fe14:5b74/64 Scope:Link
   UP BROADCAST RUNNING MULTICAST MTU:1500 Metric:1
   RX packets:279174 errors:0 dropped:0 overruns:0 frame:0
   TX packets:69923 errors:0 dropped:0 overruns:0 carrier:0
   collisions:0 txqueuelen:1000
   RX bytes:107312294 (102.3 Mb) TX bytes:87117507 (83.0 Mb)
   Memory:82200000-8227ffff

lo Link encap:Local Loopback
   inet addr:127.0.0.1 Mask:255.0.0.0
   inet6 addr: ::1/128 Scope:Host
   UP LOOPBACK RUNNING MTU:65536 Metric:1
   RX packets:16 errors:0 dropped:0 overruns:0 frame:0
   TX packets:16 errors:0 dropped:0 overruns:0 carrier:0
   collisions:0 txqueuelen:1000
   RX bytes:1216 (1.1 Kb) TX bytes:1216 (1.1 Kb)
Run brctl show to see the bridge acrn-br0 and attached devices:
bridge name   bridge id STP       enabled   interfaces

acrn-br0      8000.b25041fef7a3   no        tap0
                                            enp3s0
Add a PCI slot to the Device Model acrn-dm command line (mac address is optional):
-s 4,virtio-net,tap=<name>,[mac=<XX:XX:XX:XX:XX:XX>]
When the User VM is launched, run ifconfig to check the network. enp0s4r
is the virtual NIC created by acrn-dm:
enp0s4 Link encap:Ethernet HWaddr 00:16:3E:39:0F:CD
   inet addr:10.239.154.186 Bcast:10.239.154.255 Mask:255.255.255.0
   inet6 addr: fe80::216:3eff:fe39:fcd/64 Scope:Link
   UP BROADCAST RUNNING MULTICAST MTU:1500 Metric:1
   RX packets:140 errors:0 dropped:8 overruns:0 frame:0
   TX packets:46 errors:0 dropped:0 overruns:0 carrier:0
   collisions:0 txqueuelen:1000
   RX bytes:110727 (108.1 Kb) TX bytes:4474 (4.3 Kb)

lo Link encap:Local Loopback
   inet addr:127.0.0.1 Mask:255.0.0.0
   inet6 addr: ::1/128 Scope:Host
   UP LOOPBACK RUNNING MTU:65536 Metric:1
   RX packets:0 errors:0 dropped:0 overruns:0 frame:0
   TX packets:0 errors:0 dropped:0 overruns:0 carrier:0
   collisions:0 txqueuelen:1000
   RX bytes:0 (0.0 b) TX bytes:0 (0.0 b)
How to Use MacVTap Interface
In addition to TAP interface, ACRN also supports MacVTap interface. MacVTap replaces the combination of the TAP and bridge drivers with a single module based on MacVLan driver. With MacVTap, each virtual network interface is assigned its own MAC and IP address and is directly attached to the physical interface of the host machine to improve throughput and latencies.
Create a MacVTap interface in the Service VM as shown here:
sudo ip link add link eth0 name macvtap0 type macvtap
where eth0 is the name of the physical network interface, and
macvtap0 is the name of the MacVTap interface being created.
Once the MacVTap interface is created, the User VM can be launched by adding a PCI slot to the Device Model acrn-dm as shown below.
-s 4,virtio-net,tap=macvtap0,[mac=<XX:XX:XX:XX:XX:XX>]
Performance Estimation
We’ve introduced the network virtualization solution in ACRN, from the top level architecture to the detailed TX and RX flow. The control plane and data plane are all processed in ACRN Device Model, which may bring some overhead. But this is not a bottleneck for 1000Mbit NICs or below. Network bandwidth for virtualization can be very close to the native bandwidth. For a high-speed NIC (for example, 10Gb or above), it is necessary to separate the data plane from the control plane. We can use vhost for acceleration. For most IoT scenarios, processing in user space is simple and reasonable.