Configure ACRN Using OpenStack and Libvirt
Introduction
This document provides instructions for setting up libvirt to configure ACRN. We use OpenStack to use libvirt and we’ll install OpenStack in a container to avoid crashing your system and to take advantage of easy snapshots/restores so that you can quickly roll back your system in the event of setup failure. (You should only install OpenStack directly on Ubuntu if you have a dedicated testing machine). This setup utilizes LXC/LXD on Ubuntu 20.04.
Install ACRN
Install ACRN using Ubuntu 20.04 as its Service VM. Refer to Build and Install ACRN on Ubuntu.
Make the acrn-kernel using the kernel_config_uefi_sos configuration file (from the
acrn-kernelrepo).Append the following kernel boot arguments to the
multiboot2line in/etc/grub.d/40_customand runsudo update-grubbefore rebooting the system. It will give the Service VM more memory and more loop devices:hugepagesz=1G hugepages=10 max_loop=16
Boot the Service VM with this new
acrn-kernelusing the ACRN hypervisor.Use the command:
losetup -ato verify that Ubuntu’s snap service is not using all available loop devices. Typically, OpenStack needs at least 4 available loop devices. Follow the snaps guide to clean up old snap revisions if you’re running out of loop devices.Make sure the networking bridge
acrn-br0is created. If not, create it using the instructions in Build and Install ACRN on Ubuntu.
Set Up and Launch LXC/LXD
Set up the LXC/LXD Linux container engine:
$ sudo snap install lxd
$ lxd init --auto
Use all default values if running
lxd initin interactive mode.Create an Ubuntu 18.04 container named
openstack:$ lxc init ubuntu:18.04 openstack
Export the kernel interfaces necessary to launch a Service VM in the
openstackcontainer:Edit the
openstackconfig file using the command:$ lxc config edit openstack
In the editor, add the following lines in the config section:
linux.kernel_modules: iptable_nat, ip6table_nat, ebtables, openvswitch
raw.lxc: |-
  lxc.cgroup.devices.allow = c 10:237 rwm
  lxc.cgroup.devices.allow = b 7:* rwm
  lxc.cgroup.devices.allow = c 243:0 rwm
  lxc.mount.entry = /dev/net/tun dev/net/tun none bind,create=file 0 0
  lxc.mount.auto=proc:rw sys:rw cgroup:rw
  lxc.apparmor.profile=unconfined
security.nesting: "true"
security.privileged: "true"
Save and exit the editor.
Note
Make sure to respect the indentation as to keep these options within the config section. It is a good idea after saving your changes to check that they have been correctly recorded (
lxc config show openstack).Run the following commands to configure
openstack:$ lxc config device add openstack eth1 nic name=eth1 nictype=bridged parent=acrn-br0 $ lxc config device add openstack acrn_vhm unix-char path=/dev/acrn_vhm $ lxc config device add openstack loop-control unix-char path=/dev/loop-control $ for n in {0..15}; do lxc config device add openstack loop$n unix-block path=/dev/loop$n; done;
Launch the
openstackcontainer:$ lxc start openstack
Log in to the
openstackcontainer:$ lxc exec openstack -- su -l
Let
systemdmanage eth1 in the container, with eth0 as the default route:Edit
/etc/netplan/50-cloud-init.yamlnetwork: version: 2 ethernets: eth0: dhcp4: true eth1: dhcp4: true dhcp4-overrides: route-metric: 200Log off and restart the
openstackcontainer:$ lxc restart openstack
Log in to the
openstackcontainer again:$ lxc exec openstack -- su -l
If needed, set up the proxy inside the
openstackcontainer via/etc/environmentand make sureno_proxyis properly set up. Both IP addresses assigned to eth0 and eth1 and their subnets must be included. For example:no_proxy=xcompany.com,.xcompany.com,10.0.0.0/8,192.168.0.0/16,localhost,.local,127.0.0.0/8,134.134.0.0/16
Add a new user named stack and set permissions
# useradd -s /bin/bash -d /opt/stack -m stack
# echo "stack ALL=(ALL) NOPASSWD: ALL" >> /etc/sudoers
Log off and restart the
openstackcontainer:$ lxc restart openstack
The openstack container is now properly configured for OpenStack.
Use the lxc list command to verify that both eth0 and eth1
appear in the container.
Set Up ACRN Prerequisites Inside the Container
Log in to the
openstackcontainer as the stack user:$ lxc exec openstack -- su -l stack
Download and compile ACRN’s source code. Refer to Build ACRN From Source.
Note
All tools and build dependencies must be installed before you run the first
makecommand.$ cd ~ $ git clone https://github.com/projectacrn/acrn-hypervisor $ cd acrn-hypervisor $ git checkout v2.4 $ make $ sudo make devicemodel-install $ sudo cp build/misc/debug_tools/acrnd /usr/bin/ $ sudo cp build/misc/debug_tools/acrnctl /usr/bin/
Install only the user-space components:
acrn-dm,acrnctl, andacrndas shown above.Note
Use the tag that matches the version of the ACRN hypervisor (
acrn.bin) that runs on your system.
Set Up Libvirt
Install the required packages:
$ sudo apt install libdevmapper-dev libnl-route-3-dev libnl-3-dev python \
  automake autoconf autopoint libtool xsltproc libxml2-utils gettext \
  libxml2-dev libpciaccess-dev gnutls-dev python3-docutils
Download libvirt/ACRN:
$ cd ~
$ git clone https://github.com/projectacrn/acrn-libvirt.git
Build and install libvirt:
$ cd acrn-libvirt
$ mkdir build
$ cd build
$ ../autogen.sh --prefix=/usr --disable-werror --with-test-suite=no \
  --with-qemu=no --with-openvz=no --with-vmware=no --with-phyp=no \
  --with-vbox=no --with-lxc=no --with-uml=no --with-esx=no

$ make
$ sudo make install
Note
The
dev-acrn-v6.1.0branch is used in this tutorial. It is the default branch.Edit and enable these options in
/etc/libvirt/libvirtd.conf:unix_sock_ro_perms = "0777" unix_sock_rw_perms = "0777" unix_sock_admin_perms = "0777"
Restart the libvirt daemon:
$ sudo systemctl daemon-reload
Set Up OpenStack
Use DevStack to install OpenStack. Refer to the DevStack instructions.
Use the latest maintenance branch stable/train to ensure OpenStack stability:
$ cd ~
$ git clone https://opendev.org/openstack/devstack.git -b stable/train
Go into the
devstackdirectory, and apply thedoc/tutorials/0001-devstack-installation-for-acrn.patch:$ cd devstack $ git apply ~/acrn-hypervisor/doc/tutorials/0001-devstack-installation-for-acrn.patch
Edit
lib/nova_plugins/hypervisor-libvirt:Change
xen_hvmloader_pathto the location of your OVMF image file:/usr/share/acrn/bios/OVMF.fd. Or use the stock image that is included in the ACRN source tree (devicemodel/bios/OVMF.fd).Create a
devstack/local.conffile as shown below (setting the passwords as appropriate):[[local|localrc]] PUBLIC_INTERFACE=eth1 ADMIN_PASSWORD=<password> DATABASE_PASSWORD=<password> RABBIT_PASSWORD=<password> SERVICE_PASSWORD=<password> ENABLE_KSM=False VIRT_DRIVER=libvirt LIBVIRT_TYPE=acrn DEBUG_LIBVIRT=True DEBUG_LIBVIRT_COREDUMPS=True USE_PYTHON3=True
Note
Now is a great time to take a snapshot of the container using
lxc
snapshot
. If the OpenStack installation fails, manually rolling back to the previous state can be difficult. Currently, no step exists to reliably restart OpenStack after restarting the container.Install OpenStack:
$ ./stack.sh
The installation should take about 20-30 minutes. Upon successful installation, the installer reports the URL of OpenStack’s management interface. This URL is accessible from the native Ubuntu.
...

Horizon is now available at http://<IP_address>/dashboard

...

2020-04-09 01:21:37.504 | stack.sh completed in 1755 seconds.
Verify using the command
systemctl status libvirtd.servicethat libvirtd is active and running.Set up SNAT for OpenStack instances to connect to the external network.
Inside the container, use the command
ip ato identify thebr-exbridge interface.br-exshould have two IPs. One should be visible to the native Ubuntu’sacrn-br0interface (e.g. iNet 192.168.1.104/24). The other one is internal to OpenStack (e.g. iNet 172.24.4.1/24). The latter corresponds to the public network in OpenStack.Set up SNAT to establish a link between
acrn-br0and OpenStack. For example:$ sudo iptables -t nat -A POSTROUTING -s 172.24.4.1/24 -o br-ex -j SNAT --to-source 192.168.1.104
Configure and Create OpenStack Instance
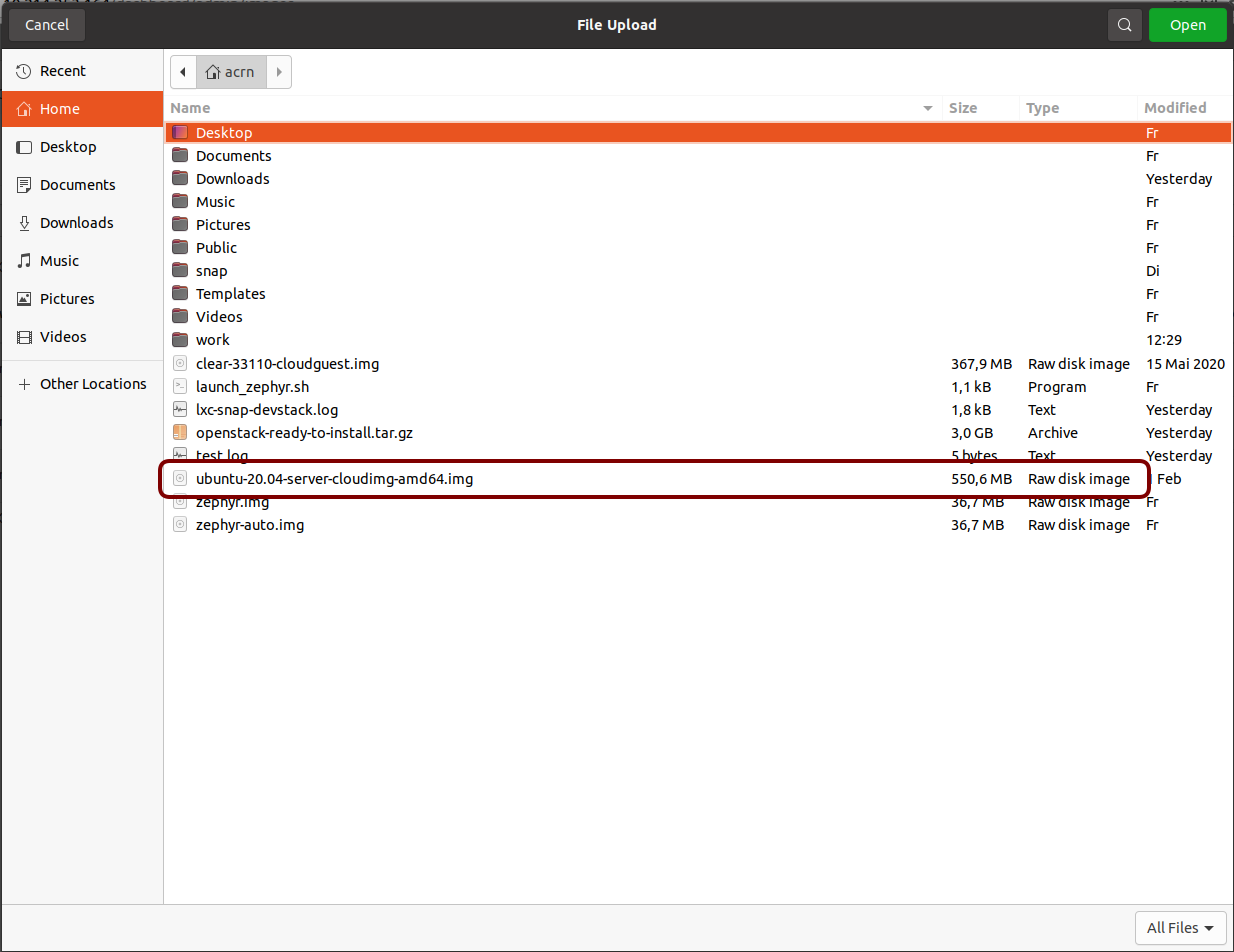
We’ll be using the Ubuntu 20.04 (Focal) Cloud image as the OS image (qcow2 format). Download the Cloud image from https://cloud-images.ubuntu.com/releases/focal, for example:
$ wget https://cloud-images.ubuntu.com/releases/focal/release-20210201/ubuntu-20.04-server-cloudimg-amd64.img
Use the OpenStack management interface URL reported in a previous step to finish setting up the network and configure and create an OpenStack instance.
Begin by using your browser to login as admin to the OpenStack management dashboard (using the URL reported previously). Use the admin password you set in the
devstack/local.conffile: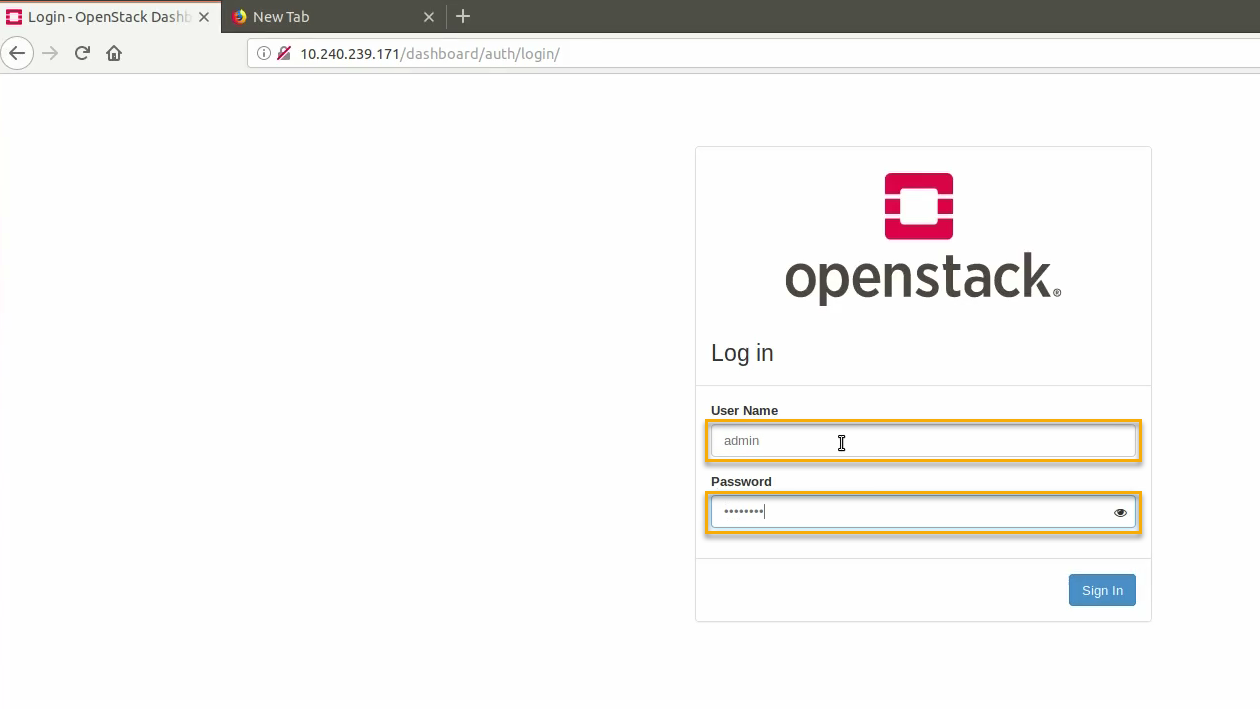
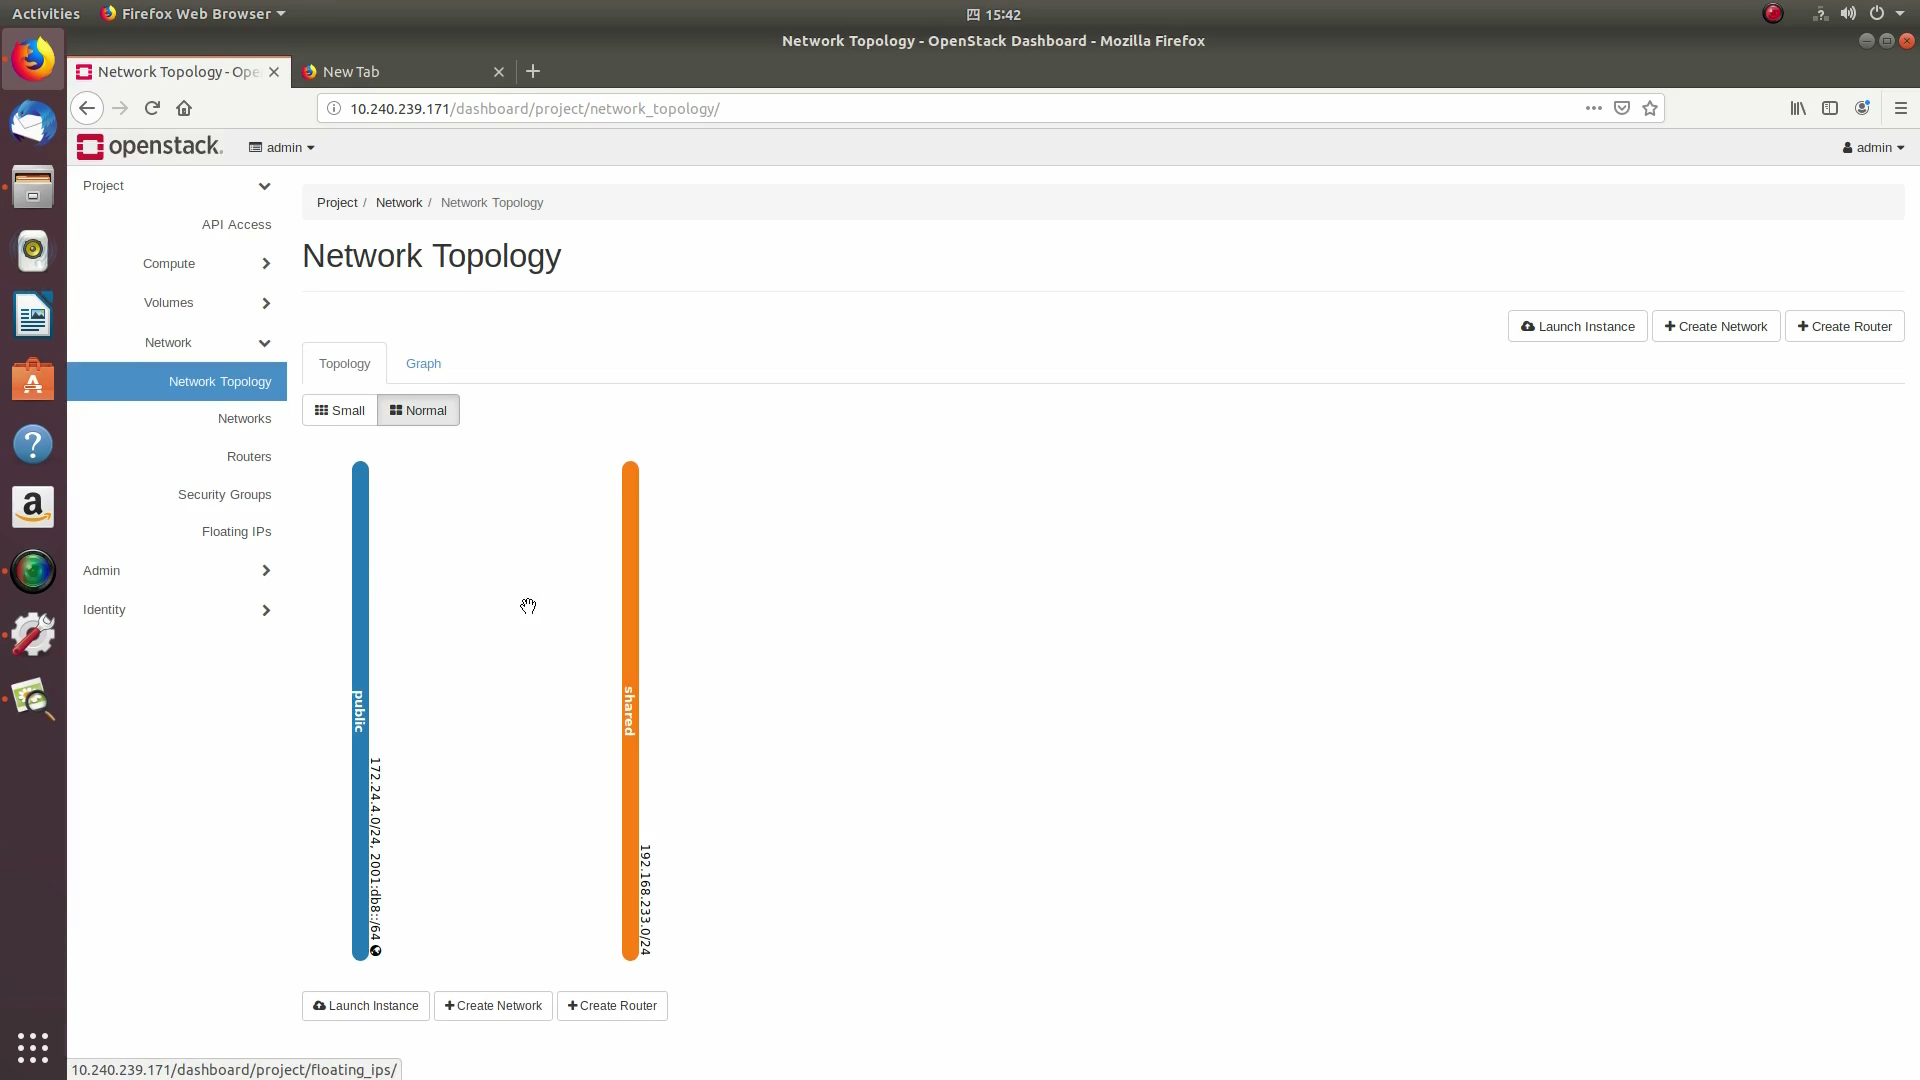
Click on the Project / Network Topology and then the Topology tab to view the existing public (external) and shared (internal) networks:
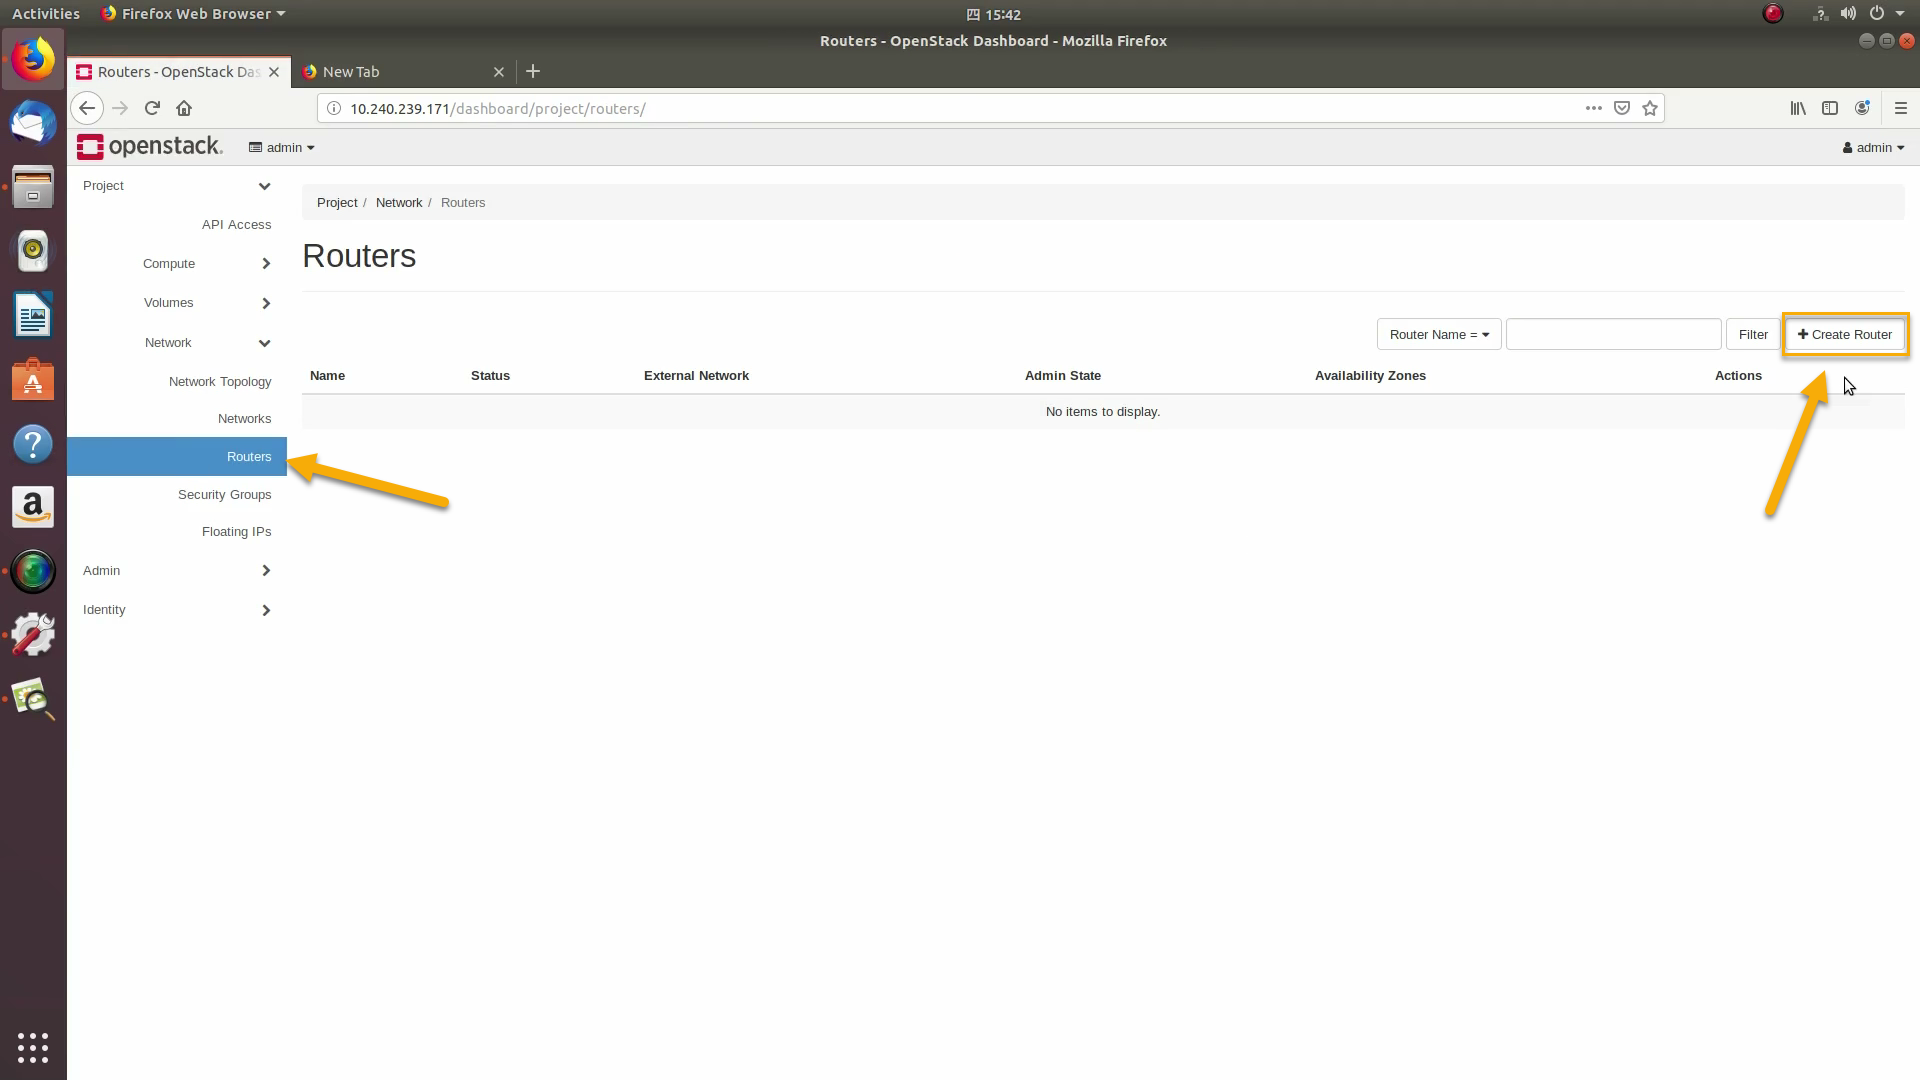
A router acts as a bridge between the internal and external networks. Create a router using Project / Network / Routers / +Create Router:
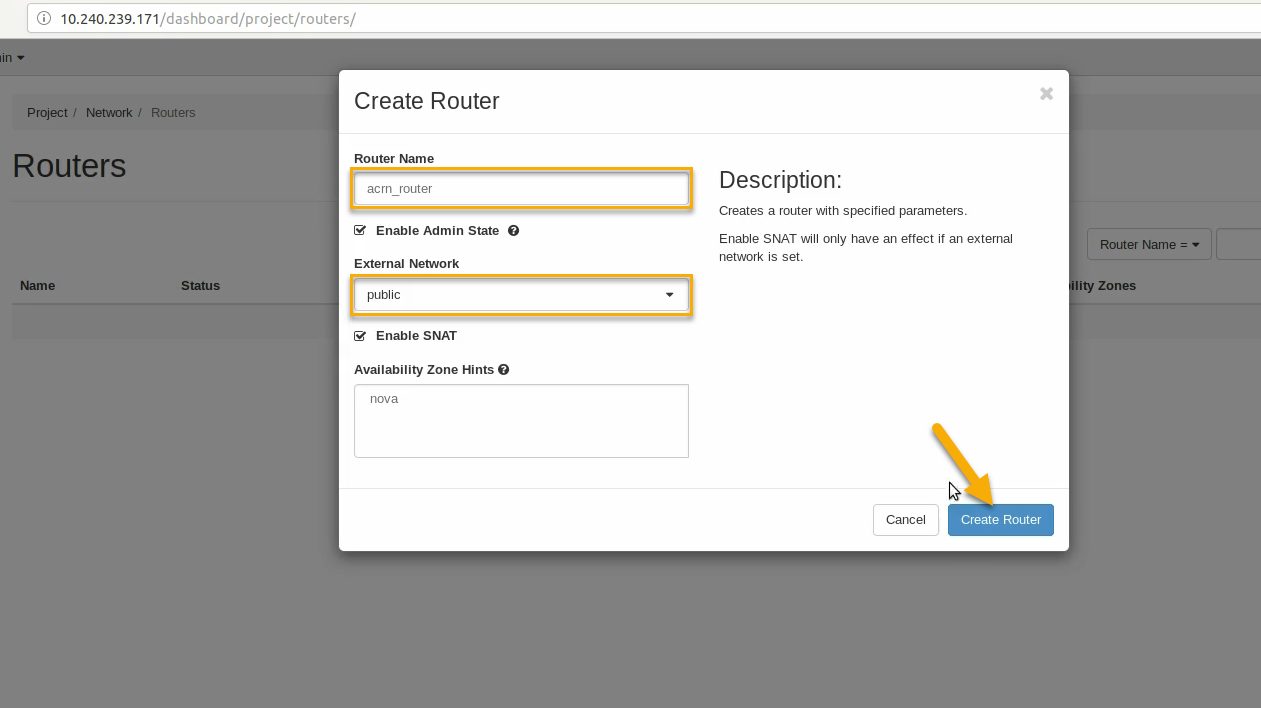
Give it a name (acrn_router), select public for the external network, and select create router:
That added the external network to the router. Now add the internal network too. Click on the acrn_router name:

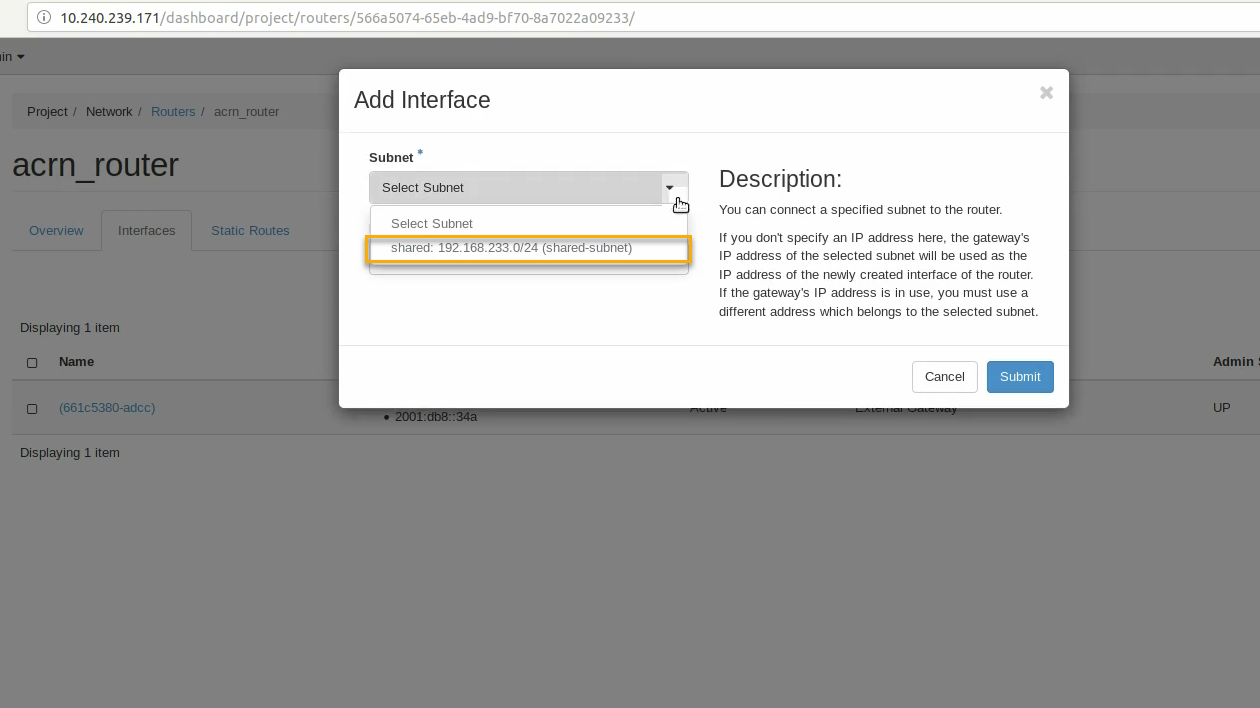
Go to the interfaces tab, and click on +Add interface:

Select the subnet of the shared (private) network and click submit:
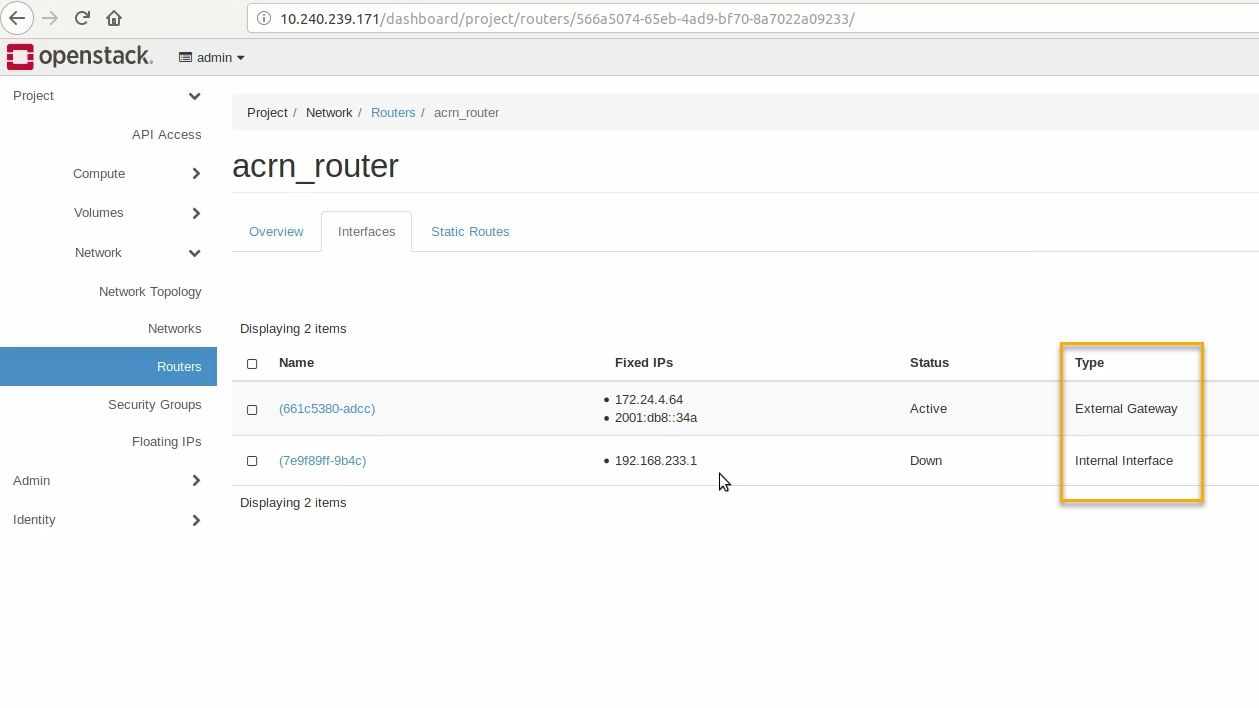
The router now has interfaces between the external and internal networks:
View the router graphically by clicking on the “Network Topology” tab:

With the router set up, we’ve completed configuring the OpenStack networking.
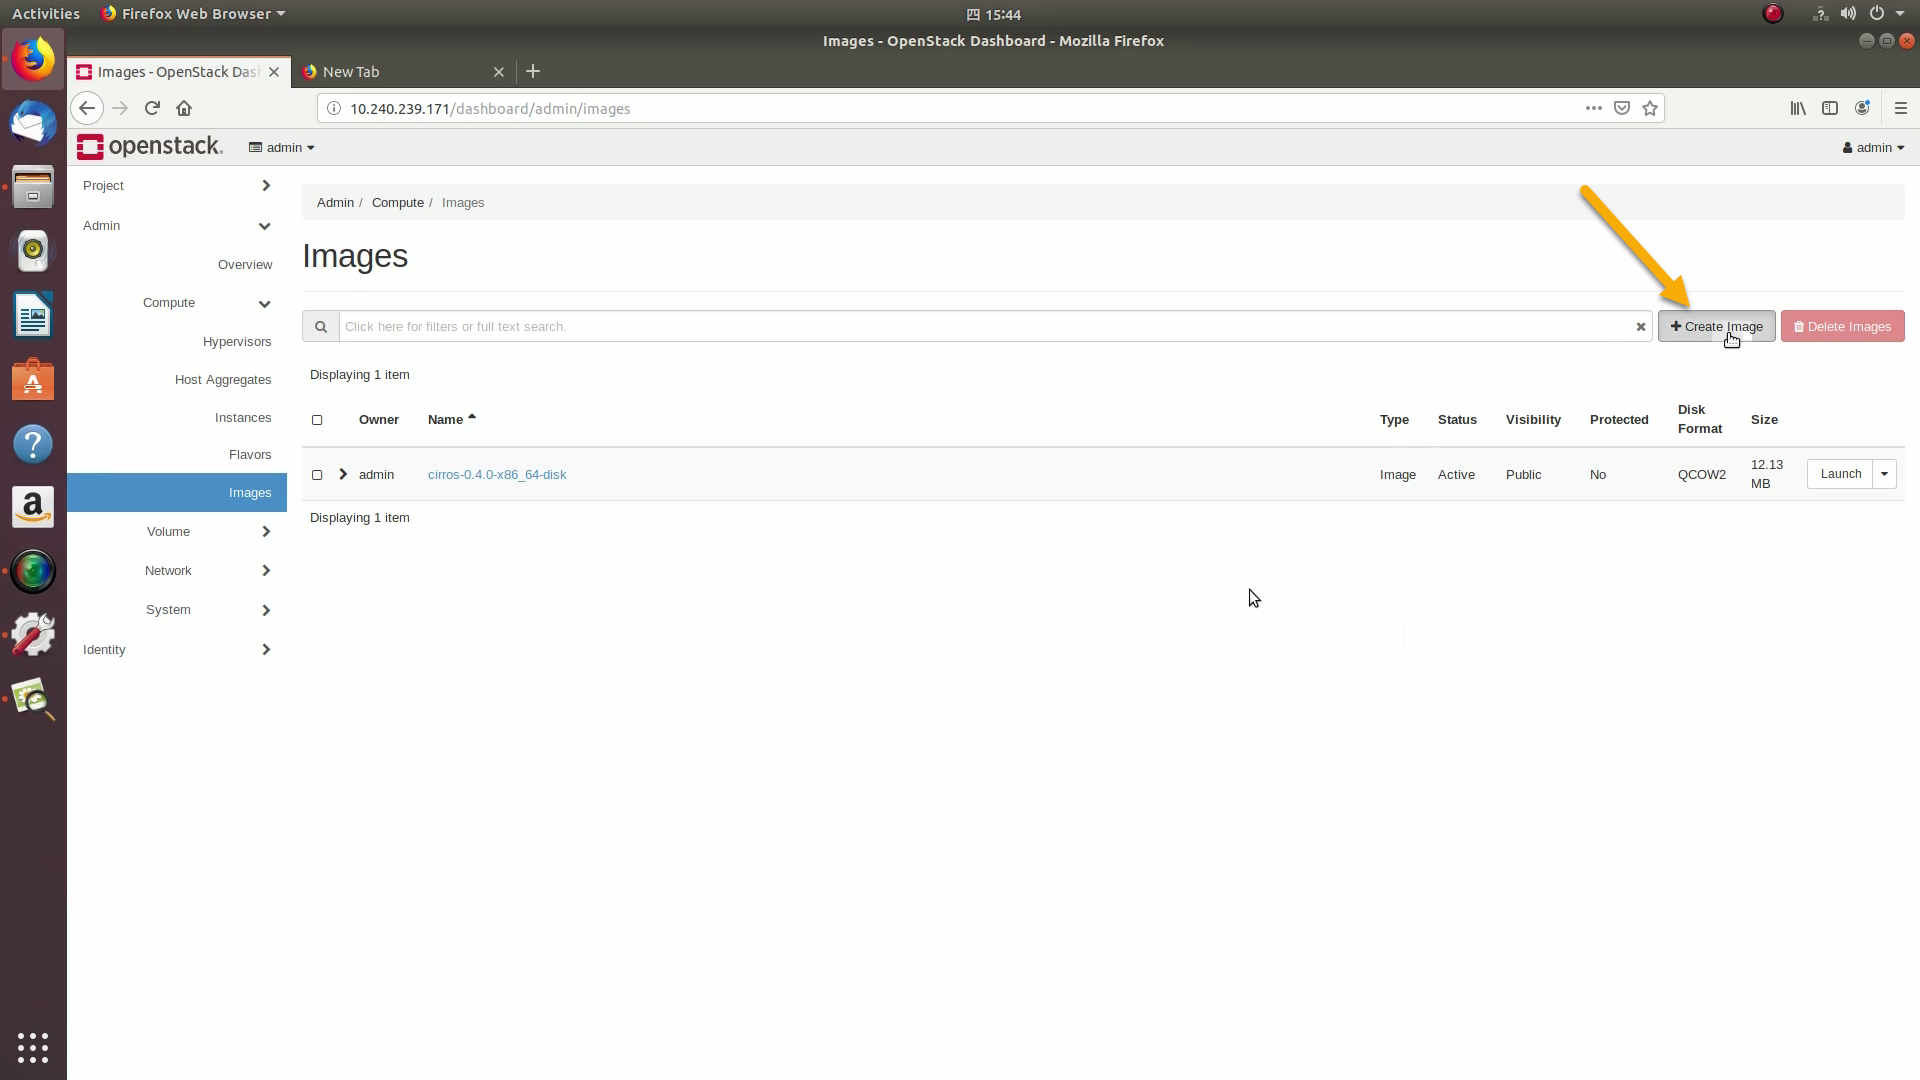
Next, we’ll prepare for launching an OpenStack instance. Click on the Admin / Compute/ Image tab and then the +Create image button:
Browse for and select the Ubuntu Cloud image file we downloaded earlier:
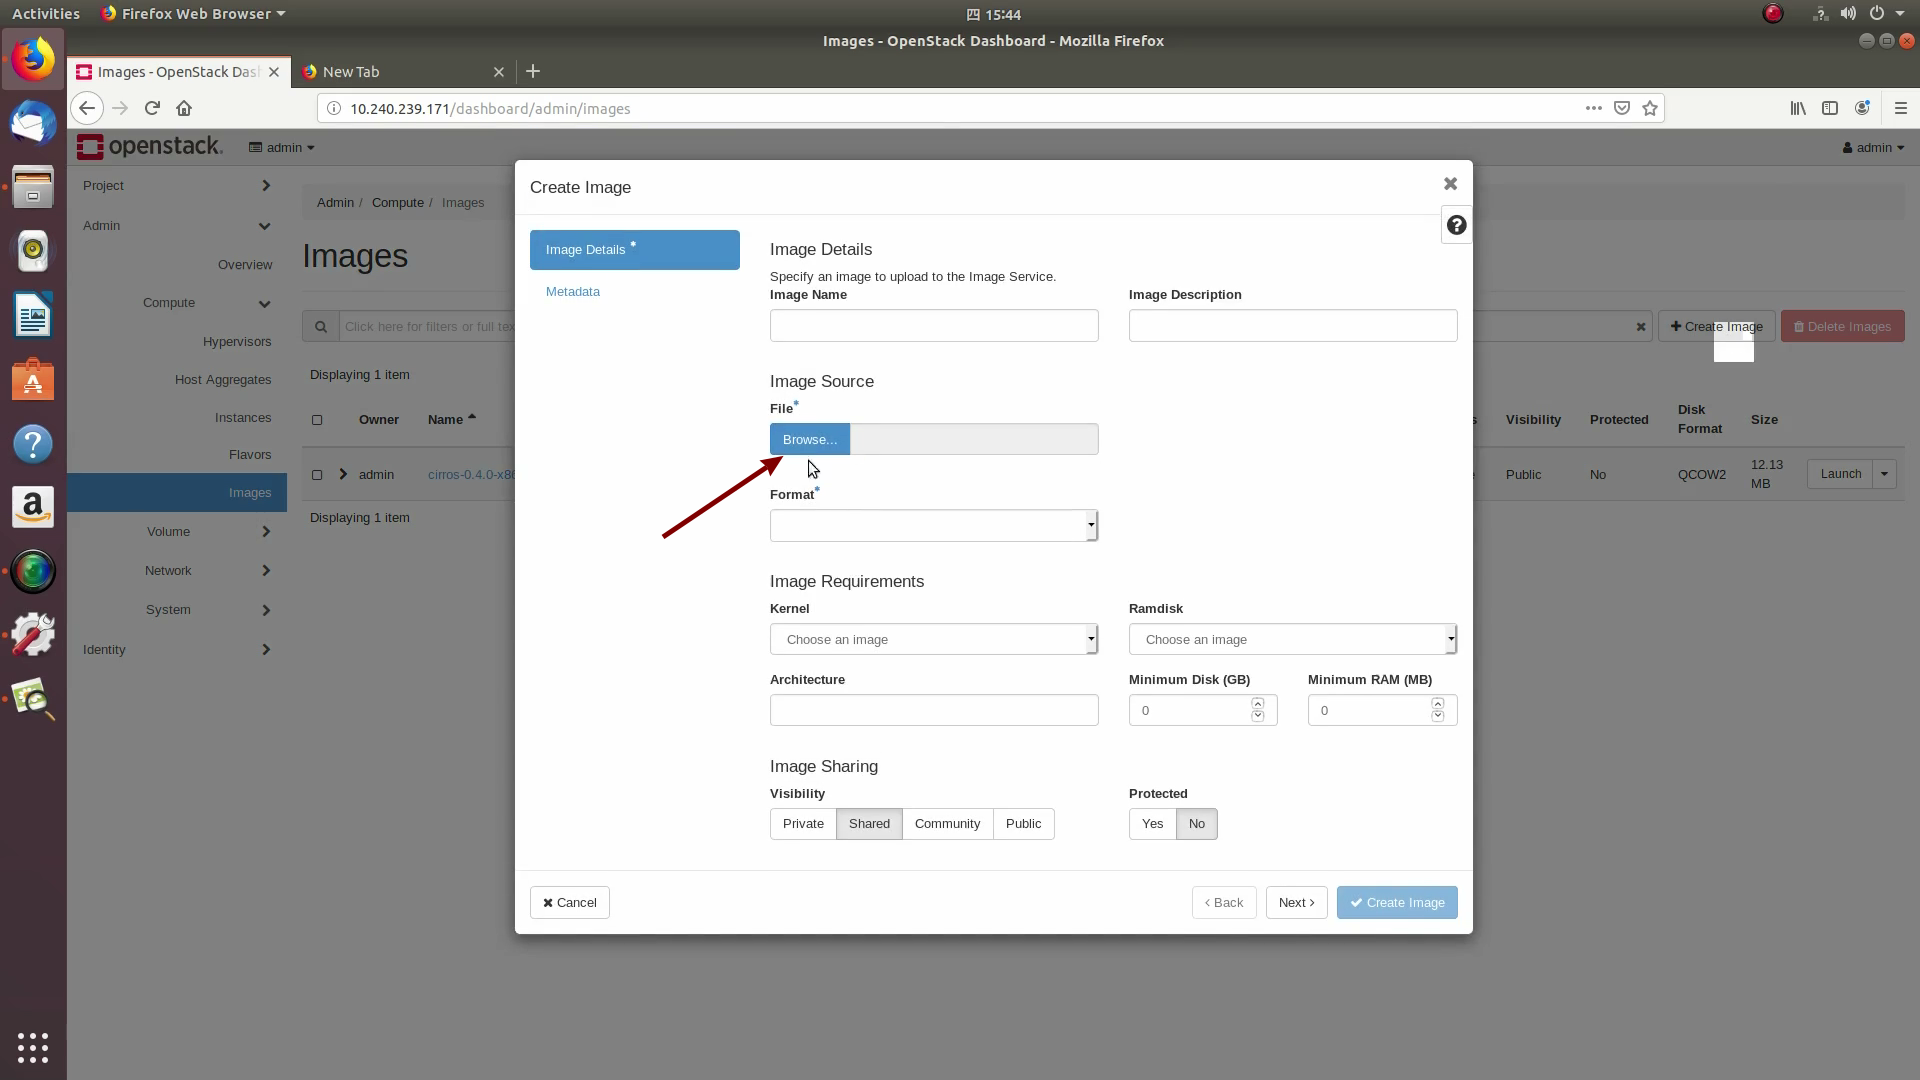
Give the image a name (Ubuntu20.04), select the QCOW2 - QEMU Emulator format, and click on Create Image:
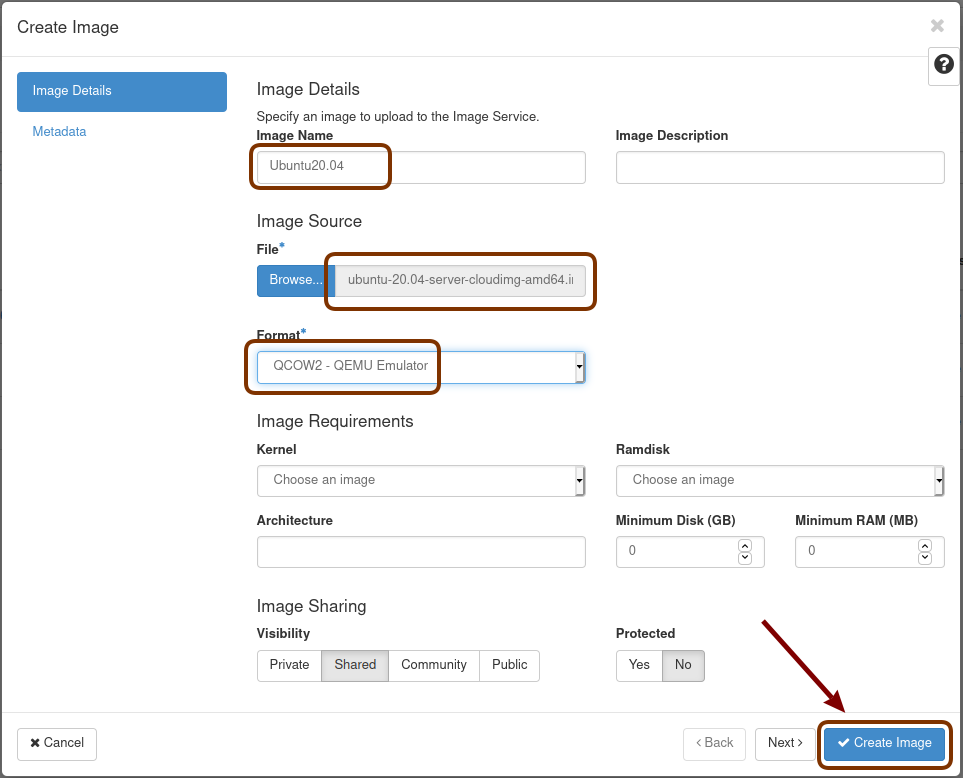
This will take a few minutes to complete.
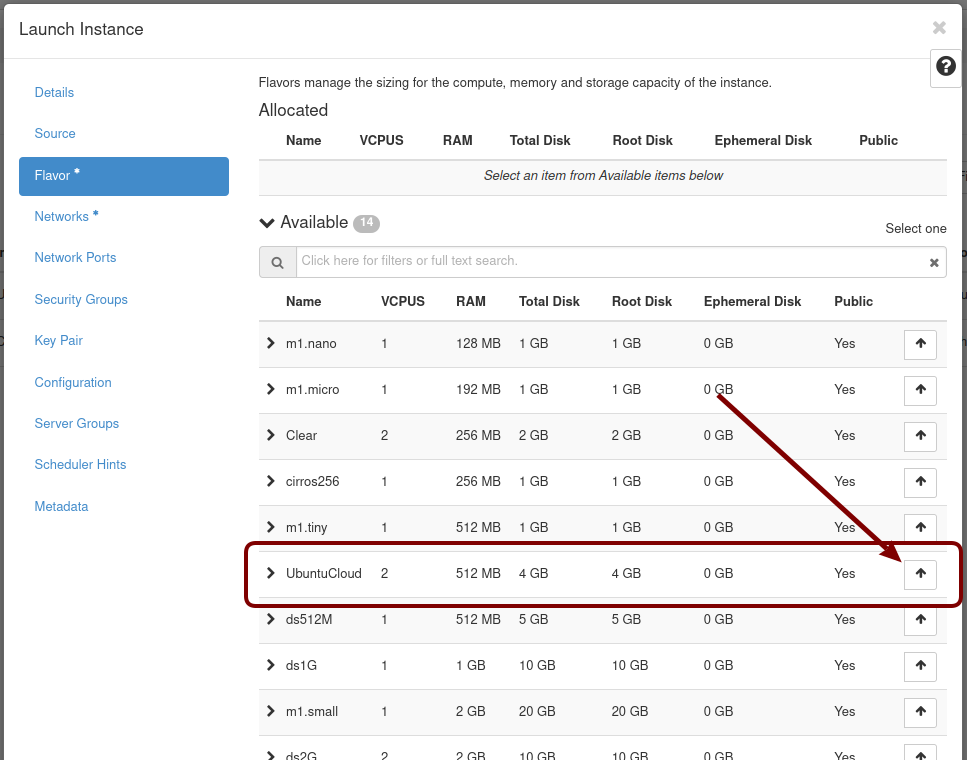
Next, click on the Admin / Computer / Flavors tabs and then the +Create Flavor button. This is where you’ll define a machine flavor name (UbuntuCloud), and specify its resource requirements: the number of vCPUs (2), RAM size (512MB), and root disk size (4GB):
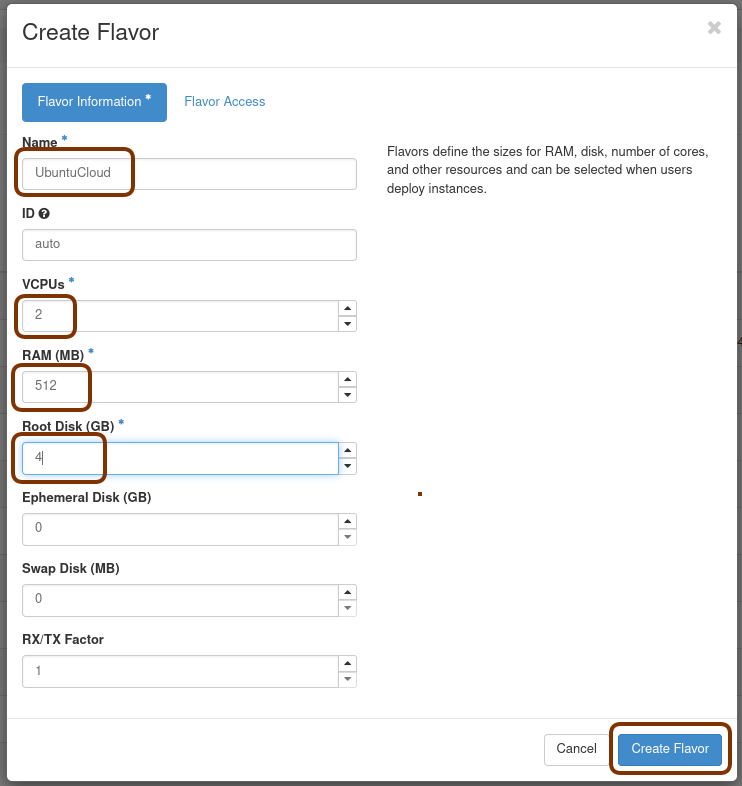
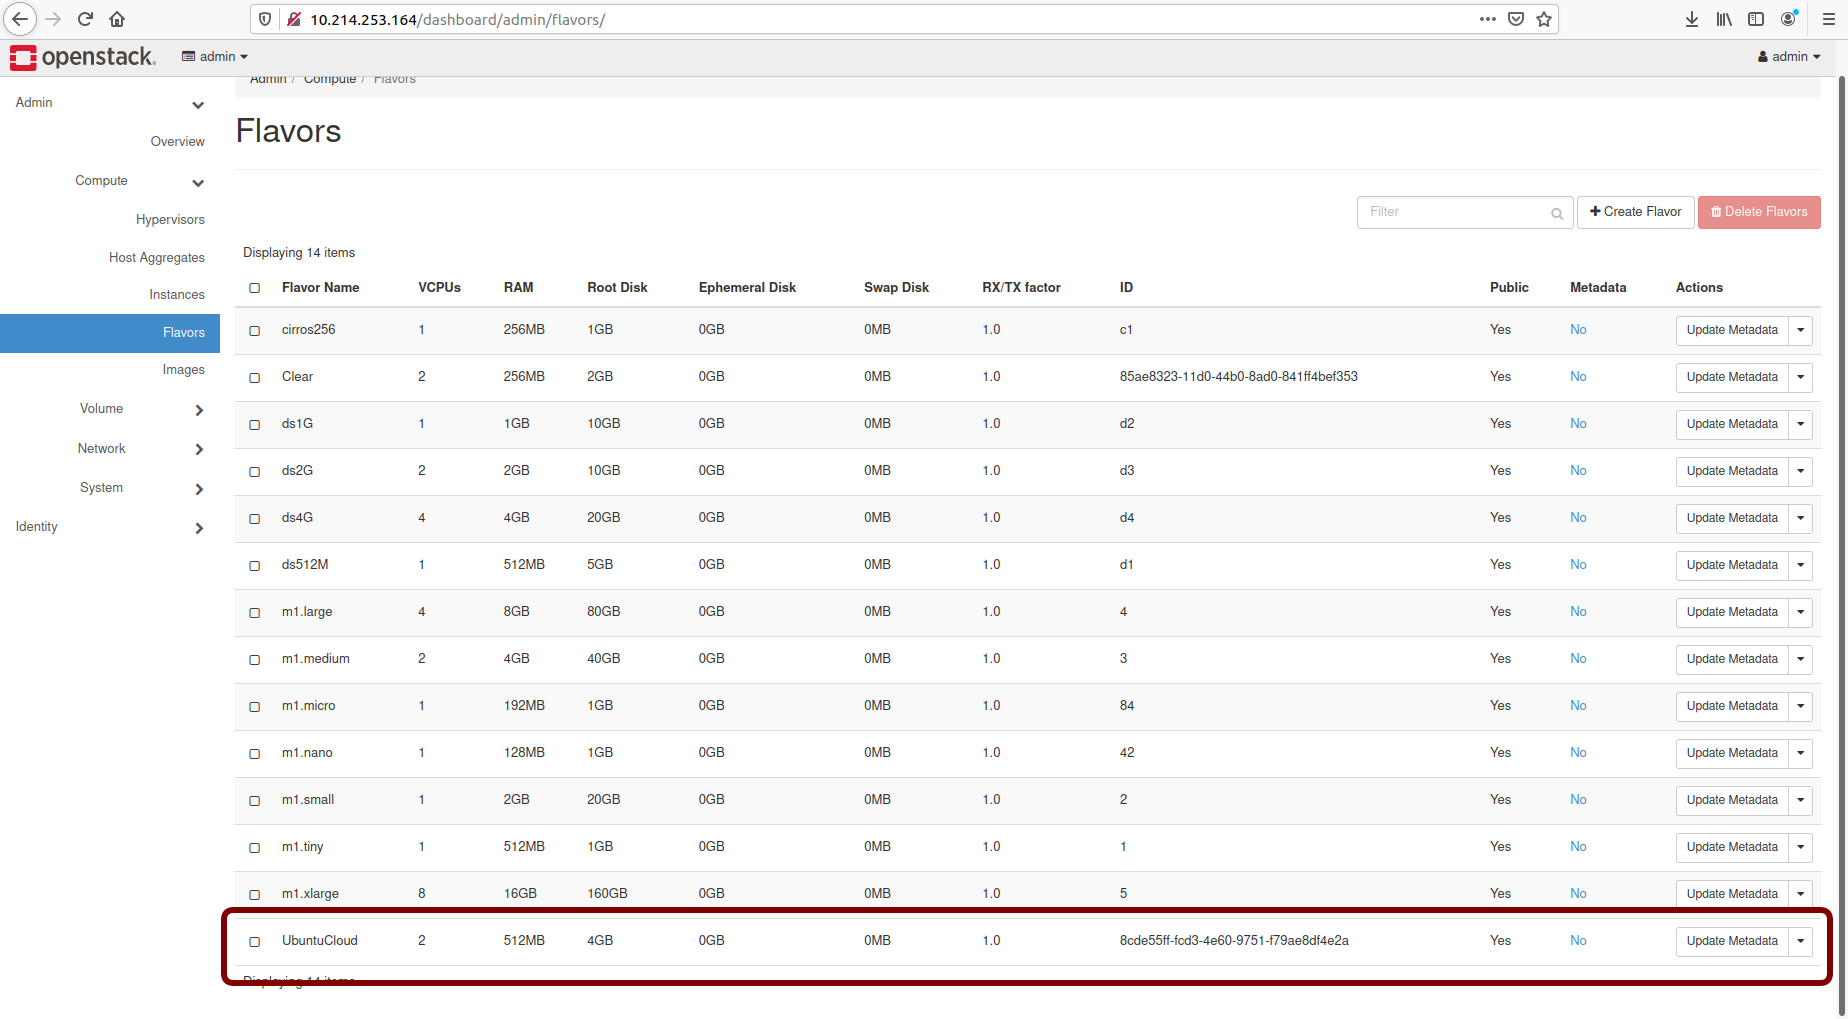
Click on Create Flavor and you’ll return to see a list of available flavors plus the new one you created (UbuntuCloud):
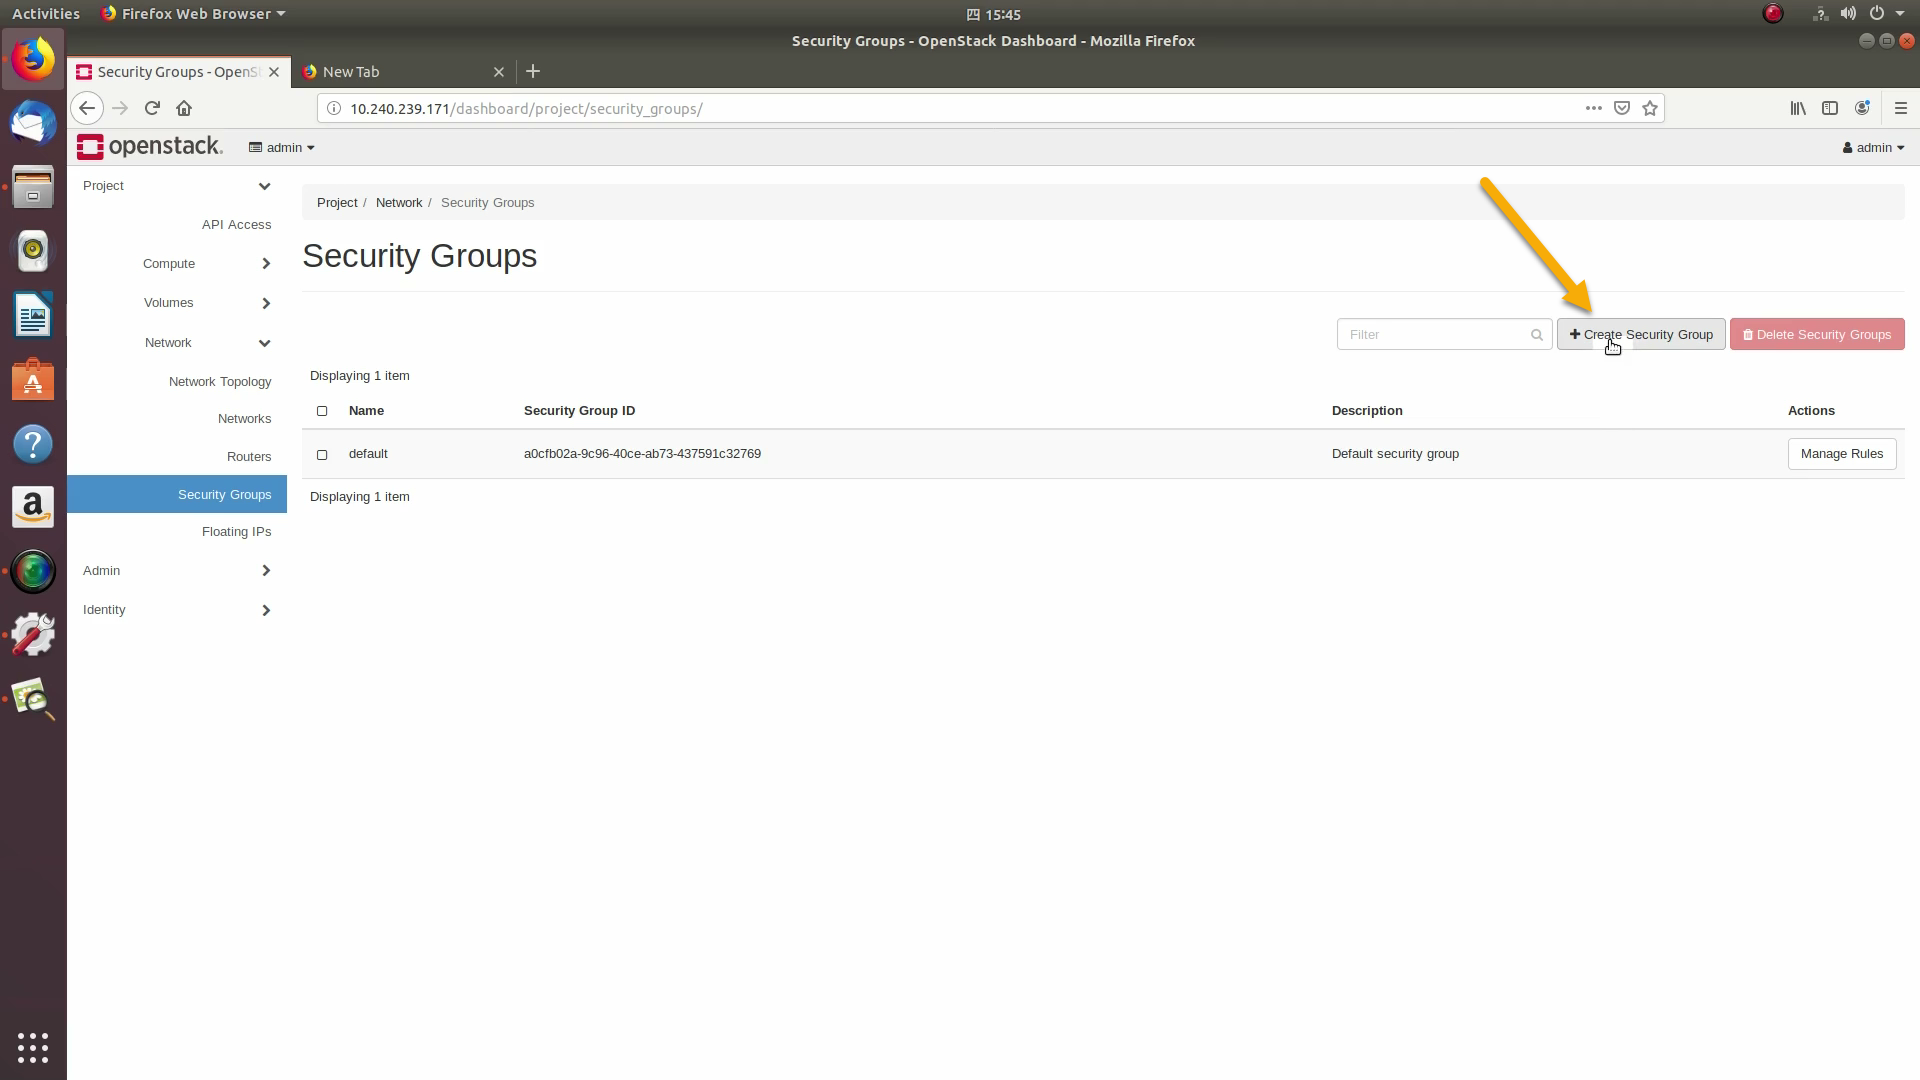
OpenStack security groups act as a virtual firewall controlling connections between instances, allowing connections such as SSH, and HTTPS. These next steps create a security group allowing SSH and ICMP connections.
Go to Project / Network / Security Groups and click on the +Create Security Group button:
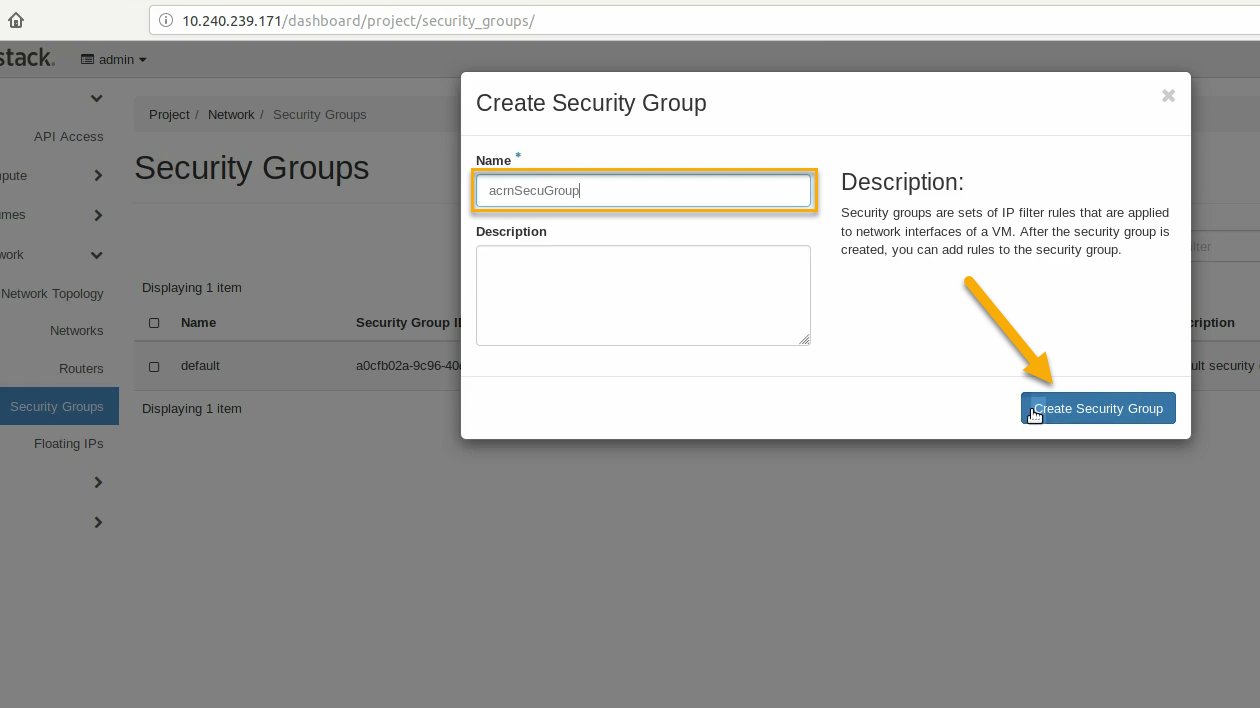
Name this security group (acrnSecuGroup) and click Create Security Group:
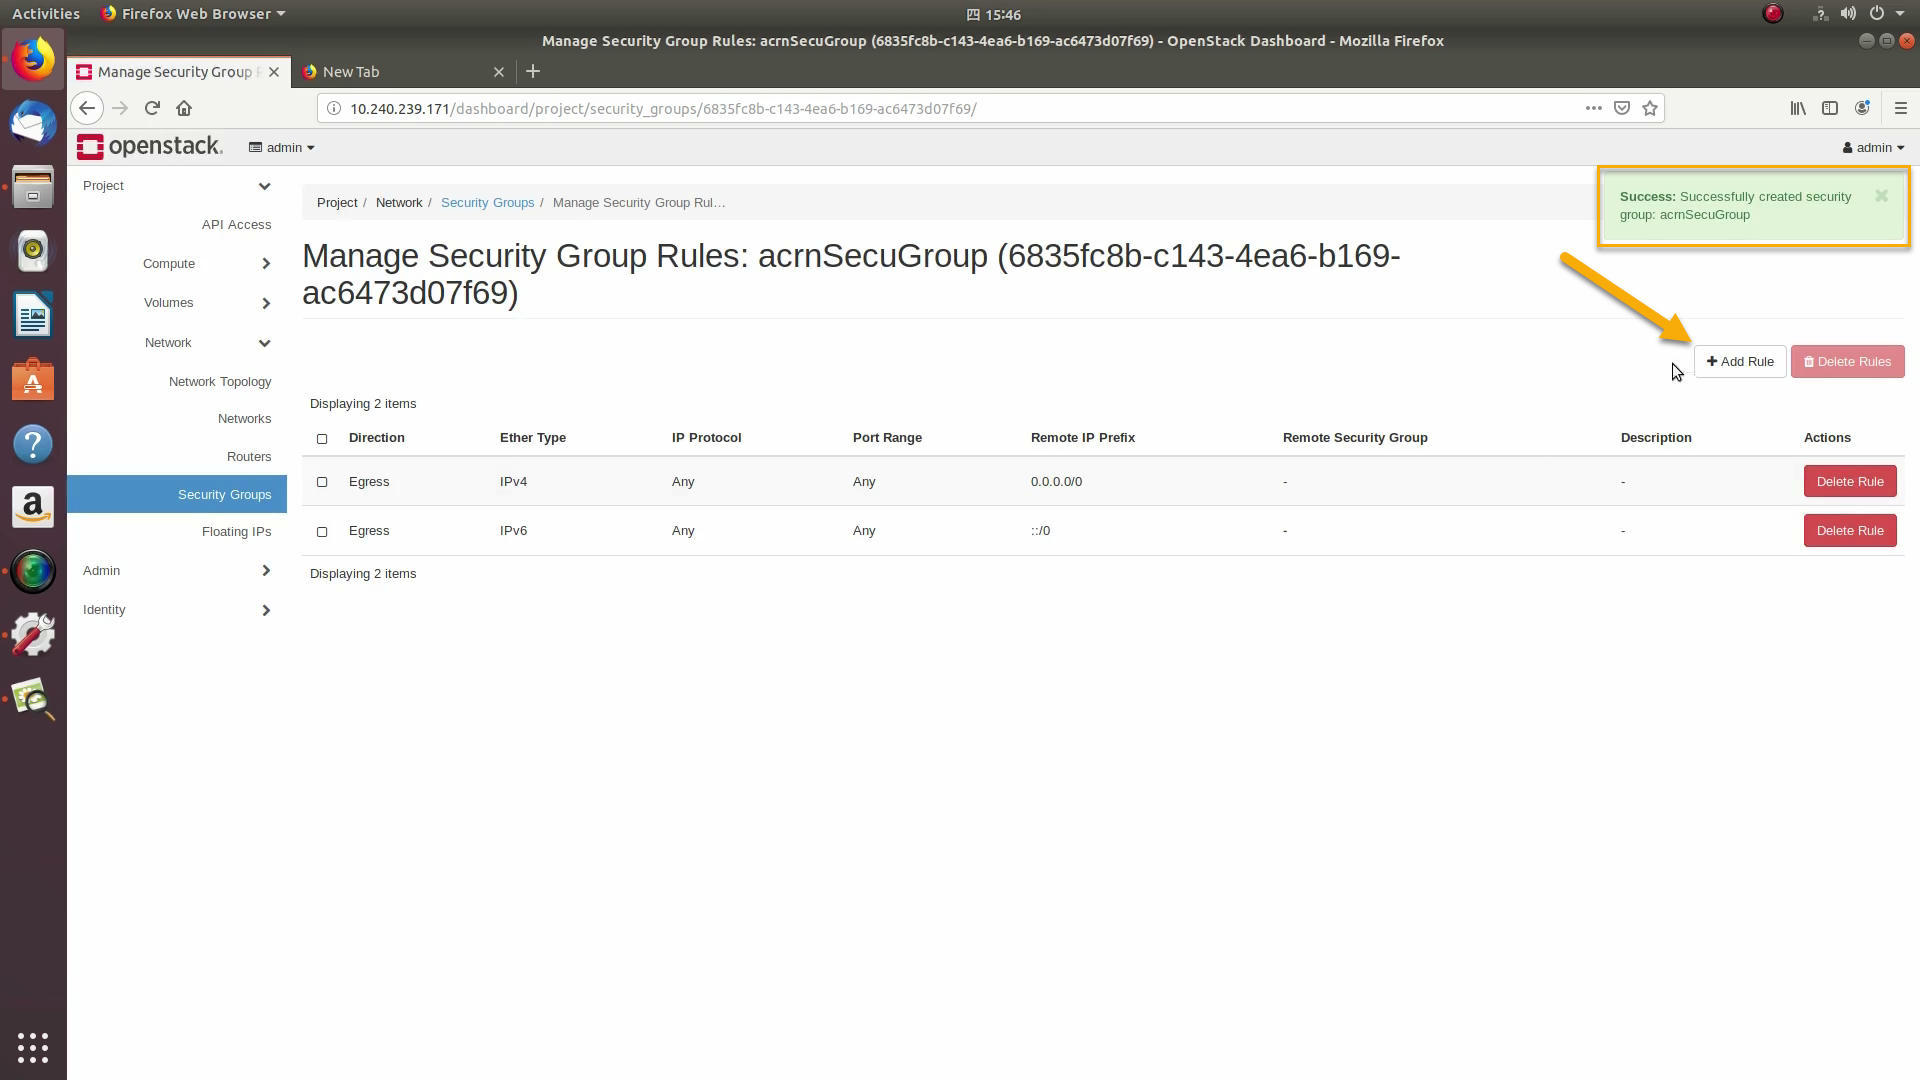
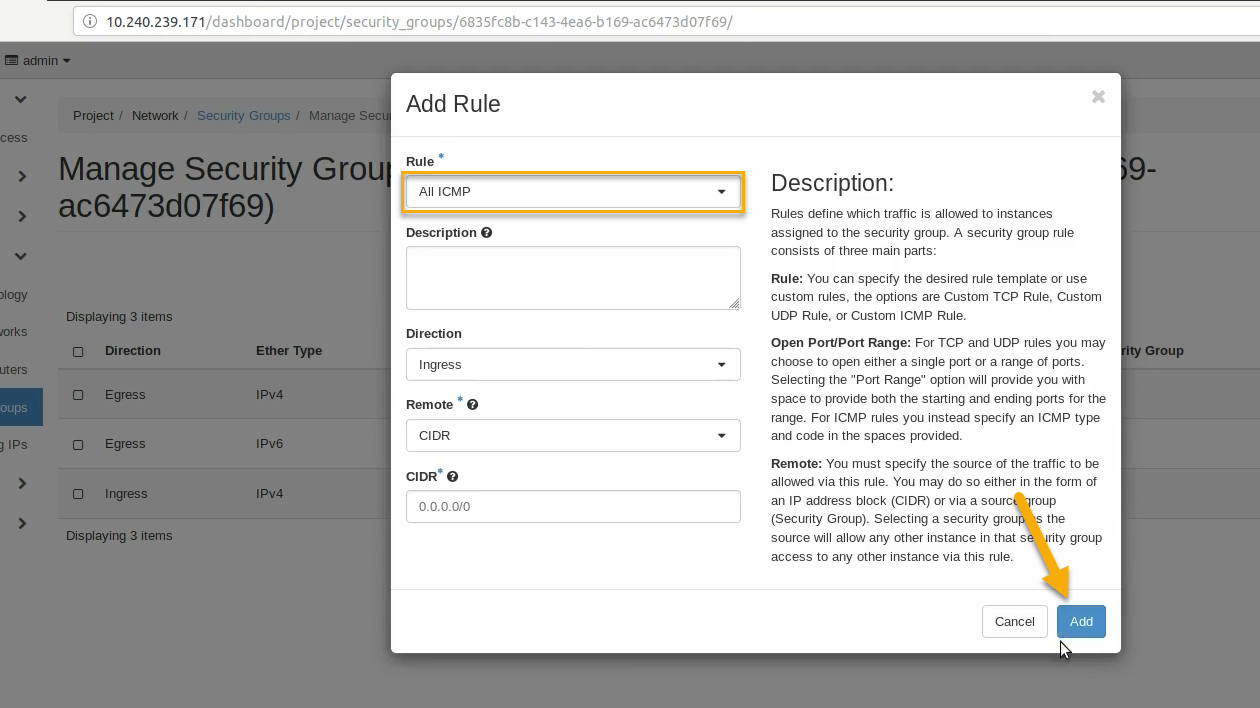
You’ll return to a rule management screen for this new group. Click on the +Add Rule button:
Select SSH from the Rule list and click Add:
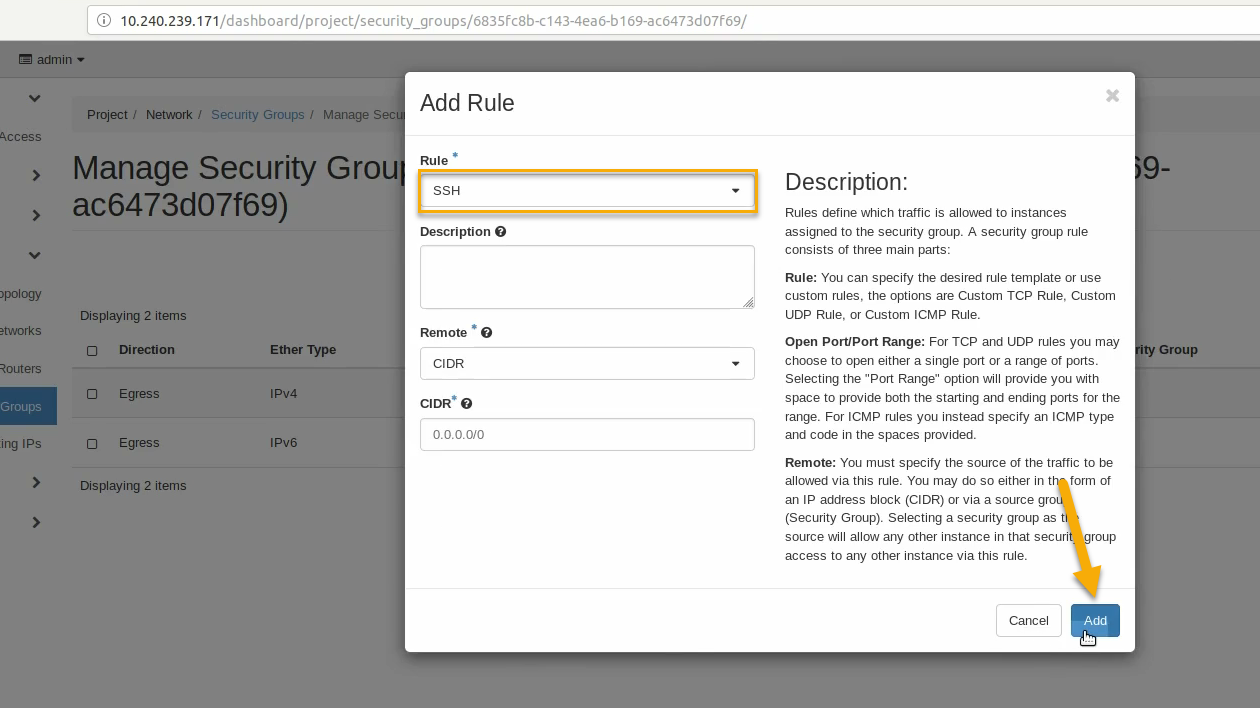
Similarly, add another rule to add a All ICMP rule too:
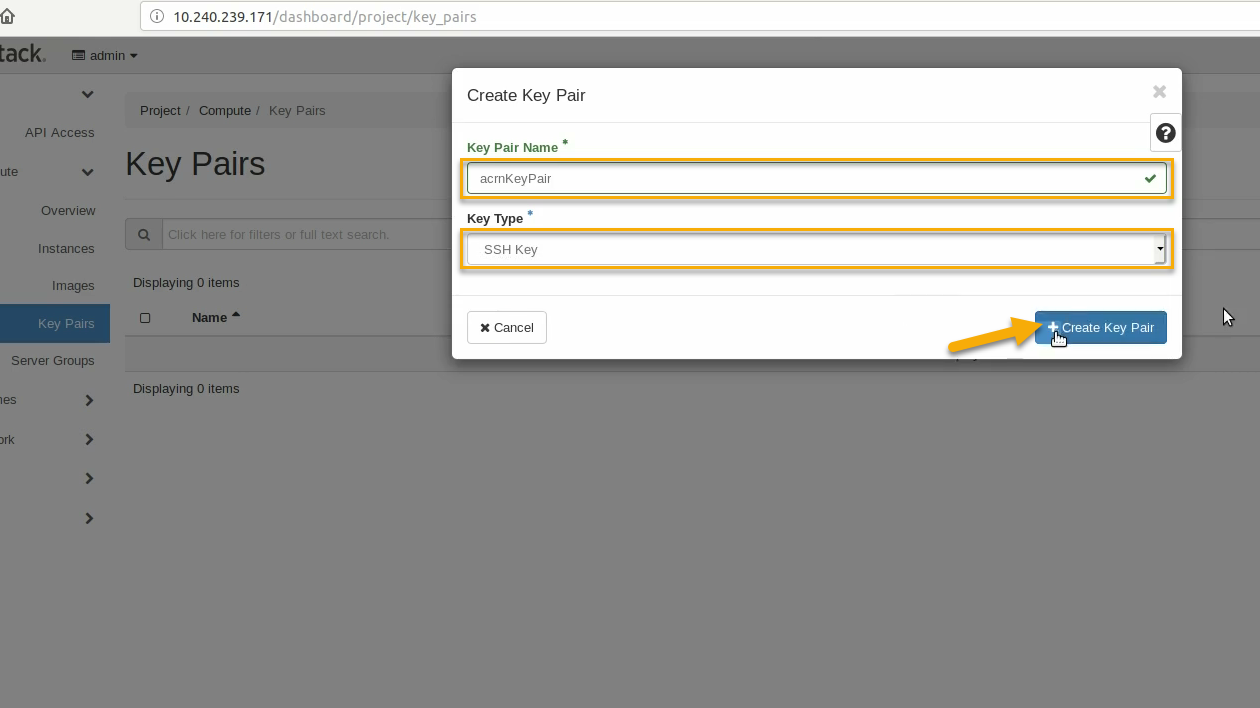
Create a public/private keypair used to access the created instance. Go to Project / Compute / Key Pairs and click on +Create Key Pair, give the keypair a name (acrnKeyPair) and Key Type (SSH Key) and click on Create Key Pair:
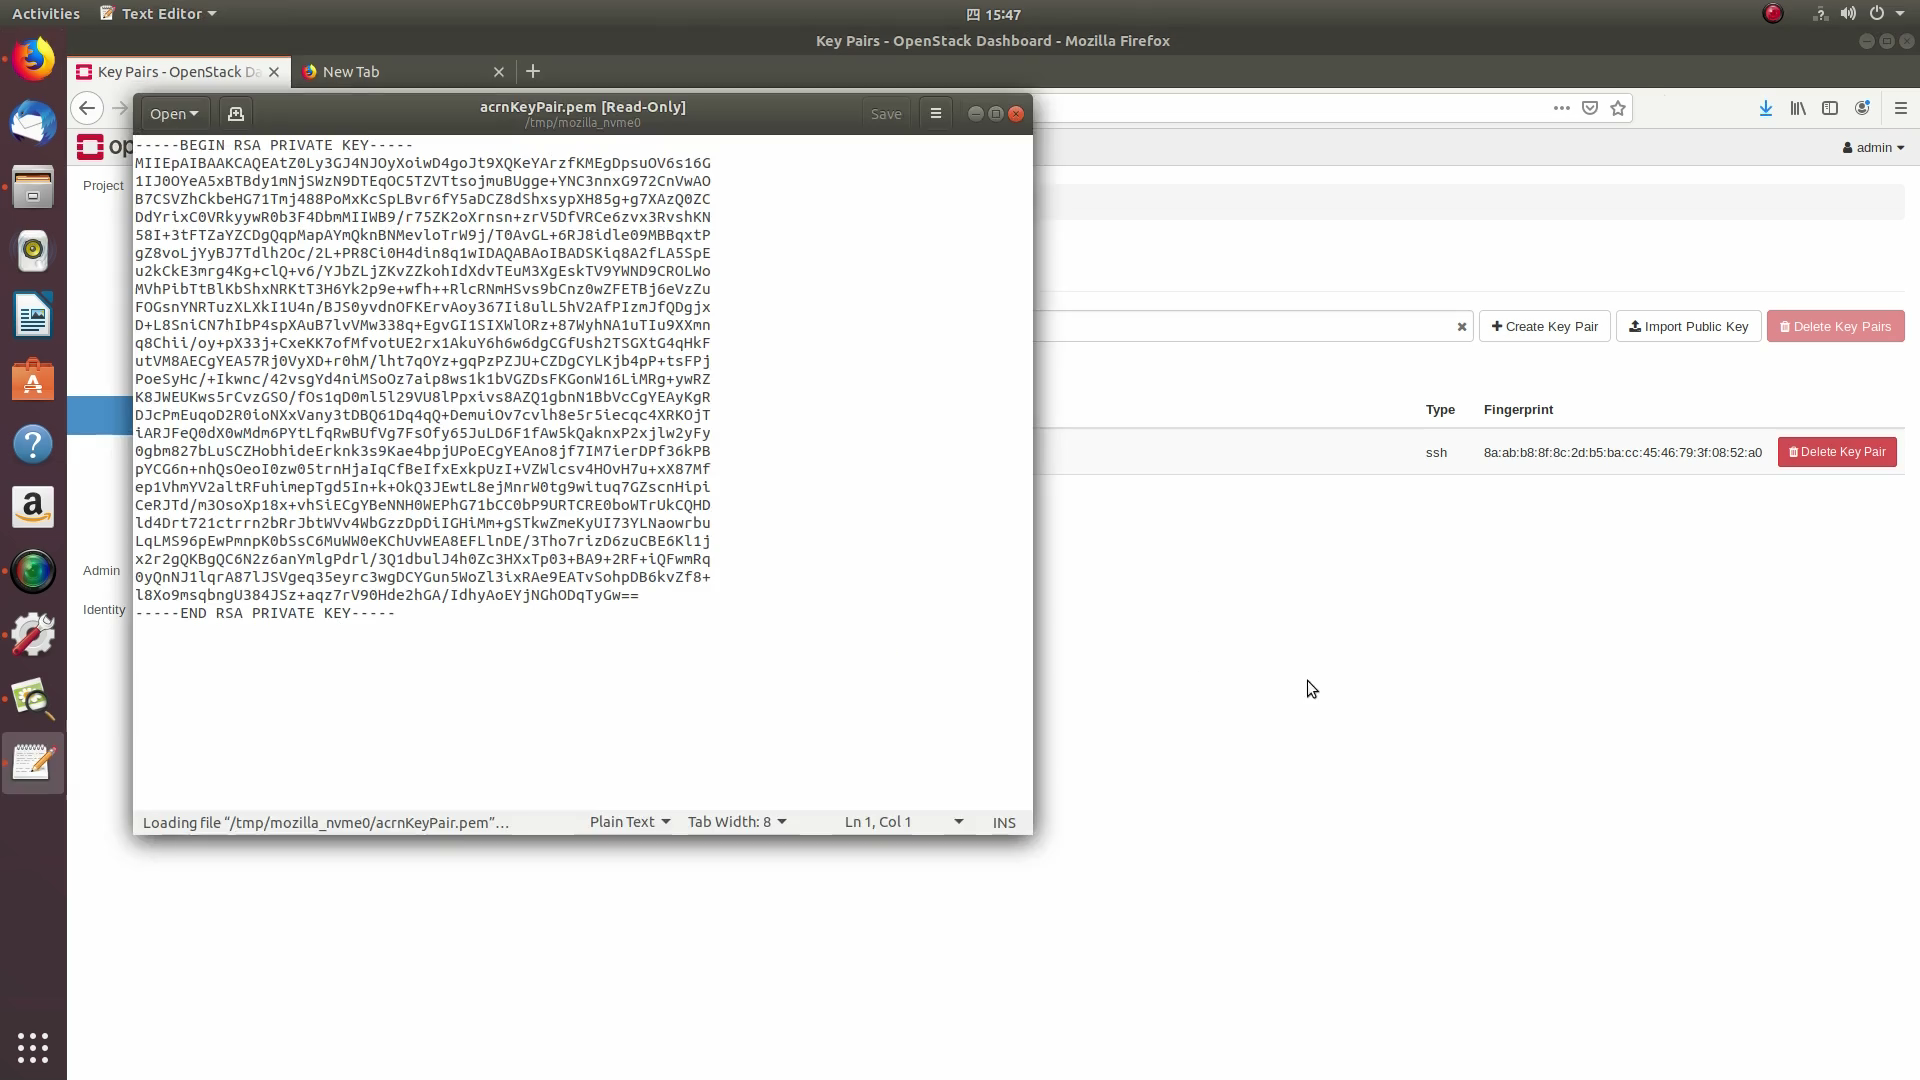
You should save the private keypair file safely, for future use:
Now we’re ready to launch an instance. Go to Project / Compute / Instance, click on the Launch Instance button, give it a name (UbuntuOnACRN) and click Next:

Select No for “Create New Volume”, and click the up-arrow button for uploaded (Ubuntu20.04) image as the “Available source” for this instance:
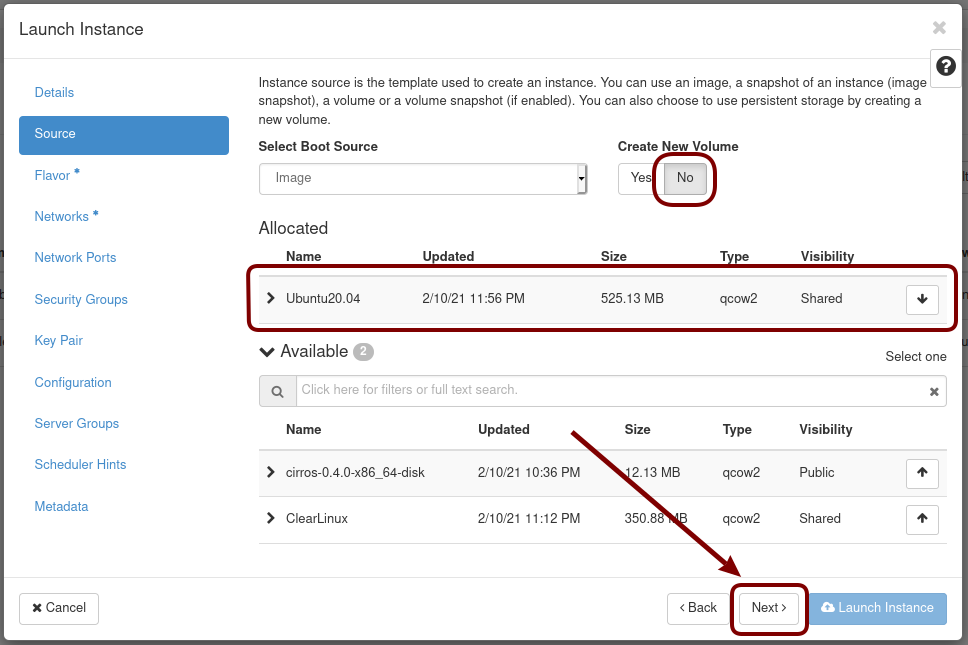
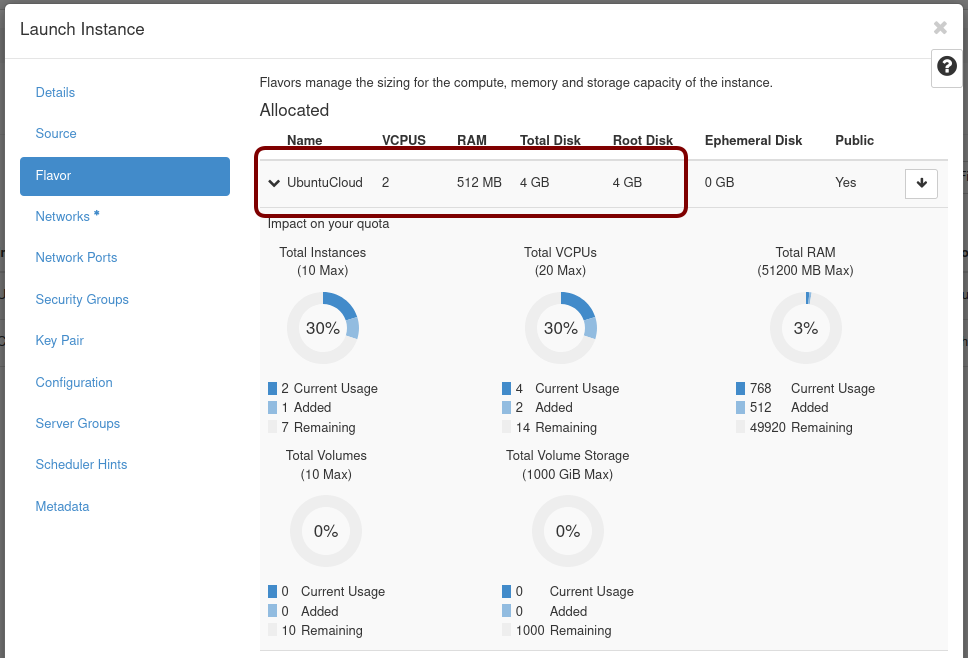
Click Next, and select the machine flavor you created earlier (UbuntuCloud):
Click on > next to the Allocated UbuntuCloud flavor and see details about your choice:
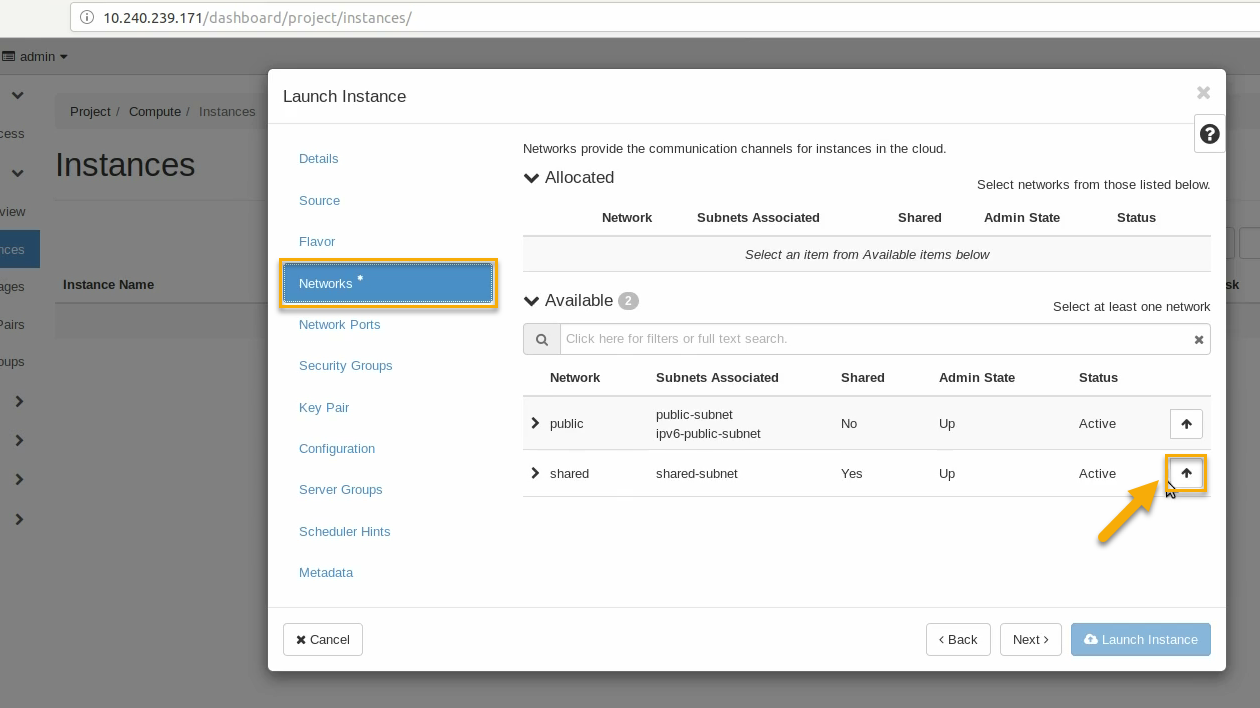
Click on the Networks tab, and select the internal shared network from the “Available” list:
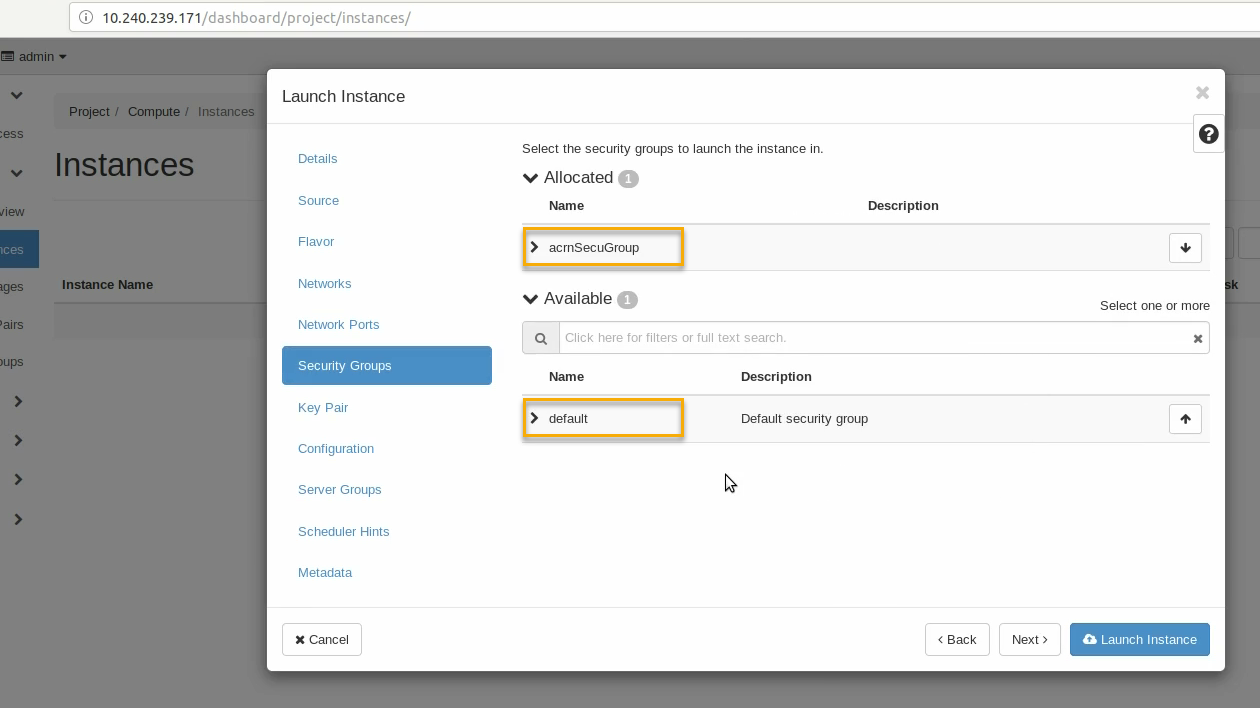
Click on the Security Groups tab and select the acrnSecuGroup security group you created earlier. Remove the default security group if it’s in the “Allocated” list:
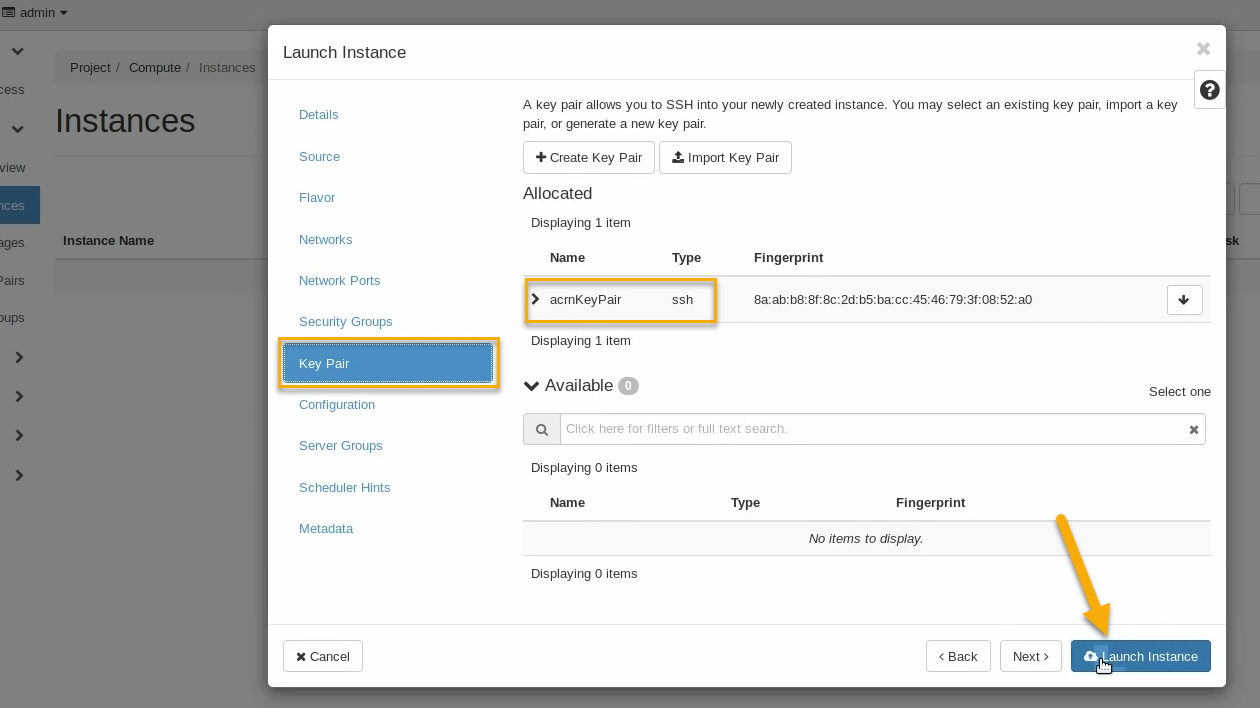
Click on the Key Pair tab and verify the acrnKeyPair you created earlier is in the “Allocated” list, and click on Launch Instance:
It will take a few minutes to complete launching the instance.
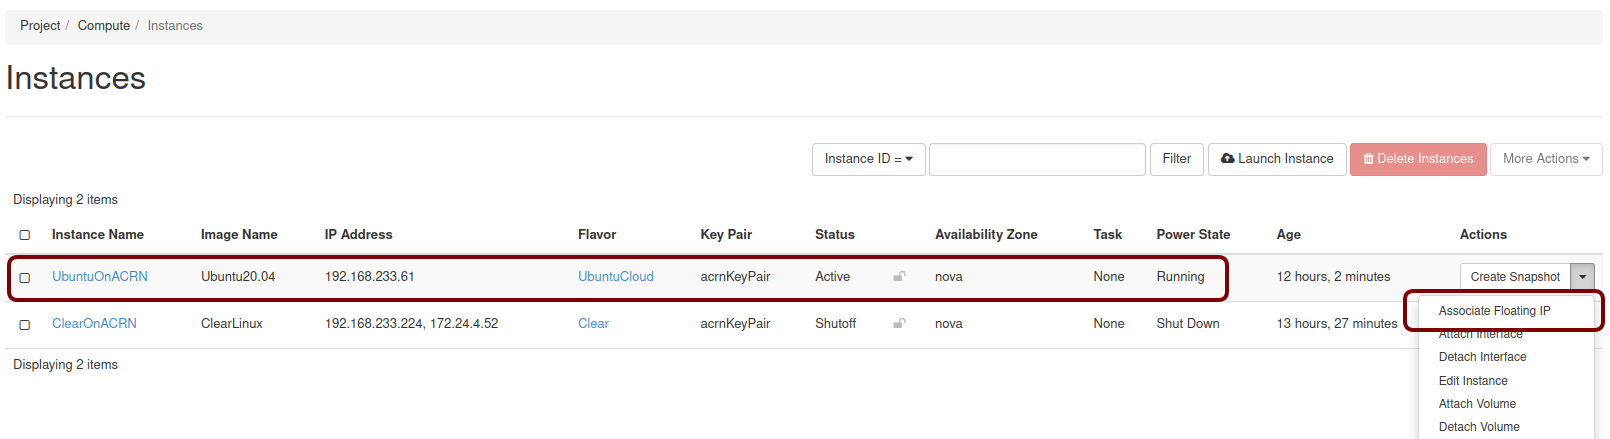
Click on the Project / Compute / Instances tab to monitor progress. When the instance status is “Active” and power state is “Running”, associate a floating IP to the instance so you can access it:
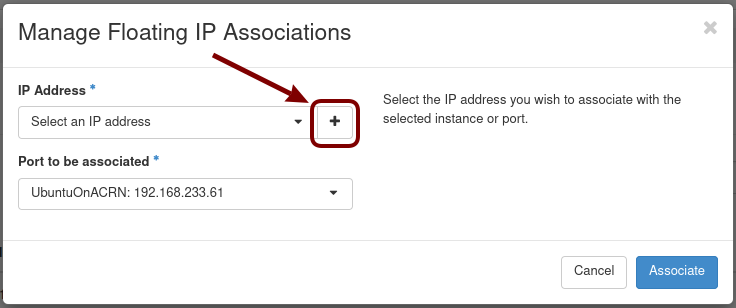
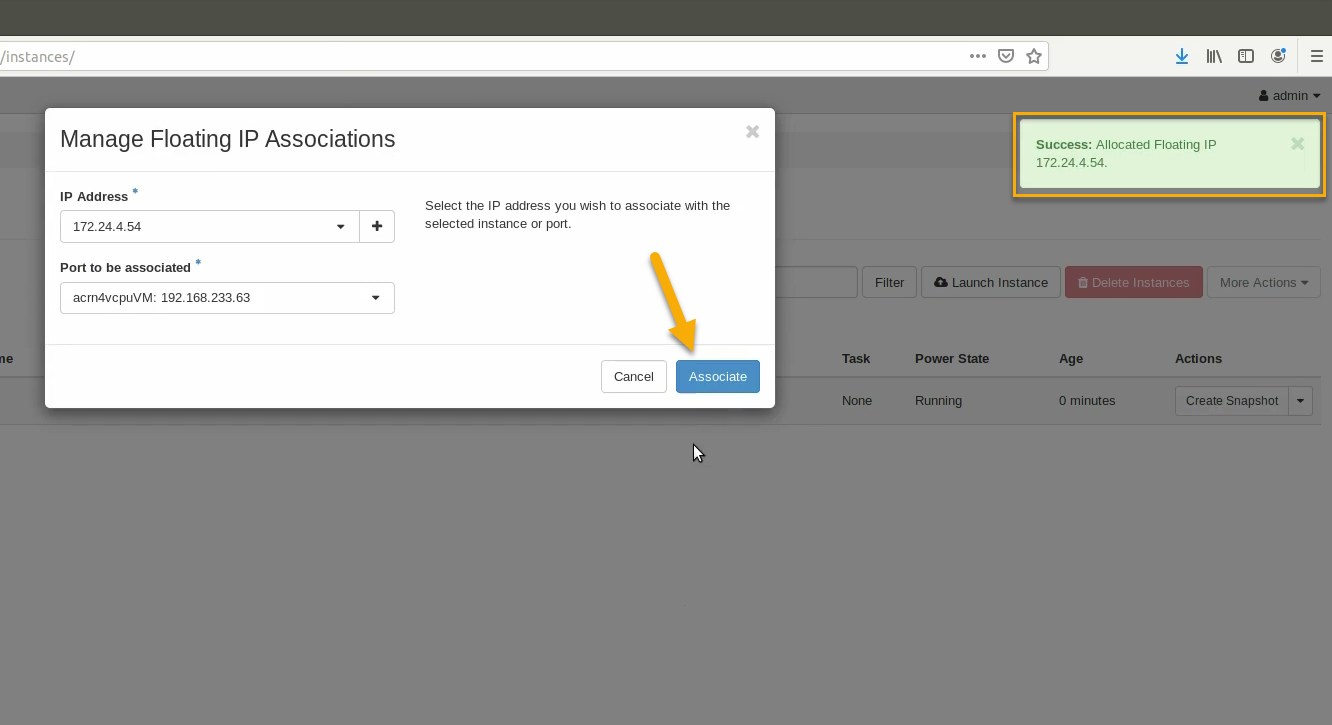
On the Manage Floating IP Associations screen, click on the + to add an association:
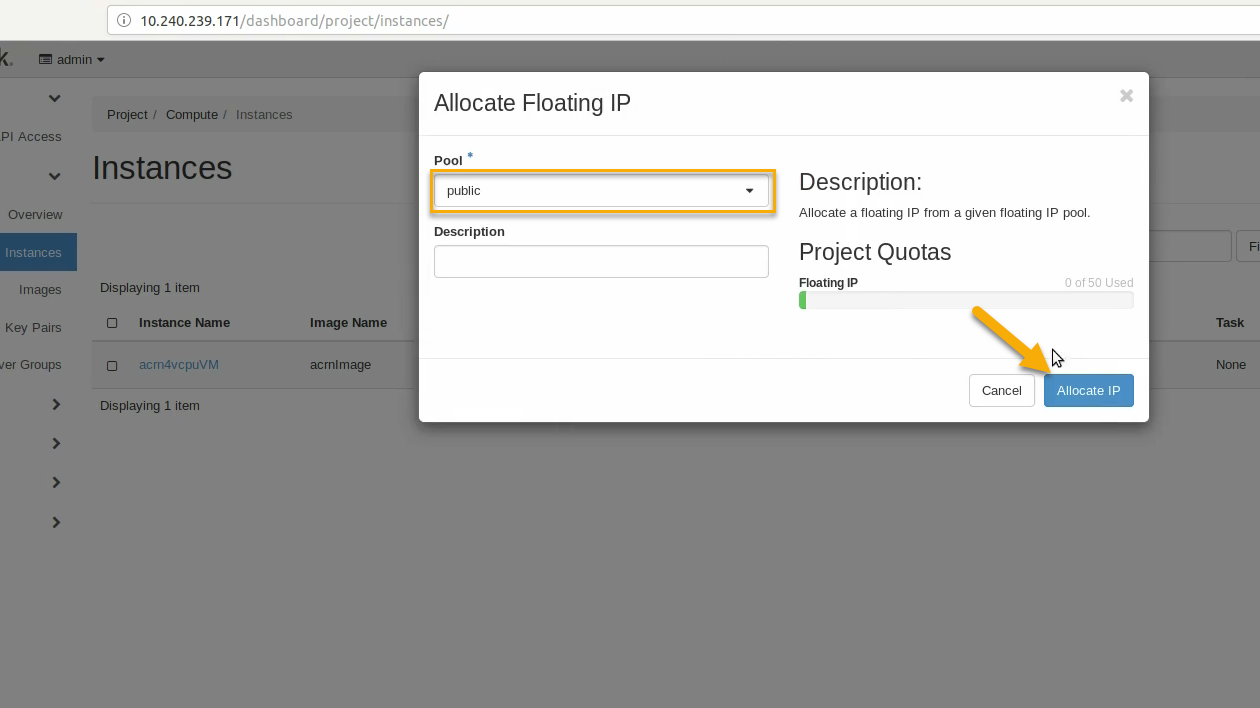
Select public pool, and click on Allocate IP:
Finally, click Associate after the IP address is assigned:
Final Steps
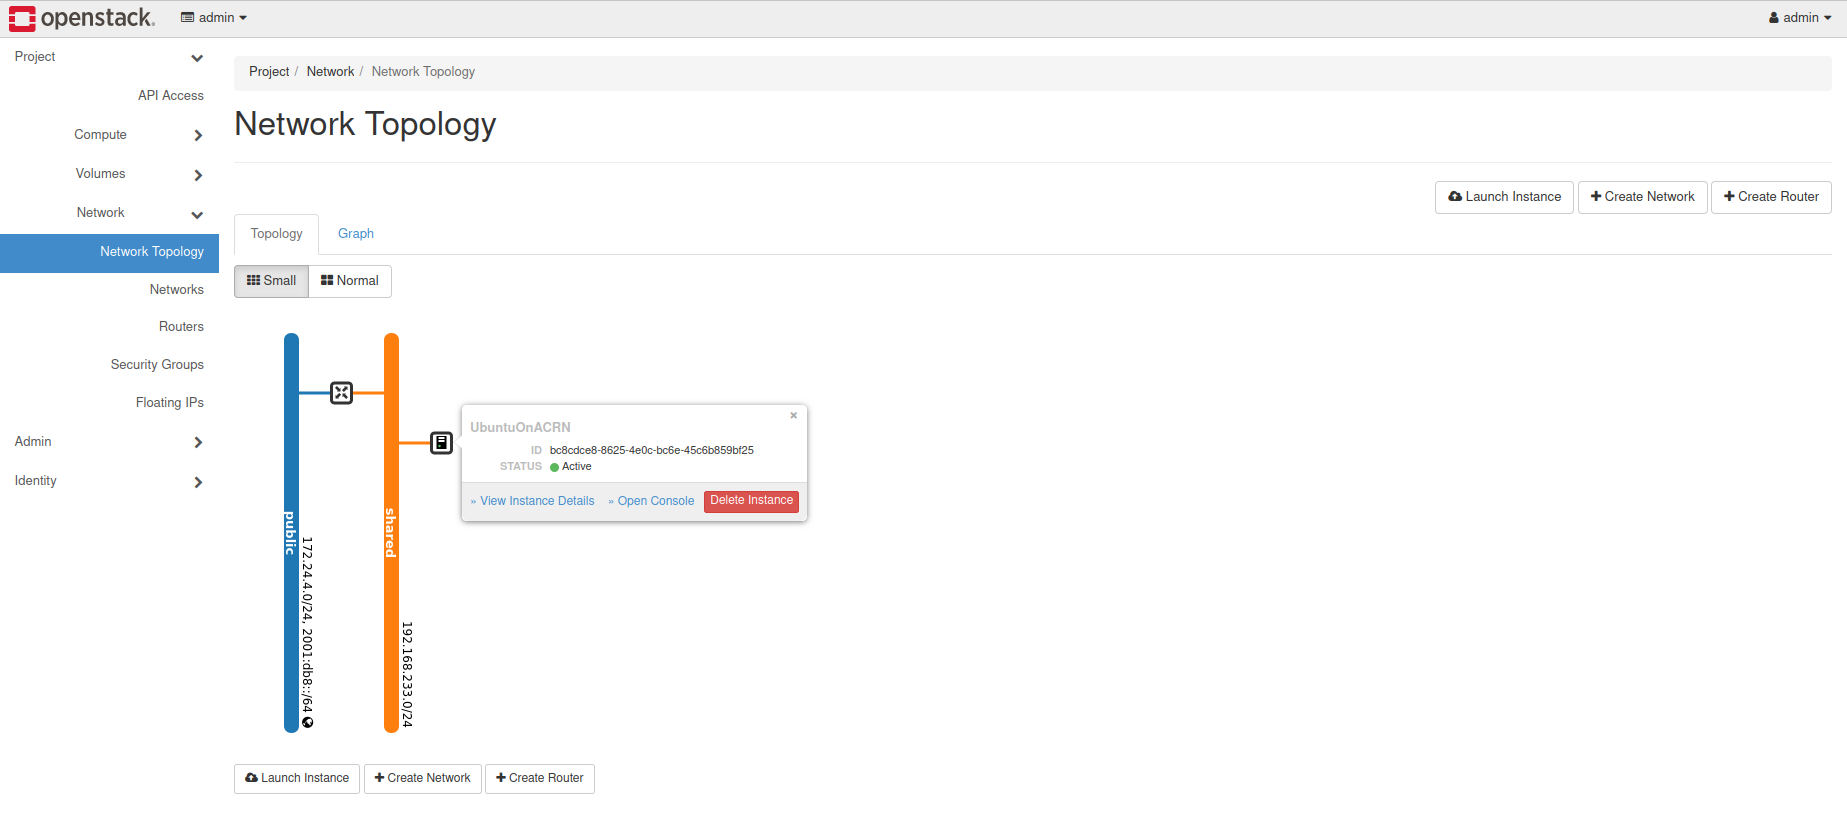
With that, the OpenStack instance is running and connected to the network. You can graphically see this by returning to the Project / Network / Network Topology view:
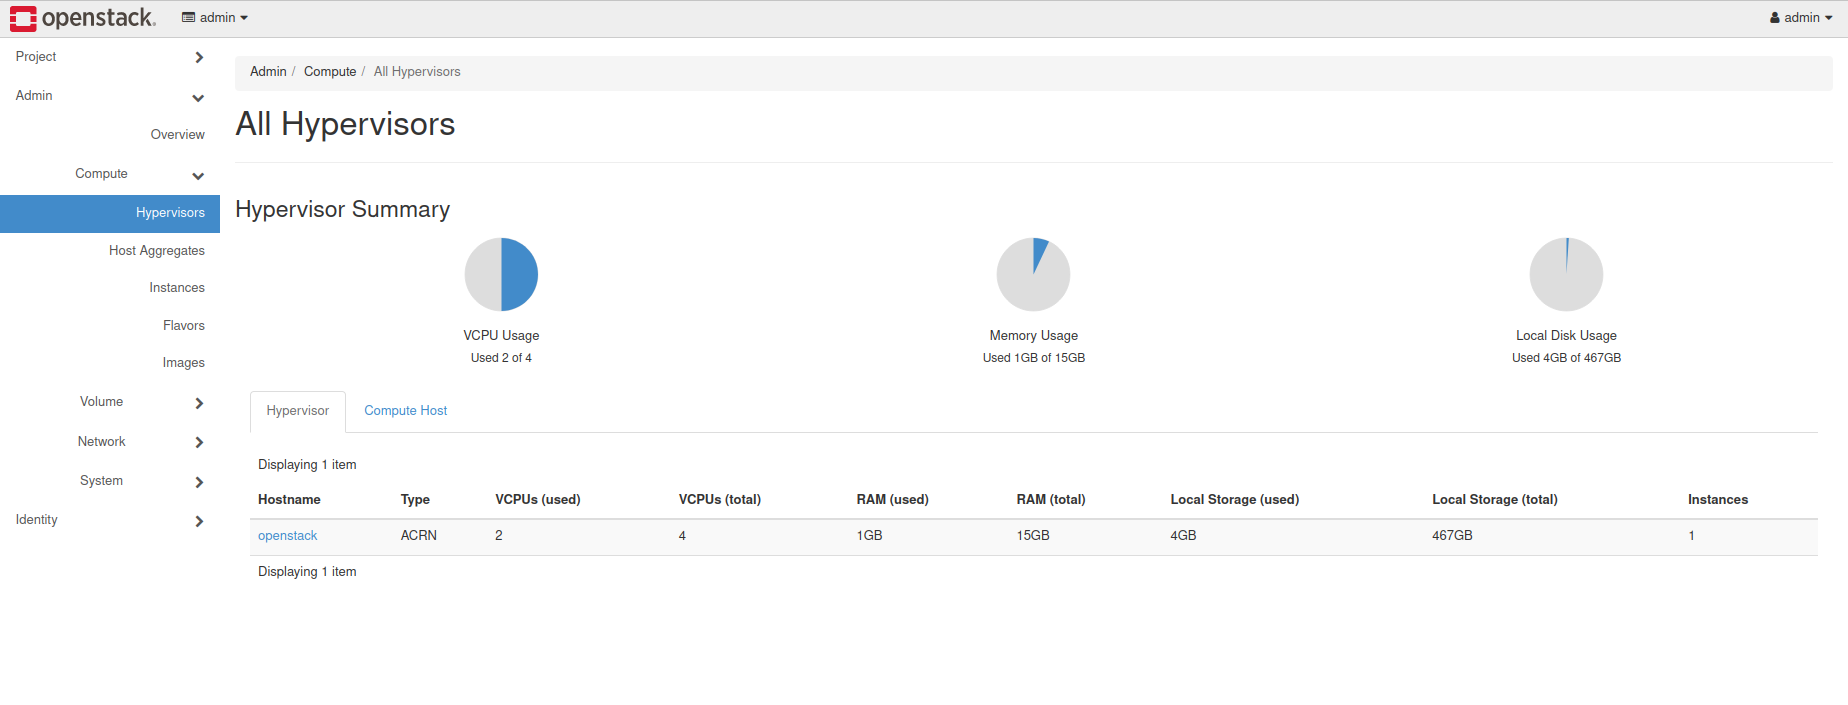
You can also see a hypervisor summary by clicking on Admin / Compute / Hypervisors:
Note
OpenStack logs to the systemd journal and libvirt logs to
/var/log/libvirt/libvirtd.log.
Here are some other tasks you can try when the instance is created and running:
Use the hypervisor console to verify the instance is running by using the
vm_listcommand.Ping the instance inside the container using the instance’s floating IP address.
For more advanced CLI usage, refer to this OpenStack cheat sheet.