Getting Started Guide for ACRN Industry Scenario With ROScube-I
Verified Version
Ubuntu version: 18.04
GCC version: 7.5.0
ACRN-hypervisor branch: v2.5
ACRN-Kernel (Service VM kernel): v2.5
RT kernel for Ubuntu User VM OS: Linux kernel 4.19.59 with Xenomai 3.1
HW: ROScube-I
ADLINK ROScube-I is a real-time ROS 2-enabled robotic controller based on Intel® Xeon® 9th Gen Intel® Core™ i7/i3 and 8th Gen Intel® Core™ i5 processors. It features comprehensive I/O connectivity supporting a wide variety of sensors and actuators for unlimited robotic applications.
Architecture
This tutorial will show you how to install the ACRN Industry Scenario on ROScube-I. The scenario is shown here:
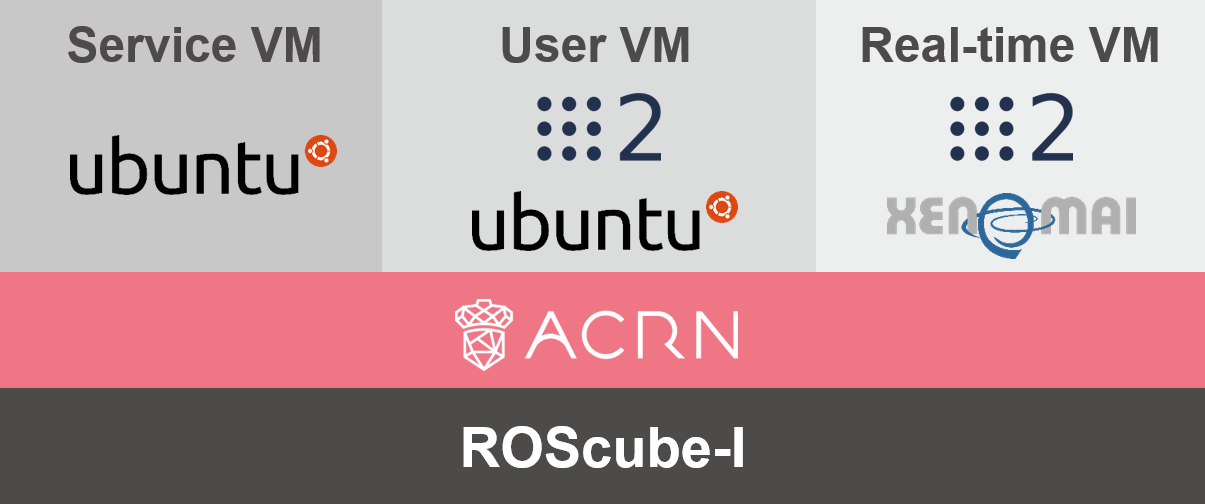
Service VM: Used to launch the User VM and real-time VM.
User VM: Run ROS 2 application in this VM, such as for SLAM or navigation.
Real-time VM: Run critical tasks in this VM, such as the base driver.
Prerequisites
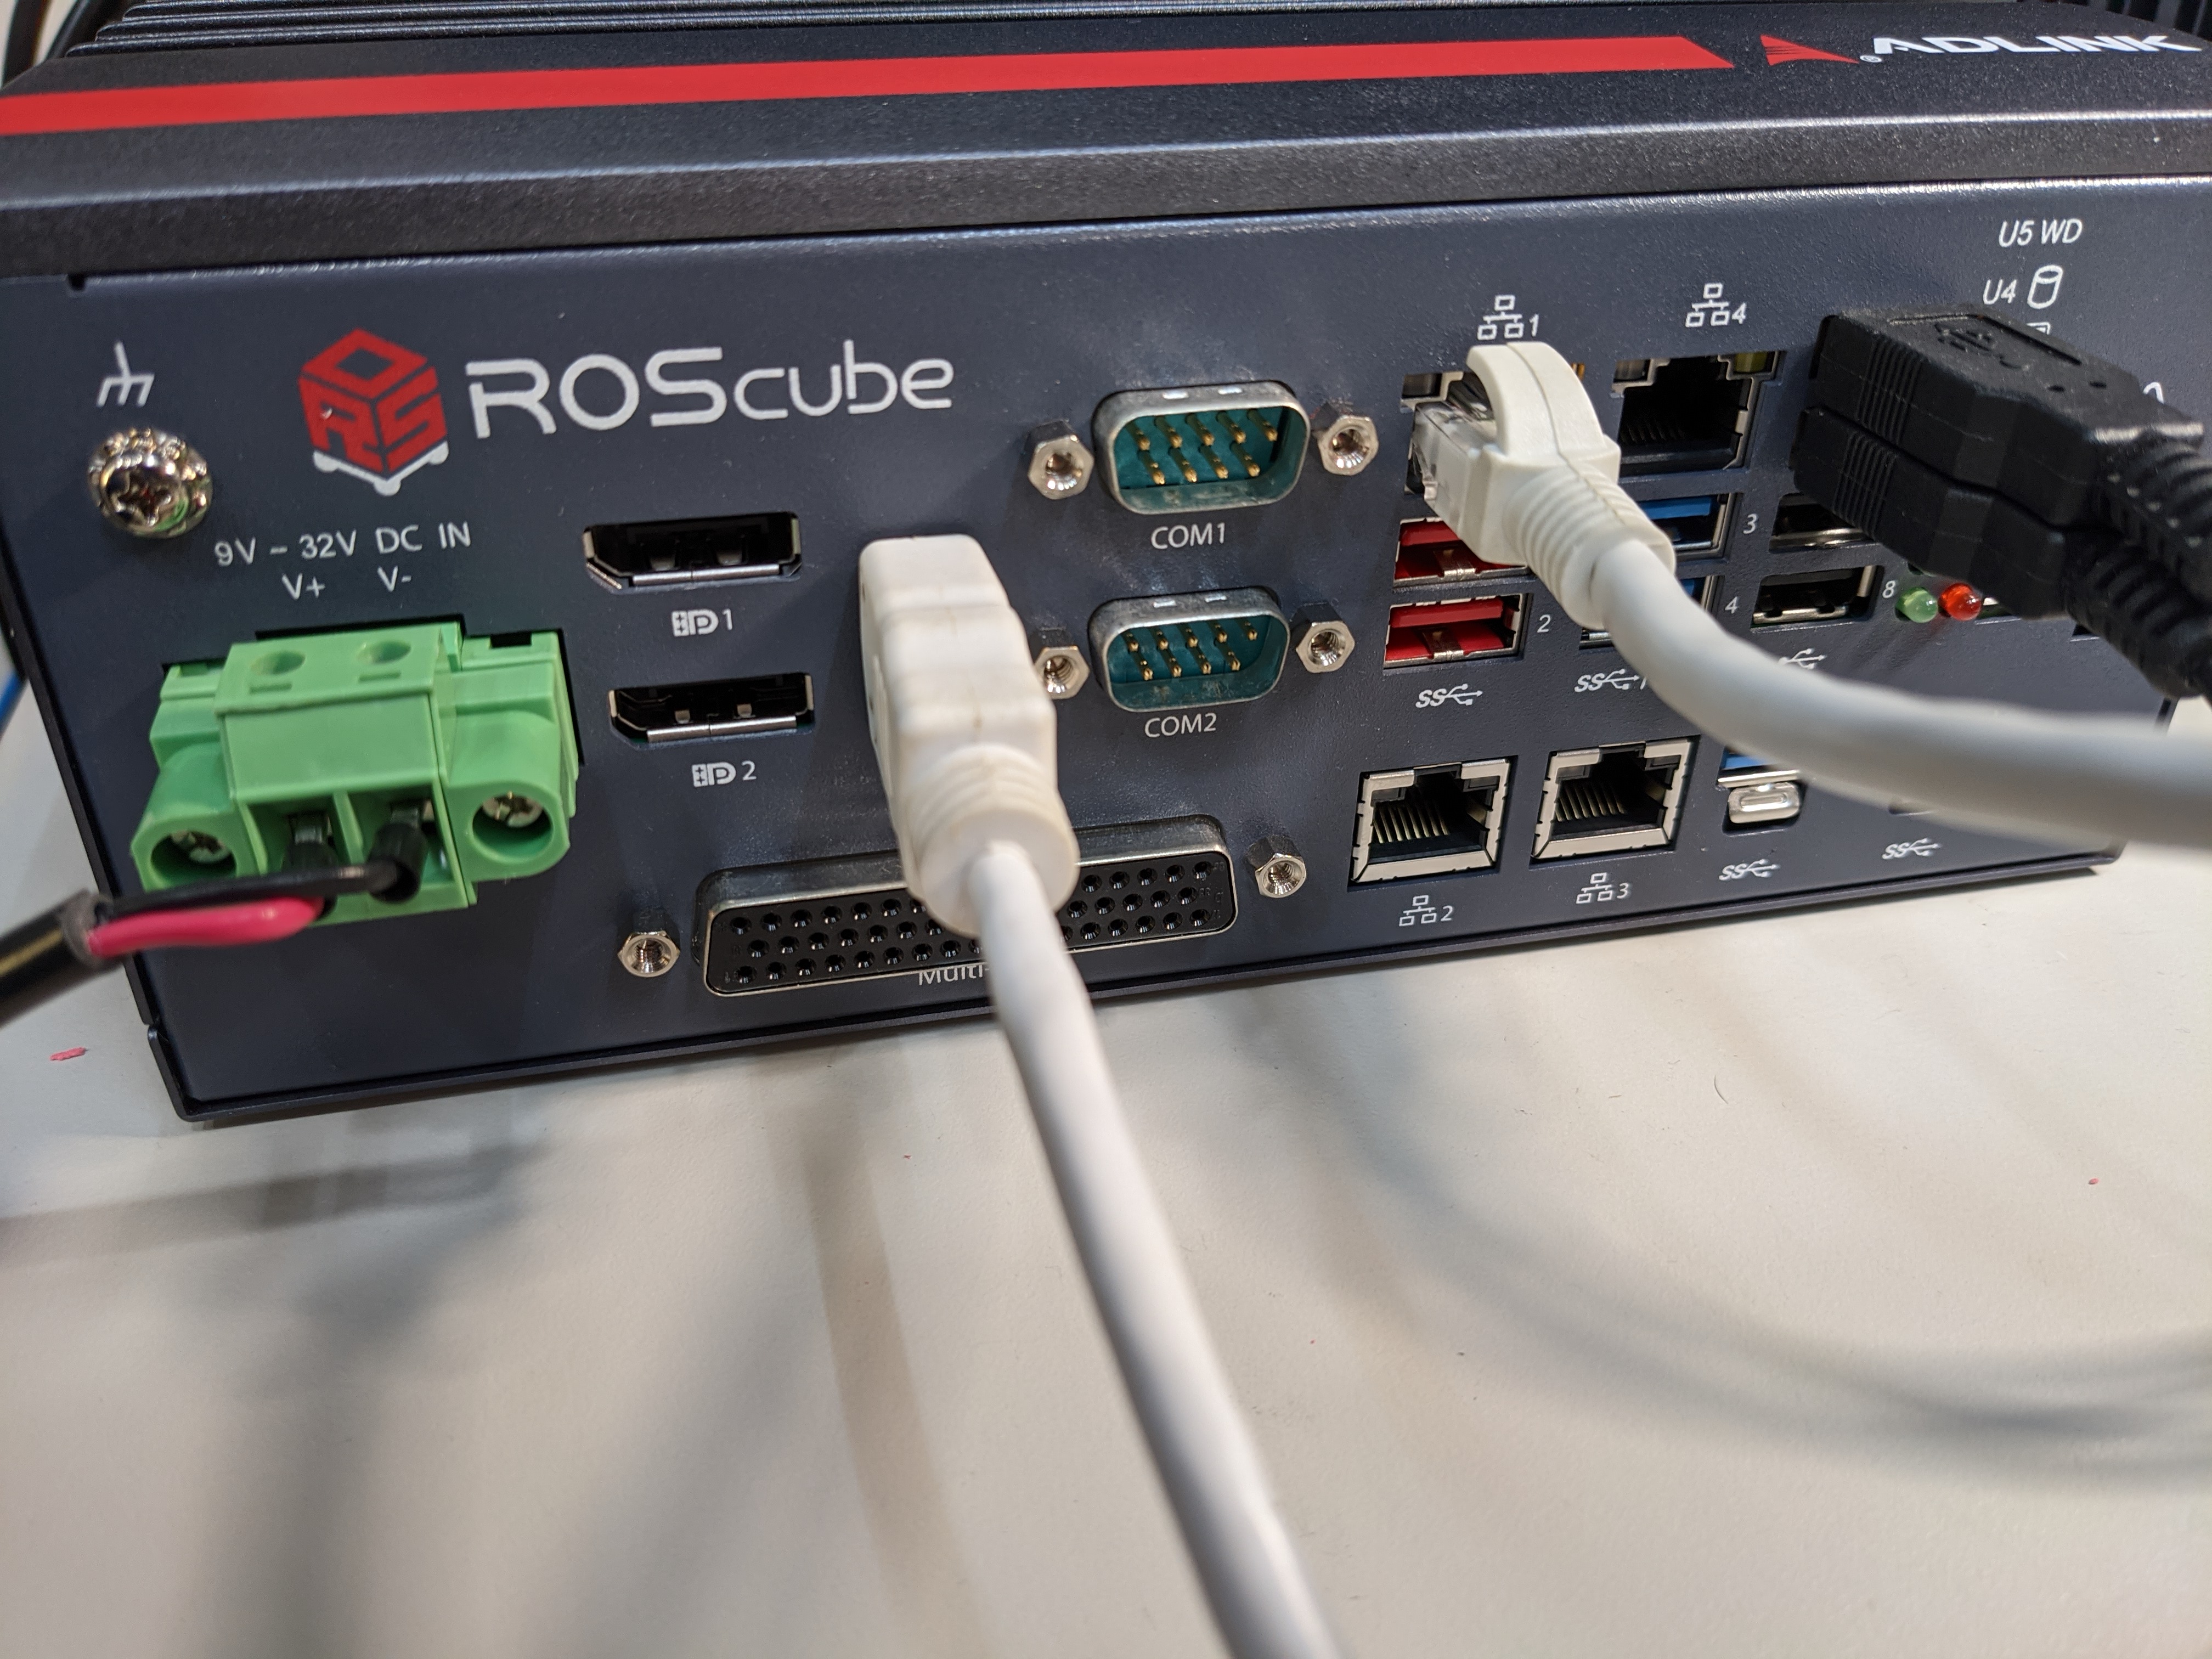
Connect the ROScube-I as shown here:
HDMI for monitor.
Network on Ethernet port 1.
Keyboard and mouse on USB.
Install Ubuntu 18.04 on ROScube-I.
Modify the following BIOS settings.
Hyper-threading
Advanced -> CPU Configuration
Disabled
Intel (VMX) Virtualization
Advanced -> CPU Configuration
Enabled
Intel(R) SpeedStep(tm)
Advanced -> CPU Configuration
Disabled
Intel(R) Speed Shift Technology
Advanced -> CPU configuration
Disabled
Turbo Mode
Advanced -> CPU configuration
Disabled
C States
Advanced -> CPU configuration
Disabled
VT-d
Chipset -> System Agent (SA) Configuration
Enabled
DVMT-Pre Allocated
Chipset -> System Agent (SA) Configuration -> Graphics Configuration
64M
Install ACRN Hypervisor
Set Up Environment
Open
/etc/default/grub/and addidle=nomwait intel_pstate=disableto the end ofGRUB_CMDLINE_LINUX_DEFAULT.
Update GRUB and then reboot.
sudo update-grub
sudo reboot
Install the necessary libraries:
sudo apt update
sudo apt install -y gcc \
    git \
    make \
    vim \
    libssl-dev \
    libpciaccess-dev \
    uuid-dev \
    libsystemd-dev \
    libevent-dev \
    libxml2-dev \
    libxml2-utils \
    libusb-1.0-0-dev \
    python3 \
    python3-pip \
    libblkid-dev \
    e2fslibs-dev \
    pkg-config \
    libnuma-dev \
    liblz4-tool \
    flex \
    bison \
    xsltproc \
    clang-format \
    bc
sudo pip3 install lxml xmlschema defusedxml
Install the iASL compiler/disassembler used for advanced power management, device discovery, and configuration (ACPI) within the host OS:
cd /tmp
wget https://acpica.org/sites/acpica/files/acpica-unix-20210105.tar.gz
tar zxvf acpica-unix-20210105.tar.gz
cd acpica-unix-20210105
make clean && make iasl
sudo cp ./generate/unix/bin/iasl /usr/sbin/
Get code from GitHub.
mkdir ~/acrn && cd ~/acrn
git clone https://github.com/projectacrn/acrn-hypervisor -b release_2.5
cd acrn-hypervisor
Configure Hypervisor
Parse system information.
sudo apt install -y cpuid msr-tools
cd ~/acrn/acrn-hypervisor/misc/config_tools/board_inspector/
sudo python3 cli.py ros-cube-cfl
cp ~/acrn/acrn-hypervisor/misc/config_tools/board_inspector/ros-cube-cfl.xml \
  ~/acrn/acrn-hypervisor/misc/config_tools/data/
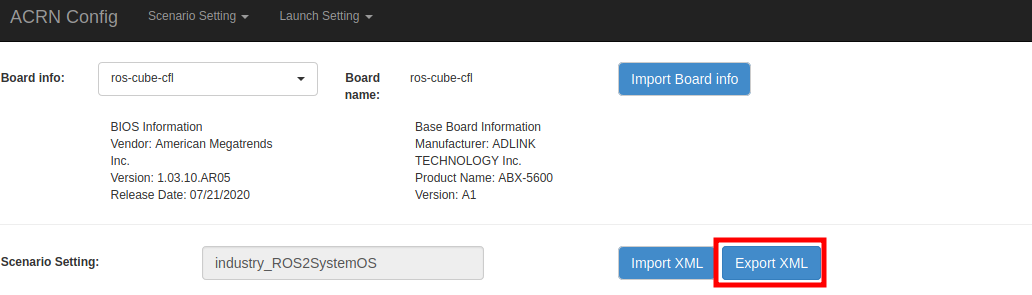
Run ACRN configuration app and it will open a browser page.
cd ~/acrn/acrn-hypervisor/misc/config_tools/config_app
sudo pip3 install -r requirements
python3 app.py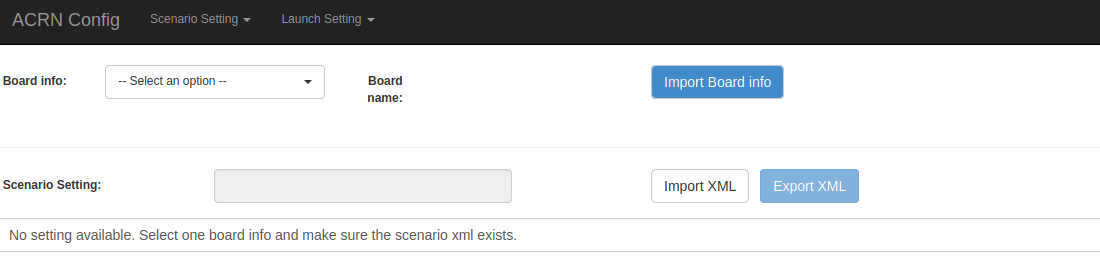
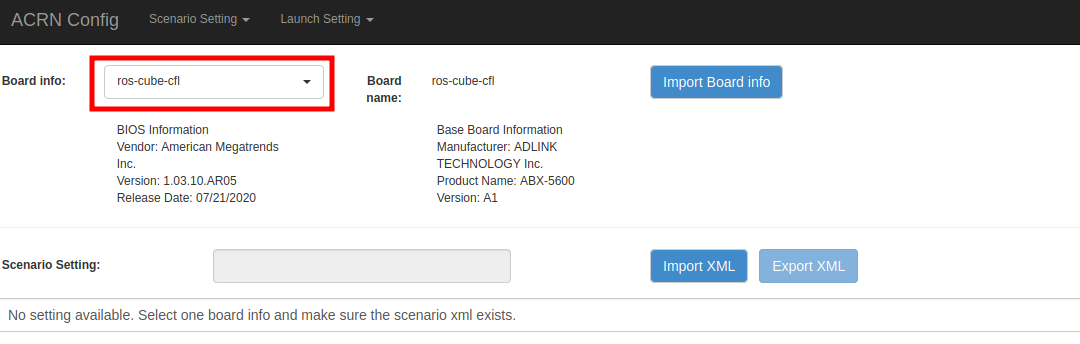
Select “Import Board info”.
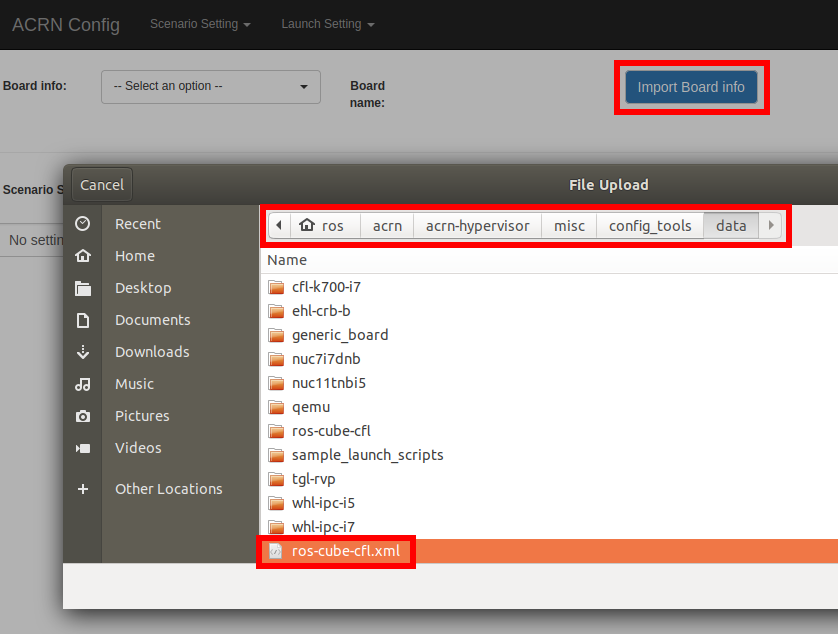
Select target board name.
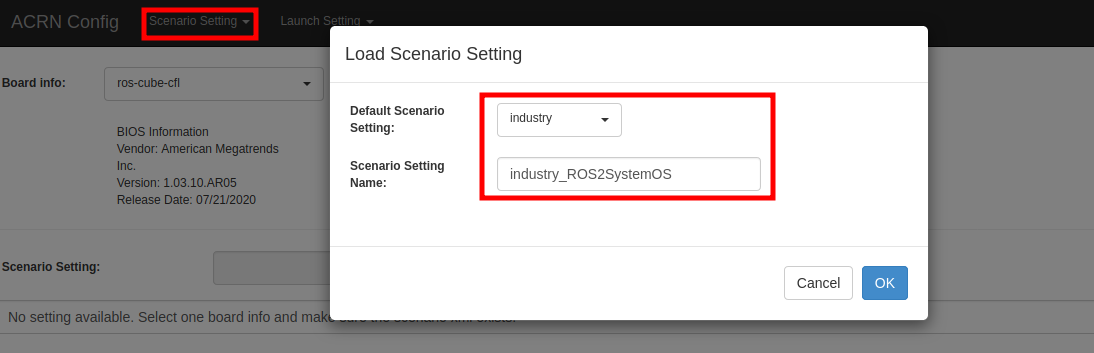
Select “Scenario Setting” and choose “Load a default scenario”.
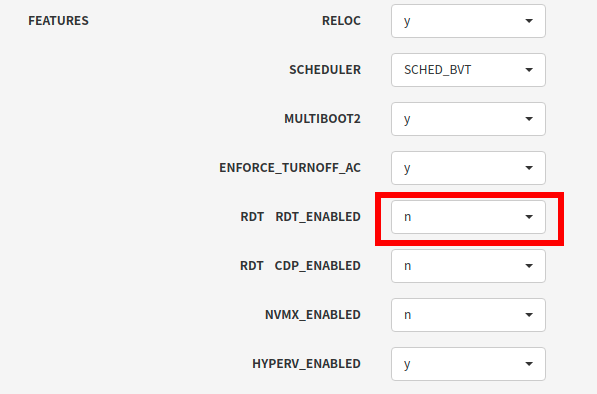
Settings “Features”: “RDT_ENABLED” option must be “n”.
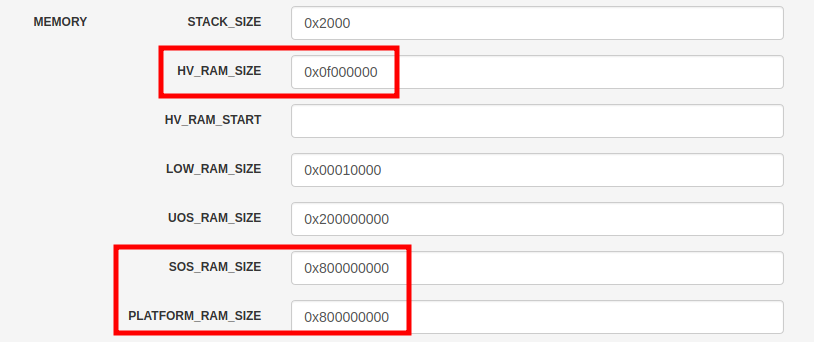
Settings “HV”: You can ignore this if your RAM is <= 16GB.
Settings “VM0”: Select the hard disk currently used. If you system need some special bootargs (like
video=eDP-1:d), you can add it below.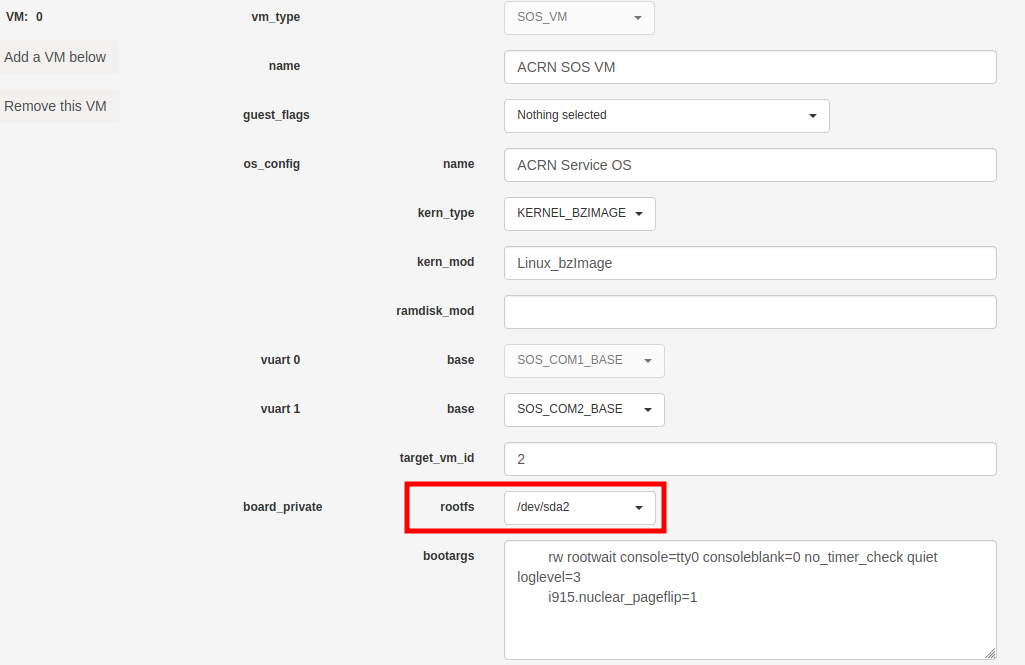
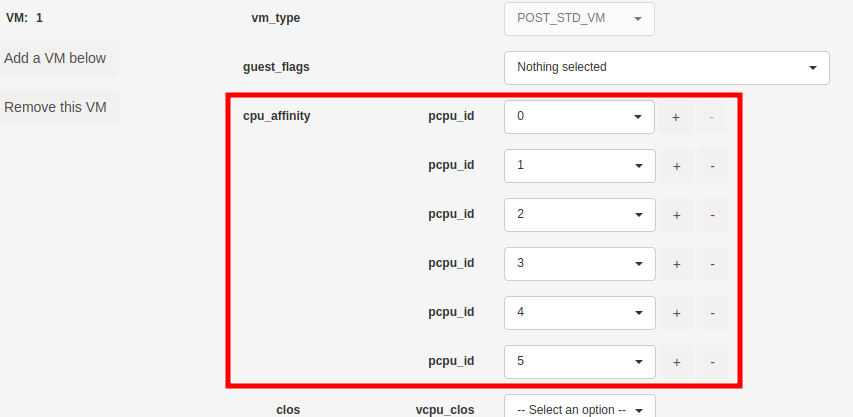
Settings “VM1”: Enable all the cpu_affinity. You can press + to increase CPU ID. This doesn’t mean to attach all CPUs to the VM. The CPU number can be adjusted later.
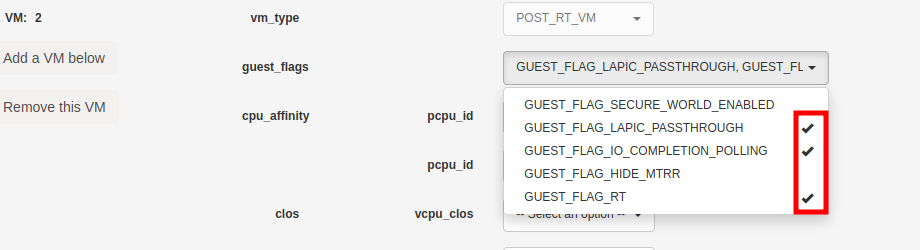
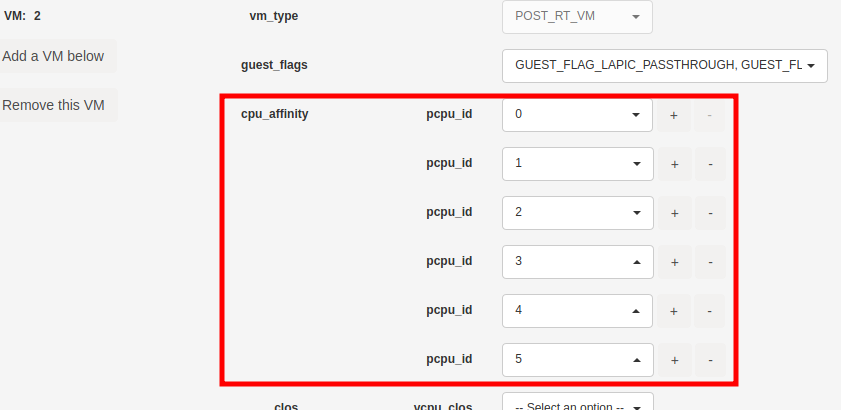
Settings “VM2”: Set up RT flags and enable all the cpu_affinity.
Export XML.

Close the browser and stop the process (Ctrl+C).
Optional: Patch the hypervisor if you want to passthrough GPIO to VM.
cd ~/acrn/acrn-hypervisor
wget https://raw.githubusercontent.com/Adlink-ROS/ROScube_ACRN_guide/v2.1/patch/0001-Fix-ROScube-I-gpio-pin-assignment-table.patch
git apply 0001-Fix-ROScube-I-gpio-pin-assignment-table.patch
Build hypervisor
cd ~/acrn/acrn-hypervisor
cp misc/config_tools/data/ros-cube-cfl.xml \
   misc/config_tools/data/ros-cube-cfl/ros-cube-cfl.xml
make all \
   BOARD_FILE=misc/config_tools/data/ros-cube-cfl/ros-cube-cfl.xml \
   SCENARIO_FILE=misc/config_tools/data/ros-cube-cfl/user_defined/industry_ROS2SystemOS.xml \
   RELEASE=0
Install hypervisor
sudo make install
sudo mkdir /boot/acrn
sudo cp ~/acrn/acrn-hypervisor/build/hypervisor/acrn.bin /boot/acrn/
Install Service VM Kernel
Build Service VM Kernel
Get code from GitHub
cd ~/acrn
git clone https://github.com/projectacrn/acrn-kernel -b release_2.5
cd acrn-kernel
Restore default ACRN configuration.
cp kernel_config_uefi_sos .config
make olddefconfig
sed -ri '/CONFIG_LOCALVERSION=/s/=.+/="-ROS2SystemSOS"/g' .config
sed -i '/CONFIG_PINCTRL_CANNONLAKE/c\CONFIG_PINCTRL_CANNONLAKE=m' .config
Build Service VM kernel. It will take some time.
make all
Install kernel and module.
sudo make modules_install
sudo cp arch/x86/boot/bzImage /boot/acrn-ROS2SystemSOS
Update Grub
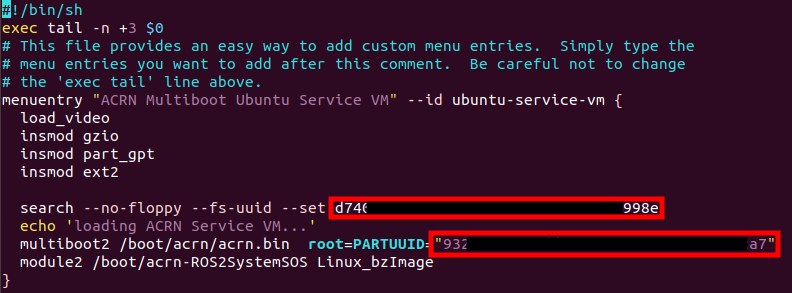
Get the UUID and PARTUUID.
sudo blkid /dev/sda*
Note
The UUID and PARTUUID we need should be
/dev/sda2, which isTYPE="ext4", as shown in the following graph:
Update
/etc/grub.d/40_customas below. Remember to edit<UUID>and<PARTUUID>to your system’s values.menuentry "ACRN Multiboot Ubuntu Service VM" --id ubuntu-service-vm { load_video insmod gzio insmod part_gpt insmod ext2 search --no-floppy --fs-uuid --set <UUID> echo 'loading ACRN Service VM...' multiboot2 /boot/acrn/acrn.bin root=PARTUUID="<PARTUUID>" module2 /boot/acrn-ROS2SystemSOS Linux_bzImage }
Update
/etc/default/grubto make GRUB menu visible and load Service VM as default.GRUB_DEFAULT=ubuntu-service-vm #GRUB_TIMEOUT_STYLE=hidden GRUB_TIMEOUT=5
Then update GRUB and reboot.
sudo update-grub
sudo reboot
ACRN Multiboot Ubuntu Service VMentry will be shown in the GRUB menu. Choose it to load ACRN. You can check that the installation is successful by usingdmesg.sudo dmesg | grep ACRN
Install User VM
Before Create User VM
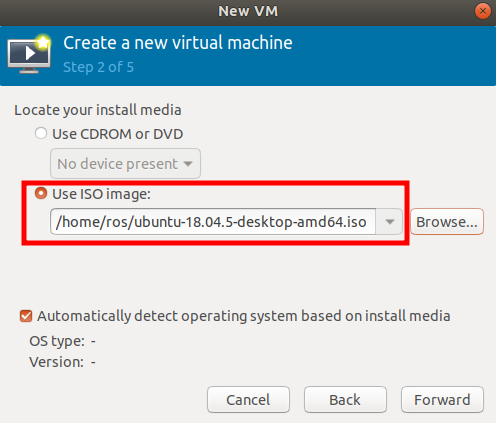
Download Ubuntu image (Here we use Ubuntu 18.04 LTS for example):
Install necessary packages.
sudo apt install qemu-kvm libvirt-clients libvirt-daemon-system \
  bridge-utils virt-manager ovmf
sudo reboot
Create User VM Image
Note
Reboot into the native Linux kernel (not the ACRN kernel) and create User VM image.
Start virtual machine manager application.
sudo virt-manager
Create a new virtual machine.
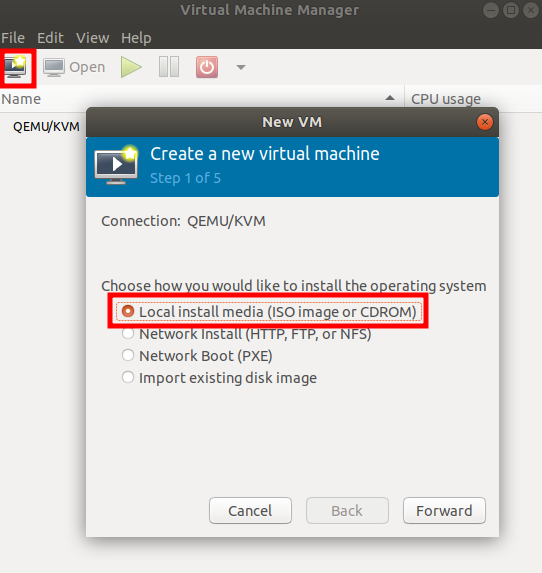
Select your ISO image path.
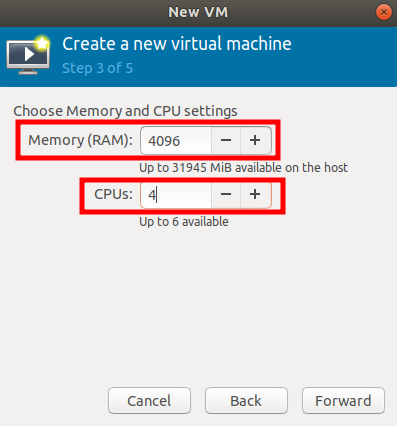
Select CPU and RAM for the VM. You can modify as high as you can to accelerate the installation time. The settings here are not related to the resource of the User VM on ACRN, which can be decided later.
Select disk size you want. Note that this can’t be modified after creating image!

Edit image name and select “Customize configuration before install”.
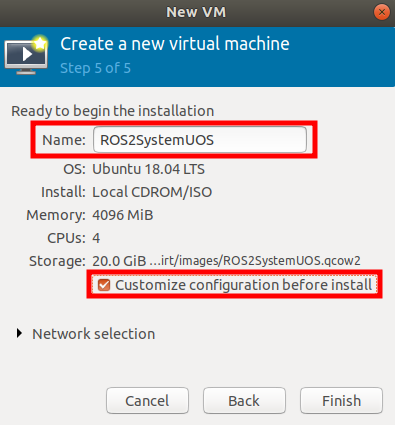
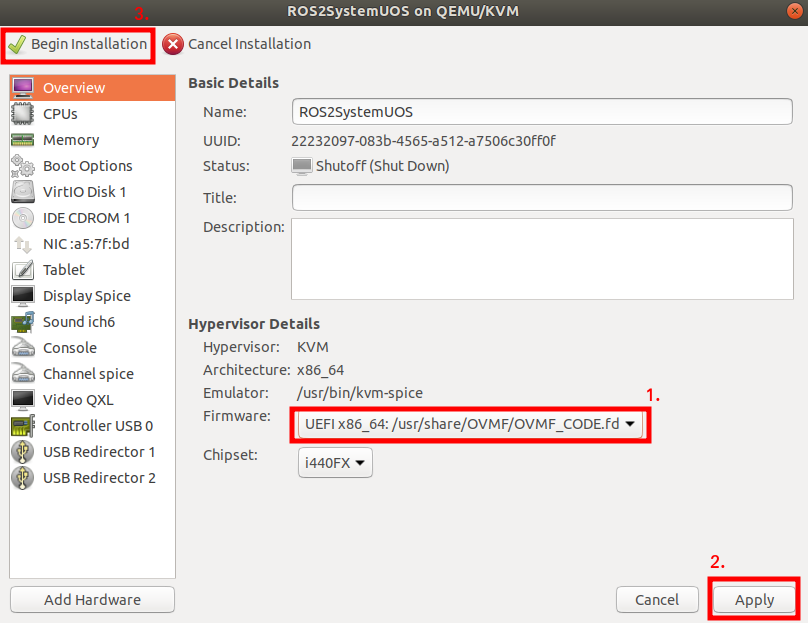
Select correct Firmware, apply it, and Begin Installation.
Now you’ll see the installation page of Ubuntu. After installing Ubuntu, you can also install some necessary packages, such as ssh, vim, and ROS 2. We’ll clone the image for real-time VM to save time.
To install ROS 2, refer to Installing ROS 2 via Debian Packages
Optional: Use ACRN kernel if you want to passthrough GPIO to User VM.
sudo apt install git build-essential bison flex libelf-dev libssl-dev liblz4-tool

# Clone code
git clone -b release_2.5 https://github.com/projectacrn/acrn-kernel
cd acrn-kernel

# Set up kernel config
cp kernel_config_uos .config
make olddefconfig
export ACRN_KERNEL_UOS=`make kernelversion`
export UOS="ROS2SystemUOS"
export BOOT_DEFAULT="${ACRN_KERNEL_UOS}-${UOS}"
sed -ri "/CONFIG_LOCALVERSION=/s/=.+/=\"-${UOS}\"/g" .config

# Build and install kernel and modules
make all
sudo make modules_install
sudo make install

# Update Grub
sudo sed -ri \
  "/GRUB_DEFAULT/s/=.+/=\"Advanced options for Ubuntu>Ubuntu, with Linux ${BOOT_DEFAULT}\"/g" \
  /etc/default/grub
sudo update-grub
When that completes, poweroff the VM.
sudo poweroff
Run User VM
Now back to the native machine to set up the environment for launching the User VM.
Convert KVM image file format.
mkdir -p ~/acrn/uosVM
cd ~/acrn/uosVM
sudo qemu-img convert -f qcow2 -O raw /var/lib/libvirt/images/ROS2SystemUOS.qcow2 ./ROS2SystemUOS.img
Prepare a Launch Script File.
wget https://raw.githubusercontent.com/Adlink-ROS/ROScube_ACRN_guide/v2.1/scripts/launch_ubuntu_uos.sh
chmod +x ./launch_ubuntu_uos.sh
Note
In different models of machines, you may need to modify this script to set which device you want to passthrough and the memory size of the virtual machine.
Set up network and reboot to take effect.
sudo apt install net-tools wget
mkdir -p ~/acrn/tools/
cd ~/acrn/tools
wget https://raw.githubusercontent.com/Adlink-ROS/ROScube_ACRN_guide/v2.1/scripts/acrn_bridge.sh
chmod +x ./acrn_bridge.sh
./acrn_bridge.sh
sudo reboot
Reboot to ACRN kernel and now you can launch the VM.
cd ~/acrn/uosVM
sudo ./launch_ubuntu_uos.sh
Install Real-Time VM
Copy Real-Time VM Image
Note
Reboot into the native Linux kernel (not the ACRN kernel) and create User VM image.
Clone real-time VM from User VM. (Right-click User VM and then clone)
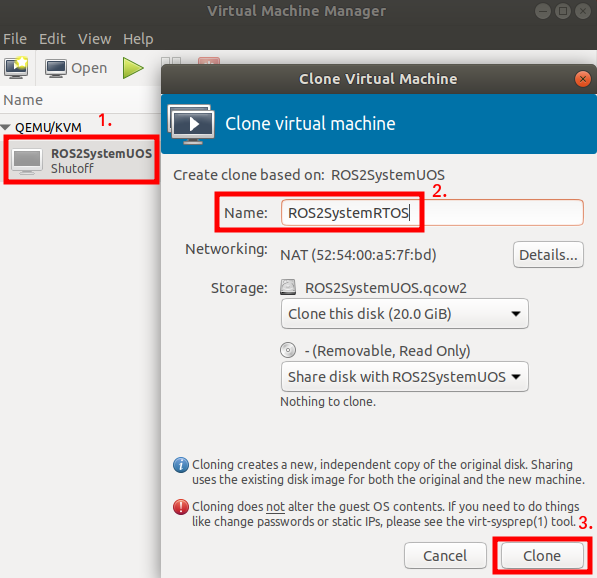
You’ll see the real-time VM is ready.
Set Up Real-Time VM
Note
The section will show you how to install Xenomai on ROScube-I. If help is needed, contact ADLINK for more information, or ask a question on the ACRN users mailing list
Run the VM and modify your VM hostname.
hostnamectl set-hostname ros-RTOS
Install Xenomai kernel.
# Install necessary packages
sudo apt install git build-essential bison flex kernel-package libelf-dev libssl-dev haveged

# Clone code from GitHub
git clone -b F/4.19.59/base/ipipe/xenomai_3.1 https://github.com/intel/linux-stable-xenomai

# Build
cd linux-stable-xenomai
cp arch/x86/configs/xenomai_test_defconfig .config
make olddefconfig
sed -i '/CONFIG_GPIO_VIRTIO/c\CONFIG_GPIO_VIRTIO=m' .config
CONCURRENCY_LEVEL=$(nproc) make-kpkg --rootcmd fakeroot --initrd kernel_image kernel_headers

# Install
sudo dpkg -i ../linux-headers-4.19.59-xenomai+_4.19.59-xenomai+-10.00.Custom_amd64.deb \
  ../linux-image-4.19.59-xenomai+_4.19.59-xenomai+-10.00.Custom_amd64.deb
Install Xenomai library and tools. For more details, refer to Xenomai Official Documentation.
cd ~
wget https://xenomai.org/downloads/xenomai/stable/xenomai-3.1.tar.bz2
tar xf xenomai-3.1.tar.bz2
cd xenomai-3.1
./configure --with-core=cobalt --enable-smp --enable-pshared
make -j`nproc`
sudo make install
Allow non-root user to run Xenomai.
sudo addgroup xenomai --gid 1234
sudo addgroup root xenomai
sudo usermod -a -G xenomai $USER
Update
/etc/default/grub.GRUB_DEFAULT="Advanced options for Ubuntu>Ubuntu, with Linux 4.19.59-xenomai+" #GRUB_TIMEOUT_STYLE=hidden GRUB_TIMEOUT=5 ... GRUB_CMDLINE_LINUX="xenomai.allowed_group=1234"
Update GRUB.
sudo update-grub
Poweroff the VM.
sudo poweroff
Run Real-Time VM
Now back to the native machine and we’ll set up the environment for launching the real-time VM.
Convert KVM image file format.
mkdir -p ~/acrn/rtosVM
cd ~/acrn/rtosVM
sudo qemu-img convert -f qcow2 \
  -O raw /var/lib/libvirt/images/ROS2SystemRTOS.qcow2 \
  ./ROS2SystemRTOS.img
Create a new launch file
wget https://raw.githubusercontent.com/Adlink-ROS/ROScube_ACRN_guide/v2.1/scripts/launch_ubuntu_rtos.sh
chmod +x ./launch_ubuntu_rtos.sh
Note
In different models of machines, you may need to modify this script to set which device you want to passthrough and the memory size of the virtual machine.
Reboot to ACRN kernel and now you can launch the VM.
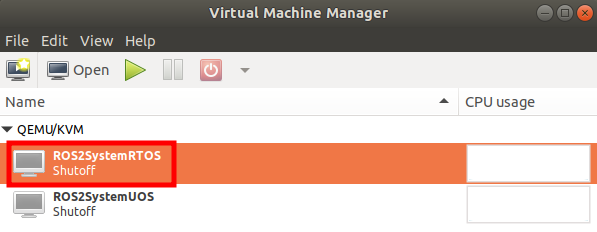
cd ~/acrn/rtosVM
sudo ./launch_ubuntu_rtos.sh
Note
Use poweroff instead of reboot in the real-time VM.
In ACRN design, rebooting the real-time VM will also reboot the whole
system.
Customizing the Launch File
The launch file in this tutorial has the following hardware resource allocation.
Resource |
Service VM |
User VM |
Real-time VM |
|---|---|---|---|
CPU |
0 |
1,2,3 |
4,5 |
Memory |
Remaining |
8 GB |
2 GB |
Ethernet |
Ethernet 1 & 2 |
Ethernet 3 |
Ethernet 4 |
USB |
Remaining |
1-2 |
1-1 |
You can modify the launch file for your own hardware resource allocation. We’ll provide some modification methods below. For more detail, see Device Model Parameters.
CPU
Modify the --cpu-affinity value in the command acrn-dm command.
The number should be between 0 and max CPU ID.
For example, if you want to run VM with core 1 and 2, use --cpu-affinity 1,2.
Memory
Modify the mem_size in launch file. This variable will be passed to
acrn-dm. The possible values are 1024M, 2048M, 4096M, and 8192M.
Ethernet
Run lspci -Dnn | grep "Ethernet controller" to get the ID of Ethernet port.

You’ll see 4 IDs, one for each Ethernet port. Assign the ID of the port you want to passthrough in the launch file. For example, if we want to passthrough Ethernet 3 to the VM:
passthru_vpid=(
["ethernet"]="8086 1539"
)
passthru_bdf=(
["ethernet"]="0000:04:00.0"
)

# Passthrough ETHERNET
echo ${passthru_vpid["ethernet"]} > /sys/bus/pci/drivers/pci-stub/new_id
echo ${passthru_bdf["ethernet"]} > /sys/bus/pci/devices/${passthru_bdf["ethernet"]}/driver/unbind
echo ${passthru_bdf["ethernet"]} > /sys/bus/pci/drivers/pci-stub/bind

acrn-dm
⋮
-s 4,passthru,04/00/0 \
⋮
USB
To passthrough USB to VM, we need to know the ID for each USB first.
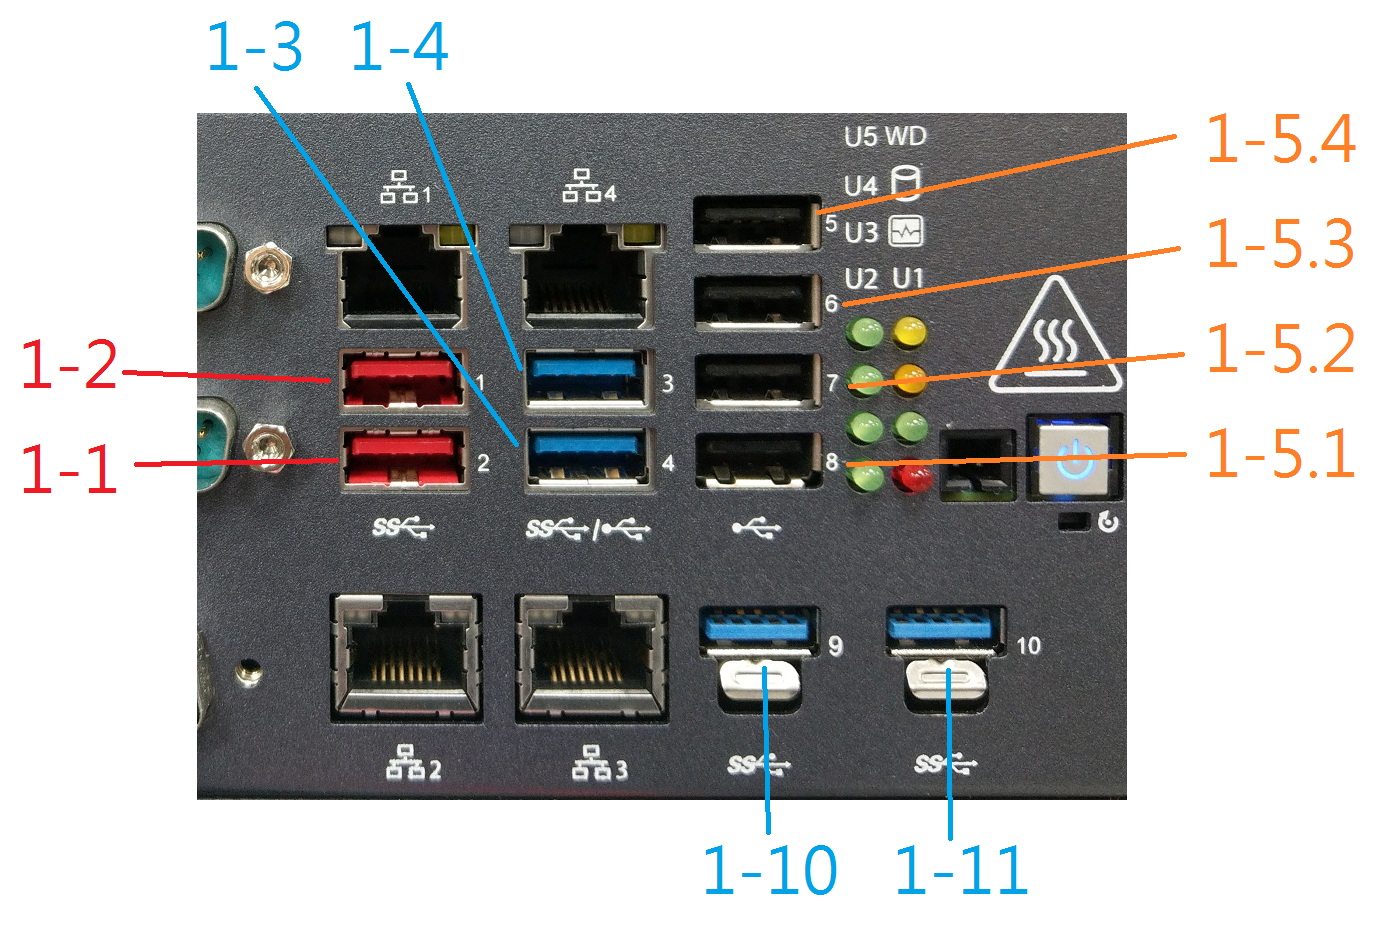
Then modify the launch file and add the USB ID. For example, if you want to passthrough USB 1-2 and 1-4.
acrn-dm
⋮
-s 8,xhci,1-2,1-4 \
⋮
GPIO
This is the PIN definition of ROScube-I.
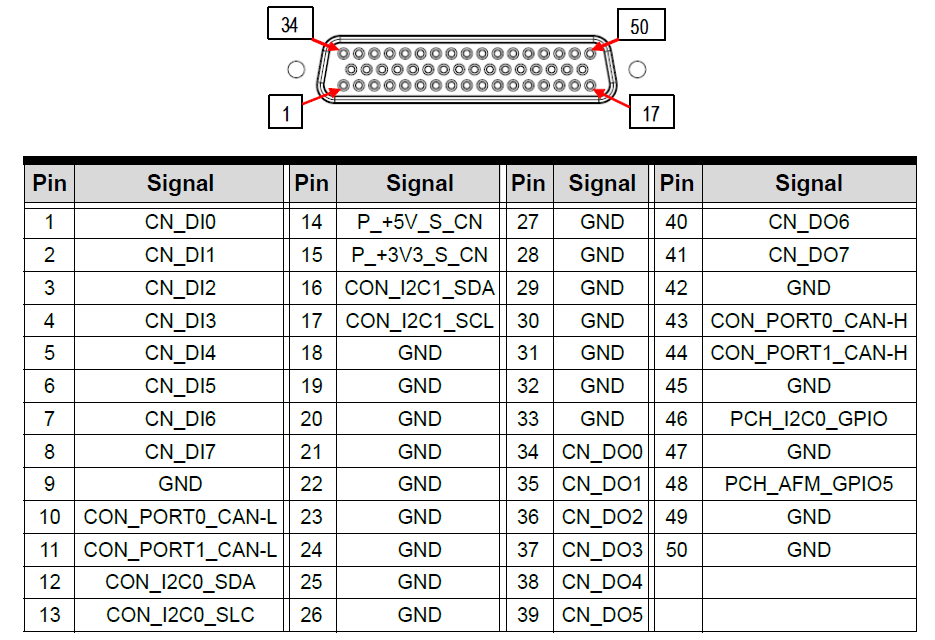
To pass GPIO to VM, you need to add the following section.
acrn-dm
⋮
-s X,virtio-gpio,@gpiochip0{<offset>=<alias_name>:<offset>=<alias_name>: ... :} \
⋮
The offset and pin mapping is as shown here:
Fn |
GPIO Pin |
In Chip Offset |
DI0 |
GPIO220 |
72 |
DI1 |
GPIO221 |
73 |
DI2 |
GPIO222 |
74 |
DI3 |
GPIO223 |
75 |
DI4 |
GPIO224 |
76 |
DI5 |
GPIO225 |
77 |
DI6 |
GPIO226 |
78 |
DI7 |
GPIO227 |
79 |
DO0 |
GPIO253 |
105 |
DO1 |
GPIO254 |
106 |
DO2 |
GPIO255 |
107 |
DO3 |
GPIO256 |
108 |
DO4 |
GPIO257 |
109 |
DO5 |
GPIO258 |
110 |
DO6 |
GPIO259 |
111 |
DO7 |
GPIO260 |
112 |
For example, if you want to pass DI0 and DO0 to VM:
acrn-dm
⋮
-s X,virtio-gpio,@gpiochip0{72=gpi0:105=gpo0} \
⋮