Getting Started Guide
Introduction
This document describes the various steps to set up a system based on the following components:
ACRN: Industry scenario
Service VM OS: Ubuntu (running off the NVMe storage device)
Real-Time VM (RTVM) OS: Ubuntu modified to use a PREEMPT-RT kernel (running off the SATA storage device)
Post-launched User VM OS: Windows
Verified Version
Ubuntu version: 18.04
GCC version: 7.5
ACRN-hypervisor branch: release_2.5 (v2.5)
ACRN-Kernel (Service VM kernel): release_2.5 (v2.5)
RT kernel for Ubuntu User OS: 4.19/preempt-rt (4.19.72-rt25)
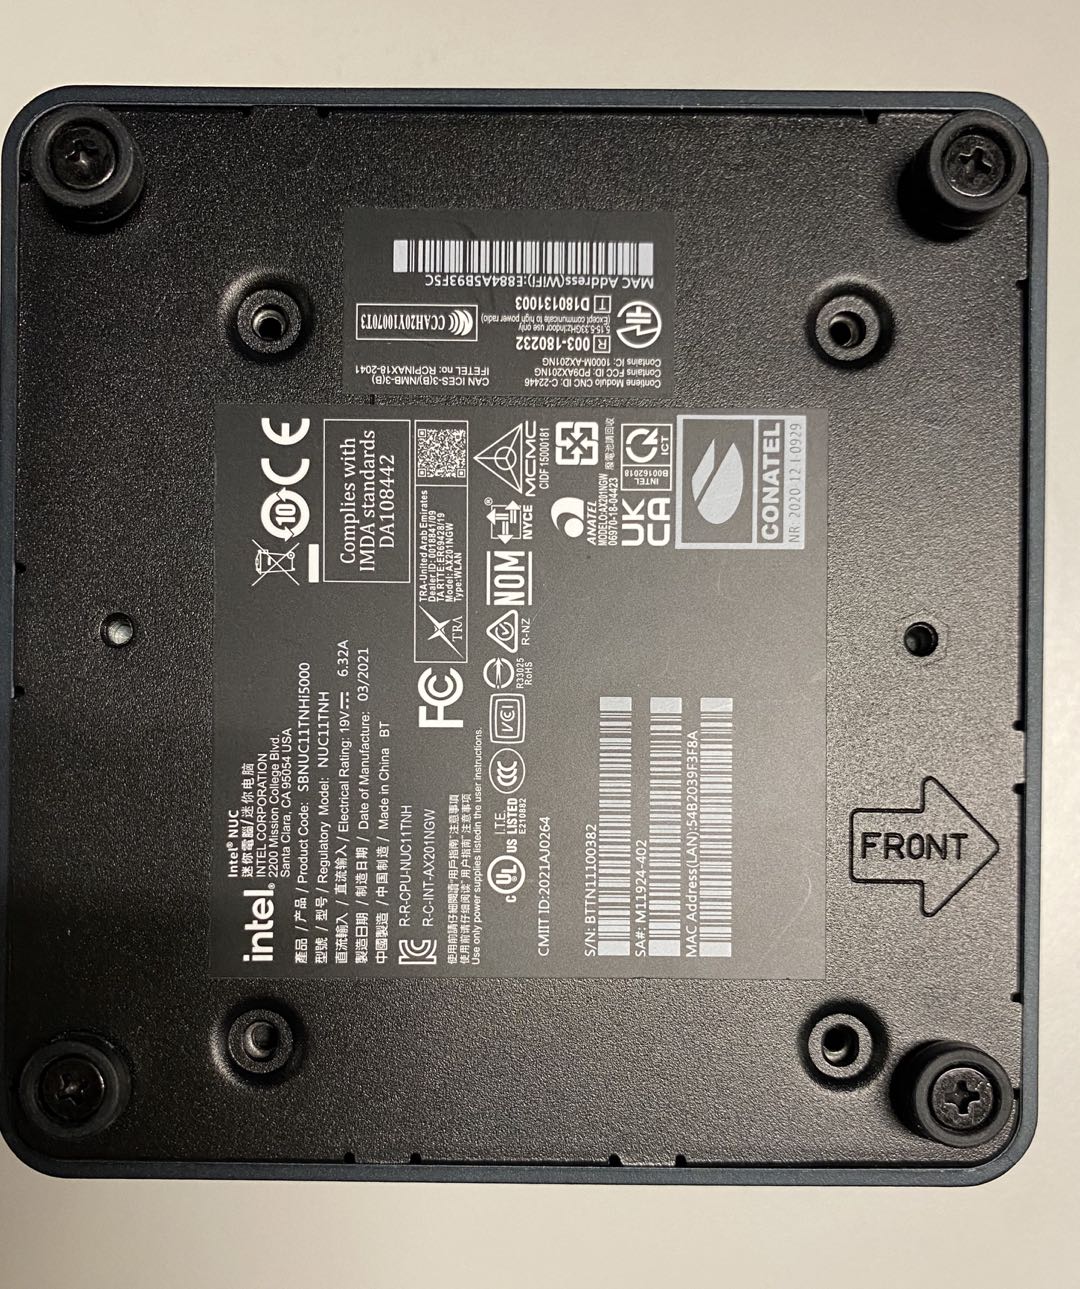
HW: Intel NUC 11 Pro Kit NUC11TNHi5 (NUC11TNHi5)
Note
This NUC is based on the
NUC11TNBi5 board.
The BOARD parameter that is used to build ACRN for this NUC is therefore nuc11tnbi5.
Prerequisites
VMX/VT-D are enabled and secure boot is disabled in the BIOS
Ubuntu 18.04 boot-able USB disk
Monitors with HDMI interface (DP interface is optional)
USB keyboard and mouse
Ethernet cables
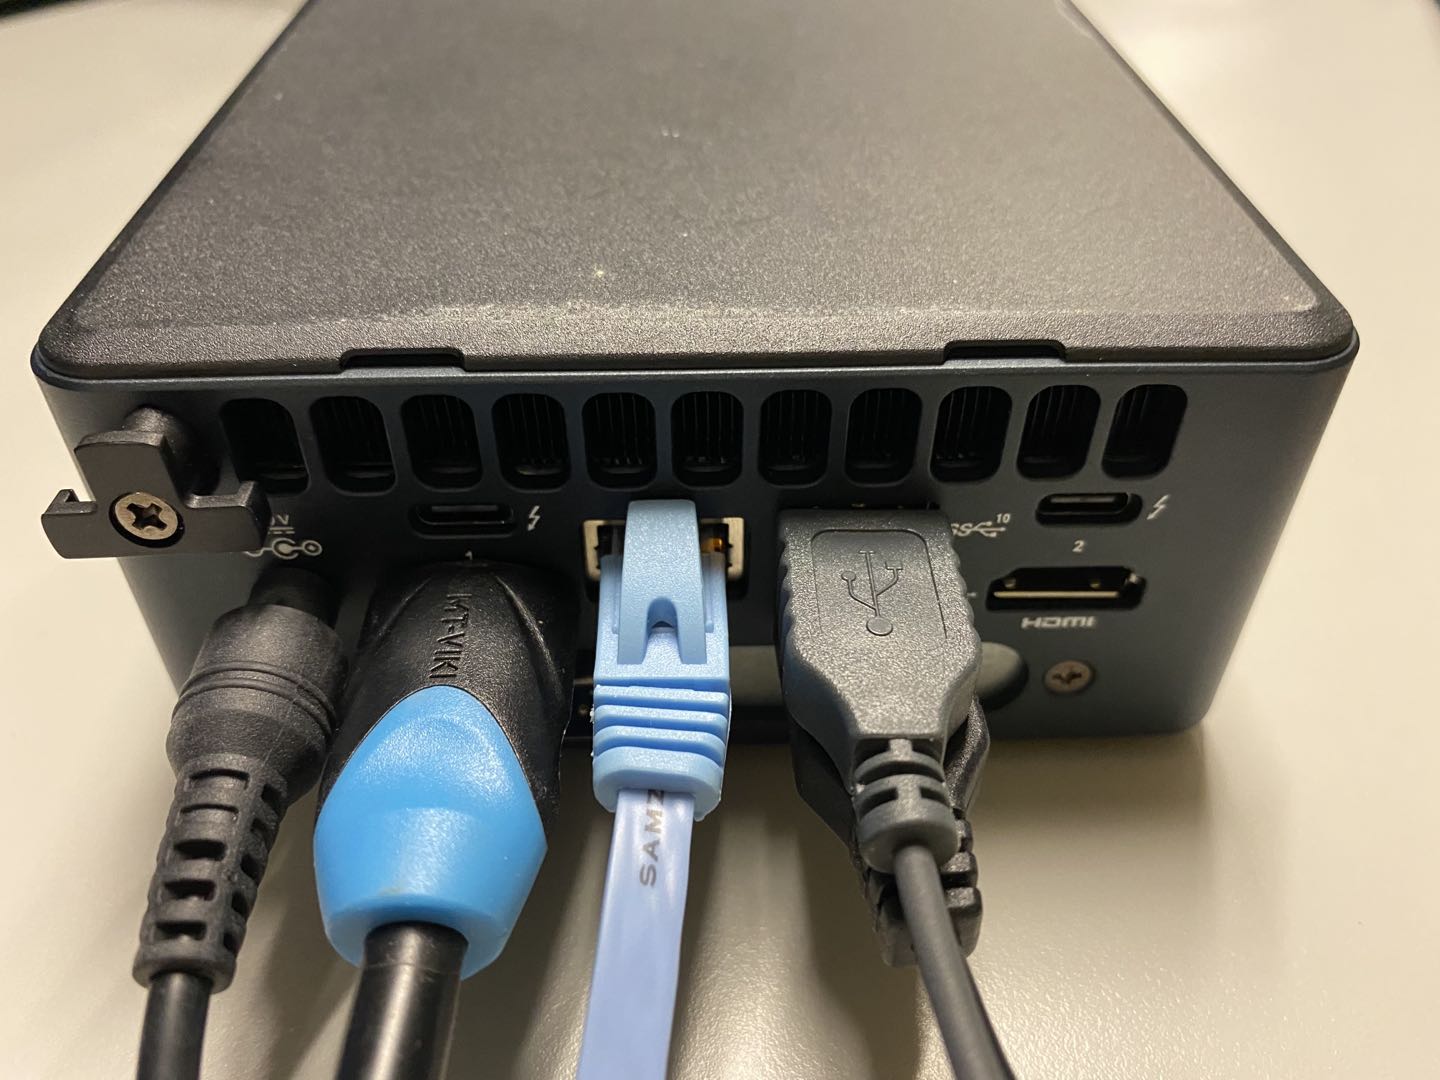
Hardware Connection
Connect the NUC11TNHi5 with the appropriate external devices.
Connect the NUC11TNHi5 NUC to a monitor via an HDMI cable.
Connect the mouse, keyboard, Ethernet cable, and power supply cable to the NUC11TNHi5 board.
Insert the Ubuntu 18.04 USB boot disk into the USB port.
Install the Ubuntu User VM (RTVM) on the SATA Disk
Note
The NUC11TNHi5 NUC contains both an NVMe and SATA disk. Before you install the Ubuntu User VM on the SATA disk, either remove the NVMe disk or delete its blocks.
Insert the Ubuntu USB boot disk into the NUC11TNHi5 machine.
Power on the machine, then press F10 to select the USB disk as the boot device. Select UEFI: SanDisk to boot using UEFI. Note that the label depends on the brand/make of the USB drive.
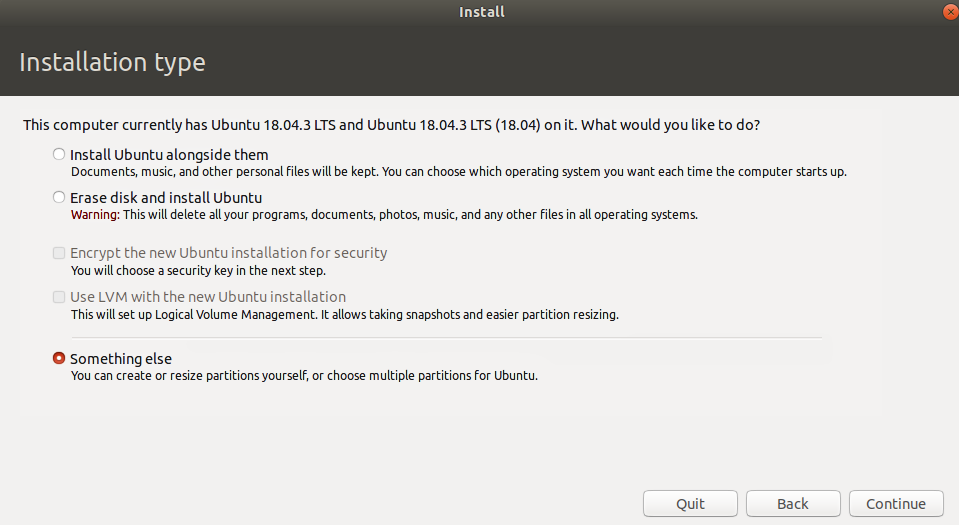
Install the Ubuntu OS.
Select Something else to create the partition.

Configure the
/dev/sdapartition. Refer to the diagram below: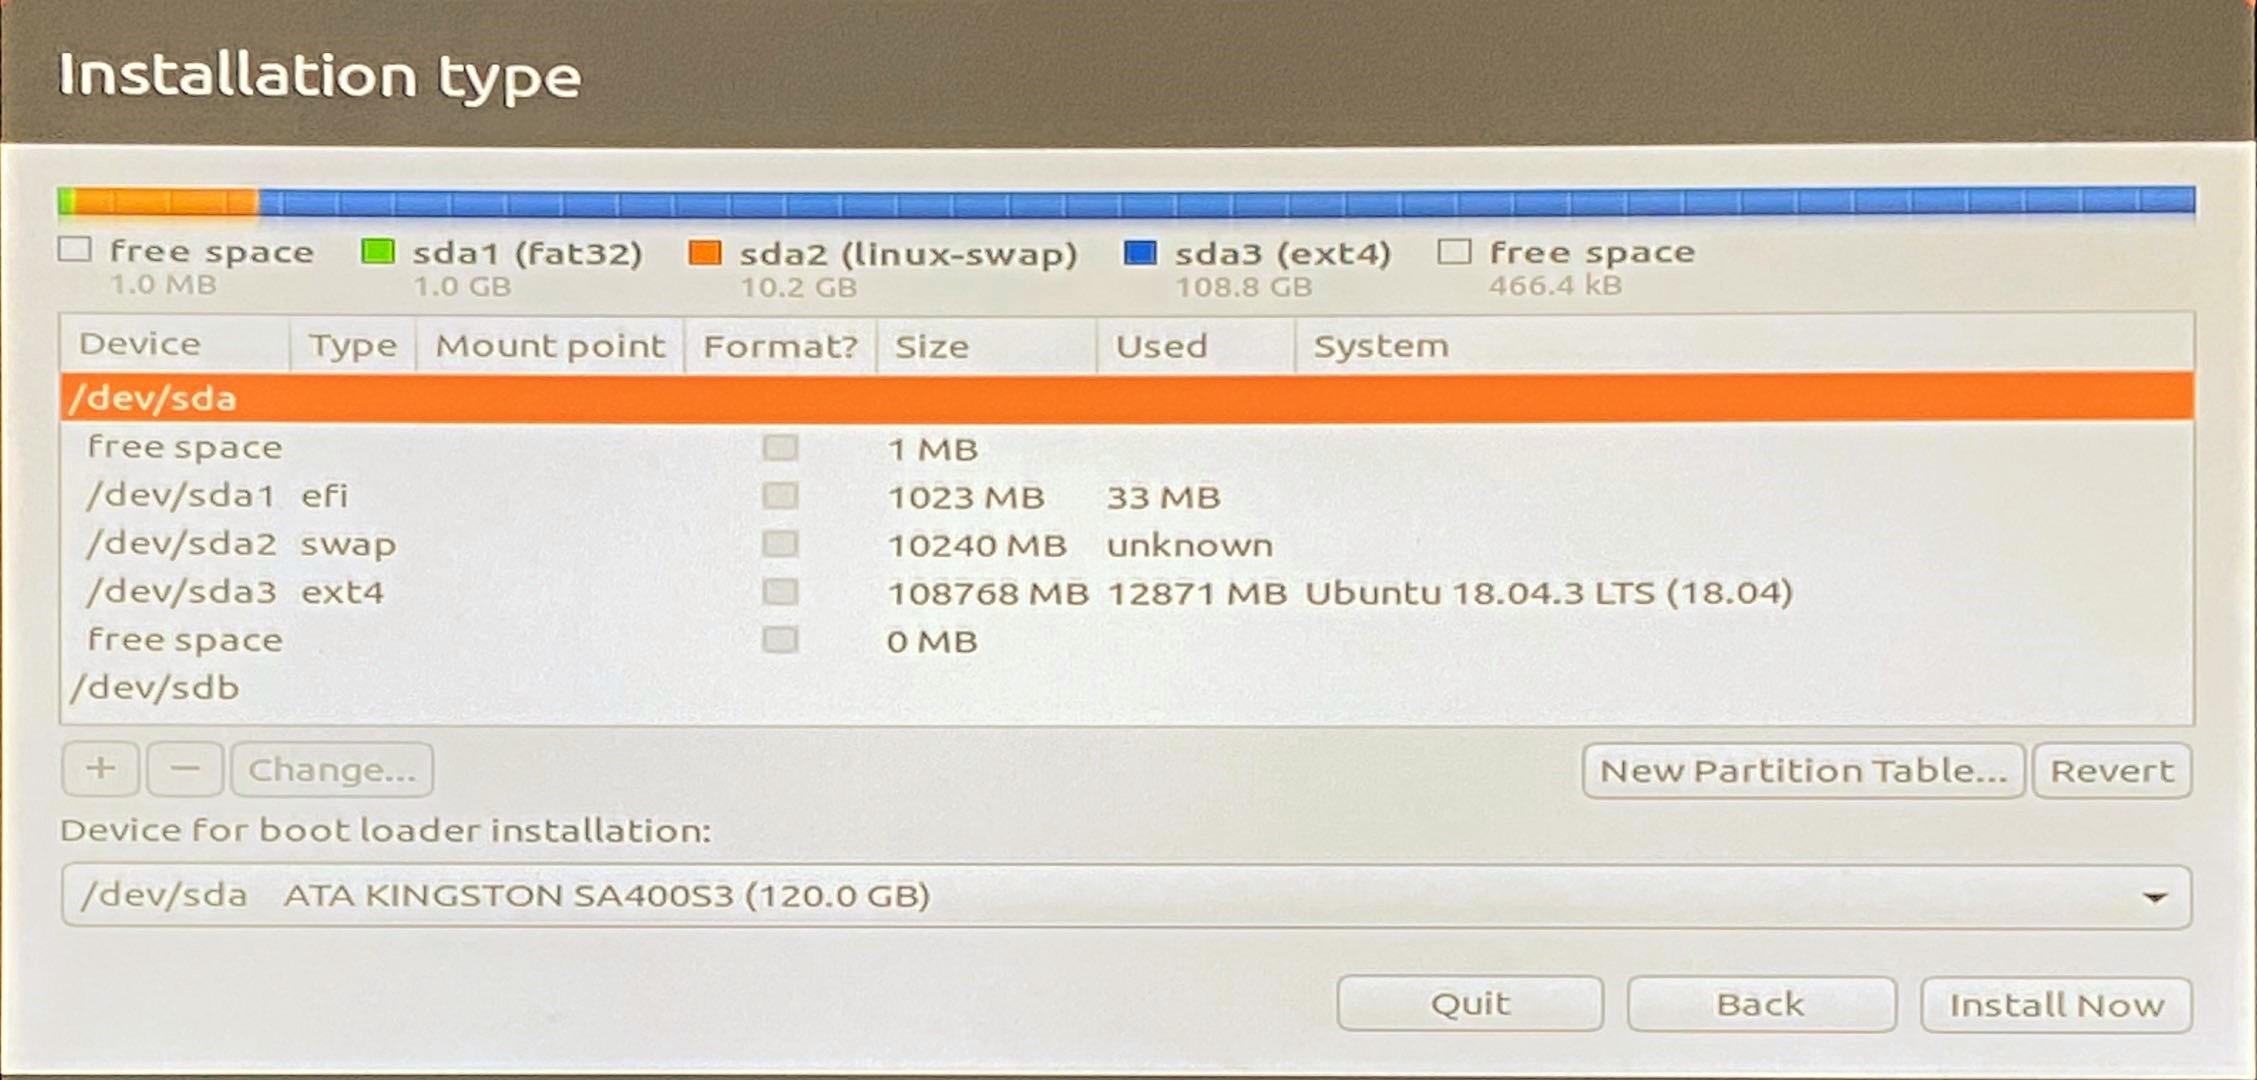
Select the
/dev/sdapartition, not/dev/nvme0p1.Select
/dev/sdaATA KINGSTON SA400S3 as the device for the bootloader installation. Note that the label depends on the SATA disk used.
Complete the Ubuntu installation on
/dev/sda.
This Ubuntu installation will be modified later (see Build and Install the RT kernel for the Ubuntu User VM) to turn it into a real-time User VM (RTVM).
Install the Ubuntu Service VM on the NVMe Disk
Note
Before you install the Ubuntu Service VM on the NVMe disk, please remove the SATA disk.
Insert the Ubuntu USB boot disk into the NUC11TNHi5 machine.
Power on the machine, then press F10 to select the USB disk as the boot device. Select UEFI: SanDisk to boot using UEFI. Note that the label depends on the brand/make of the USB drive.
Install the Ubuntu OS.
Select Something else to create the partition.
Configure the
/dev/nvme0n1partition. Refer to the diagram below: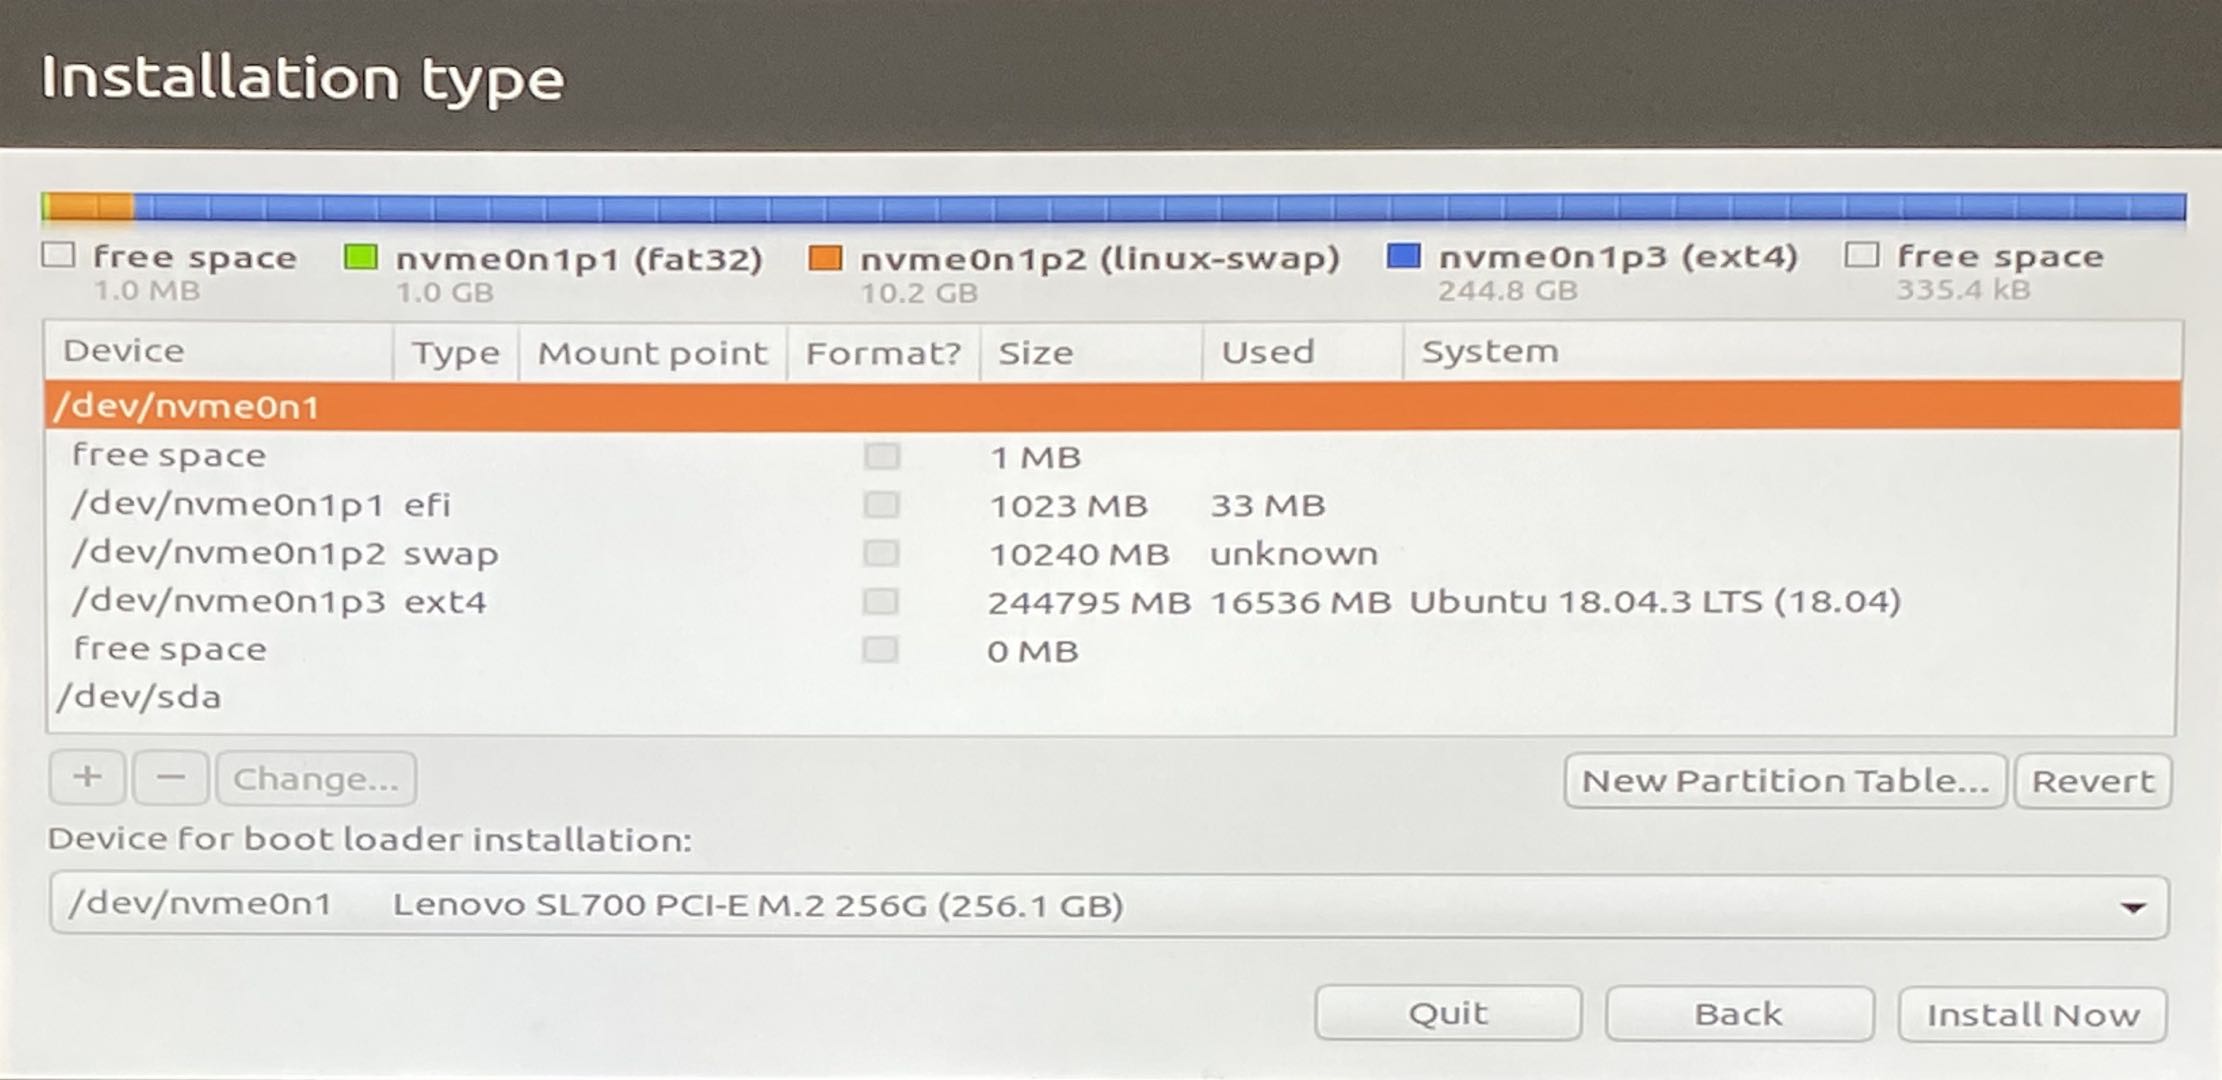
Select the
/dev/nvme0n1partition, not/dev/sda.Select
/dev/nvme0n1Lenovo SL700 PCI-E M.2 256G as the device for the bootloader installation. Note that the label depends on the NVMe disk used.
Complete the Ubuntu installation and reboot the system.
Note
Set
acrnas the username for the Ubuntu Service VM.
Build and Install ACRN on Ubuntu
Pre-Steps
Set the network configuration, proxy, etc.
Update Ubuntu:
$ sudo -E apt update
Create a work folder:
$ mkdir /home/acrn/work
Build the ACRN Hypervisor on Ubuntu
Install the necessary libraries:
$ sudo apt install gcc \
  git \
  make \
  libssl-dev \
  libpciaccess-dev \
  uuid-dev \
  libsystemd-dev \
  libevent-dev \
  libxml2-dev \
  libxml2-utils \
  libusb-1.0-0-dev \
  python3 \
  python3-pip \
  libblkid-dev \
  e2fslibs-dev \
  pkg-config \
  libnuma-dev \
  liblz4-tool \
  flex \
  bison \
  xsltproc \
  clang-format

$ sudo pip3 install lxml xmlschema
Starting with the ACRN v2.2 release, we use the
iasltool to compile an offline ACPI binary for pre-launched VMs while building ACRN, so we need to install theiasltool in the ACRN build environment.Follow these steps to install
iasl(and its dependencies) and then update theiaslbinary with a newer version not available in Ubuntu 18.04:$ cd /home/acrn/work $ wget https://acpica.org/sites/acpica/files/acpica-unix-20210105.tar.gz $ tar zxvf acpica-unix-20210105.tar.gz $ cd acpica-unix-20210105 $ make clean && make iasl $ sudo cp ./generate/unix/bin/iasl /usr/sbin/
Get the ACRN source code:
$ cd /home/acrn/work
$ git clone https://github.com/projectacrn/acrn-hypervisor
$ cd acrn-hypervisor
Switch to the v2.5 version:
$ git checkout v2.5
Build ACRN:
$ make BOARD=nuc11tnbi5 SCENARIO=industry
$ sudo make install
$ sudo mkdir -p /boot/acrn
$ sudo cp build/hypervisor/acrn.bin /boot/acrn/
Build and Install the ACRN Kernel
Build the Service VM kernel from the ACRN repo:
$ cd /home/acrn/work/
$ git clone https://github.com/projectacrn/acrn-kernel
$ cd acrn-kernel
Switch to the 5.4 kernel:
$ git checkout v2.5
$ cp kernel_config_uefi_sos .config
$ make olddefconfig
$ make all
Install the Service VM Kernel and Modules
$ sudo make modules_install
$ sudo cp arch/x86/boot/bzImage /boot/bzImage
Update Grub for the Ubuntu Service VM
Update the
/etc/grub.d/40_customfile as shown below.Note
Enter the command line for the kernel in
/etc/grub.d/40_customas a single line and not as multiple lines. Otherwise, the kernel will fail to boot.menuentry "ACRN Multiboot Ubuntu Service VM" --id ubuntu-service-vm { load_video insmod gzio insmod part_gpt insmod ext2 search --no-floppy --fs-uuid --set 9bd58889-add7-410c-bdb7-1fbc2af9b0e1 echo 'loading ACRN...' multiboot2 /boot/acrn/acrn.bin root=PARTUUID="e515916d-aac4-4439-aaa0-33231a9f4d83" module2 /boot/bzImage Linux_bzImage }Note
Update this to use the UUID (
--set) and PARTUUID (root=parameter) (or use the device node directly) of the root partition (e.g./dev/nvme0n1p2). Hint: usesudo blkid <device node>.Update the kernel name if you used a different name as the source for your Service VM kernel.
Add the
menuentryat the bottom of40_custom, keep theexec tailline at the top intact.Modify the
/etc/default/grubfile to make the Grub menu visible when booting and make it load the Service VM kernel by default. Modify the lines shown below:GRUB_DEFAULT=ubuntu-service-vm #GRUB_TIMEOUT_STYLE=hidden GRUB_TIMEOUT=5 GRUB_CMDLINE_LINUX="text"
Update Grub on your system:
$ sudo update-grub
Enable Network Sharing for the User VM
In the Ubuntu Service VM, enable network sharing for the User VM:
$ sudo systemctl enable systemd-networkd
$ sudo systemctl start systemd-networkd
Reboot the System
Reboot the system. You should see the Grub menu with the new ACRN ubuntu-service-vm entry. Select it and proceed to booting the platform. The system will start Ubuntu and you can now log in (as before).
To verify that the hypervisor is effectively running, check dmesg. The
typical output of a successful installation resembles the following:
$ dmesg | grep ACRN
[    0.000000] Hypervisor detected: ACRN
[    0.862942] ACRN HVLog: acrn_hvlog_init
Additional Settings in the Service VM
Build and Install the RT Kernel for the Ubuntu User VM
Follow these instructions to build the RT kernel.
Clone the RT kernel source code:
Note
This guide assumes you are doing this within the Service VM. This acrn-kernel repository was already cloned under
/home/acrn/workearlier on so you can justcdinto it and perform thegit checkoutdirectly.$ git clone https://github.com/projectacrn/acrn-kernel $ cd acrn-kernel $ git checkout origin/4.19/preempt-rt $ make mrproper
Note
The
make mrproperis to make sure there is no.configfile left from any previous build (e.g. the one for the Service VM kernel).Build the kernel:
$ cp x86-64_defconfig .config
$ make olddefconfig
$ make targz-pkg
Copy the kernel and modules:
$ sudo mount /dev/sda2 /mnt
$ sudo cp arch/x86/boot/bzImage /mnt/boot/
$ sudo tar -zxvf linux-4.19.72-rt25-x86.tar.gz -C /mnt/
$ sudo cd ~ && sudo umount /mnt && sync
Launch the RTVM
Grub in the Ubuntu User VM (RTVM) needs to be configured to use the new RT kernel that was just built and installed on the rootfs. Follow these steps to perform this operation.
Update the Grub File
Reboot into the Ubuntu User VM located on the SATA drive and log on.
Update the
/etc/grub.d/40_customfile as shown below.Note
Enter the command line for the kernel in
/etc/grub.d/40_customas a single line and not as multiple lines. Otherwise, the kernel will fail to boot.menuentry "ACRN Ubuntu User VM" --id ubuntu-user-vm { load_video insmod gzio insmod part_gpt insmod ext2 search --no-floppy --fs-uuid --set b2ae4879-c0b6-4144-9d28-d916b578f2eb echo 'loading ACRN...' linux /boot/bzImage root=PARTUUID=<UUID of rootfs partition> rw rootwait nohpet console=hvc0 console=ttyS0 no_timer_check ignore_loglevel log_buf_len=16M consoleblank=0 clocksource=tsc tsc=reliable x2apic_phys processor.max_cstate=0 intel_idle.max_cstate=0 intel_pstate=disable mce=ignore_ce audit=0 isolcpus=nohz,domain,1 nohz_full=1 rcu_nocbs=1 nosoftlockup idle=poll irqaffinity=0 }Note
Update this to use the UUID (
--set) and PARTUUID (root=parameter) (or use the device node directly) of the root partition (e.g./dev/sda2). Hint: use ``sudo blkid /dev/sda*.Update the kernel name if you used a different name as the source for your Service VM kernel.
Add the
menuentryat the bottom of40_custom, keep theexec tailline at the top intact.Modify the
/etc/default/grubfile to make the grub menu visible when booting and make it load the RT kernel by default. Modify the lines shown below:GRUB_DEFAULT=ubuntu-user-vm #GRUB_TIMEOUT_STYLE=hidden GRUB_TIMEOUT=5
Update Grub on your system:
$ sudo update-grub
Reboot into the Ubuntu Service VM
Launch the RTVM
$ sudo /usr/share/acrn/samples/nuc/launch_hard_rt_vm.sh
Note
If using a KBL NUC, the script must be adapted to match the BDF on the actual HW platform
Recommended Kernel Cmdline for RTVM
root=PARTUUID=<UUID of rootfs partition> rw rootwait nohpet console=hvc0 console=ttyS0 \
no_timer_check ignore_loglevel log_buf_len=16M consoleblank=0 \
clocksource=tsc tsc=reliable x2apic_phys processor.max_cstate=0 \
intel_idle.max_cstate=0 intel_pstate=disable mce=ignore_ce audit=0 \
isolcpus=nohz,domain,1 nohz_full=1 rcu_nocbs=1 nosoftlockup idle=poll \
irqaffinity=0
Configure RDT
In addition to setting the CAT configuration via HV commands, we allow developers to add CAT configurations to the VM config and configure automatically at the time of RTVM creation. Refer to Enable RDT Configuration for details on RDT configuration and RDT Allocation Feature Supported by Hypervisor for details on RDT high-level design.
Set Up the Core Allocation for the RTVM
In our recommended configuration, two cores are allocated to the RTVM: core 0 for housekeeping and core 1 for RT tasks. In order to achieve this, follow the below steps to allocate all housekeeping tasks to core 0:
Prepare the RTVM launch script
Follow the Passthrough a hard disk to RTVM section to make adjustments to the
/usr/share/acrn/samples/nuc/launch_hard_rt_vm.shlaunch script.Launch the RTVM:
$ sudo /usr/share/acrn/samples/nuc/launch_hard_rt_vm.sh
Log in to the RTVM as root and run the script as below:
#!/bin/bash
# Copyright (C) 2019 Intel Corporation.
# SPDX-License-Identifier: BSD-3-Clause
# Move all IRQs to core 0.
for i in `cat /proc/interrupts | grep '^ *[0-9]*[0-9]:' | awk {'print $1'} | sed 's/:$//' `;
do
    echo setting $i to affine for core zero
    echo 1 > /proc/irq/$i/smp_affinity
done

# Move all rcu tasks to core 0.
for i in `pgrep rcu`; do taskset -pc 0 $i; done

# Change real-time attribute of all rcu tasks to SCHED_OTHER and priority 0
for i in `pgrep rcu`; do chrt -v -o -p 0 $i; done

# Change real-time attribute of all tasks on core 1 to SCHED_OTHER and priority 0
for i in `pgrep /1`; do chrt -v -o -p 0 $i; done

# Change real-time attribute of all tasks to SCHED_OTHER and priority 0
for i in `ps -A -o pid`; do chrt -v -o -p 0 $i; done

echo disabling timer migration
echo 0 > /proc/sys/kernel/timer_migration
Note
Ignore the error messages that might appear while the script is running.
Run Cyclictest
Refer to the troubleshooting section below that discusses how to enable the network connection for RTVM.
Launch the RTVM and log in as root.
Install the
rt-teststool:sudo apt install rt-tests
Use the following command to start cyclictest:
sudo cyclictest -a 1 -p 80 -m -N -D 1h -q -H 30000 --histfile=test.log
Parameter descriptions:
- -a 1
to bind the RT task to core 1
- -p 80
to set the priority of the highest prio thread
- -m
lock current and future memory allocations
- -N
print results in ns instead of us (default us)
- -D 1h
to run for 1 hour, you can change it to other values
- -q
quiet mode; print a summary only on exit
- -H 30000 –histfile=test.log
dump the latency histogram to a local file
Launch the Windows VM
Follow this guide to prepare the Windows image file and then reboot.
Troubleshooting
Enabling the Network on the RTVM
If you need to access the internet, you must add the following command line
to the launch_hard_rt_vm.sh script before launching it:
acrn-dm -A -m $mem_size -s 0:0,hostbridge \
   --lapic_pt \
   --rtvm \
   --virtio_poll 1000000 \
   -U 495ae2e5-2603-4d64-af76-d4bc5a8ec0e5 \
   -s 2,passthru,00/17/0 \
   -s 3,virtio-console,@stdio:stdio_port \
   -s 8,virtio-net,tap0 \
   --ovmf /usr/share/acrn/bios/OVMF.fd \
   hard_rtvm
Passthrough a Hard Disk to RTVM
Use the
lspcicommand to ensure that the correct SATA device IDs will be used for the passthrough before launching the script:# lspci -nn | grep -i sata 00:17.0 SATA controller [0106]: Intel Corporation Device [8086:a0d3] (rev 20)
Modify the script to use the correct SATA device IDs and bus number:
# vim /usr/share/acrn/launch_hard_rt_vm.sh

passthru_vpid=(
["eth"]="8086 15f2"
["sata"]="8086 a0d3"
["nvme"]="126f 2263"
)
passthru_bdf=(
["eth"]="0000:58:00.0"
["sata"]="0000:00:17.0"
["nvme"]="0000:01:00.0"
)

# SATA pass-through
echo ${passthru_vpid["sata"]} > /sys/bus/pci/drivers/pci-stub/new_id
echo ${passthru_bdf["sata"]} > /sys/bus/pci/devices/${passthru_bdf["sata"]}/driver/unbind
echo ${passthru_bdf["sata"]} > /sys/bus/pci/drivers/pci-stub/bind

# NVME pass-through
#echo ${passthru_vpid["nvme"]} > /sys/bus/pci/drivers/pci-stub/new_id
#echo ${passthru_bdf["nvme"]} > /sys/bus/pci/devices/${passthru_bdf["nvme"]}/driver/unbind
#echo ${passthru_bdf["nvme"]} > /sys/bus/pci/drivers/pci-stub/bind
--lapic_pt \ --rtvm \ --virtio_poll 1000000 \ -U 495ae2e5-2603-4d64-af76-d4bc5a8ec0e5 \ -s 2,passthru,00/17/0 \ -s 3,virtio-console,@stdio:stdio_port \ -s 8,virtio-net,tap0 \ --ovmf /usr/share/acrn/bios/OVMF.fd \ hard_rtvmUpon deployment completion, launch the RTVM directly onto your NUC11TNHi5:
$ sudo /usr/share/acrn/samples/nuc/launch_hard_rt_vm.sh