Enable Nested Virtualization
With nested virtualization enabled in ACRN, you can run virtual machine instances inside of a guest VM (also called a user VM) running on the ACRN hypervisor. Although both “level 1” guest VMs and nested guest VMs can be launched from the Service VM, the following distinction is worth noting:
The VMX feature (
CPUID01.01H:ECX[5]) does not need to be visible to the Service VM in order to launch guest VMs. A guest VM not running on top of the Service VM is considered a level 1 (L1) guest.The VMX feature must be visible to an L1 guest to launch a nested VM. An instance of a guest hypervisor (KVM) runs on the L1 guest and works with the L0 ACRN hypervisor to run the nested VM.
The conventional single-level virtualization has two levels - the L0 host (ACRN hypervisor) and the L1 guest VMs. With nested virtualization enabled, ACRN can run guest VMs with their associated virtual machines that define a third level:
The host (ACRN hypervisor), which we call the L0 hypervisor
The guest hypervisor (KVM), which we call the L1 hypervisor
The nested guest VMs, which we call the L2 guest VMs
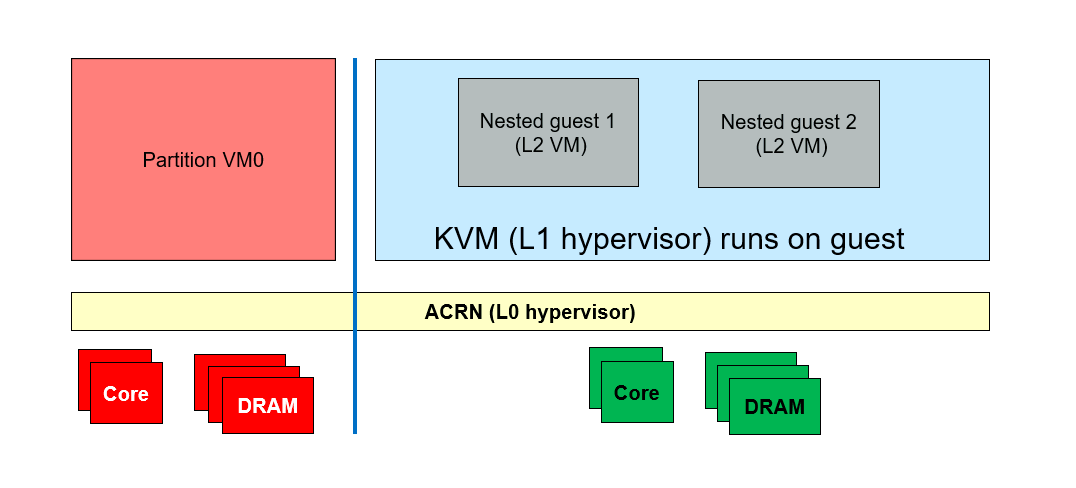
Figure 53 Generic Nested Virtualization
High Level ACRN Nested Virtualization Design
The high-level design of nested virtualization in ACRN is shown in Figure 54. Nested VMX is enabled by allowing a guest VM to use VMX instructions, and emulating them using the single level of VMX available in the hardware.
In x86, a logical processor uses VMCSs to manage VM entries and VM exits as well as processor behavior in VMX non-root operation. The trick of nVMX emulation is ACRN builds a VMCS02 out of the VMCS01, which is the VMCS ACRN uses to run the L1 VM, and VMCS12 which is built by L1 hypervisor to actually run the L2 guest.
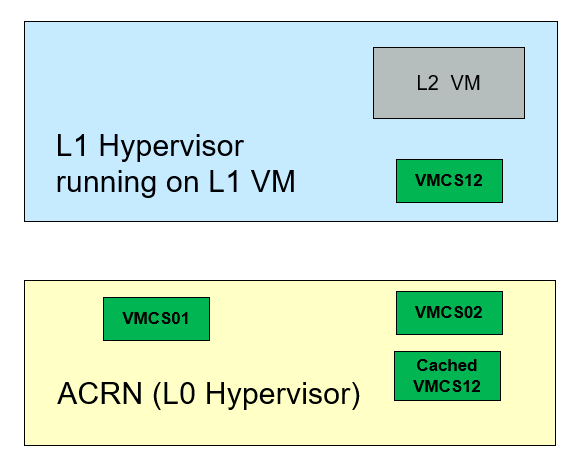
Figure 54 Nested Virtualization in ACRN
L0 hypervisor (ACRN) runs L1 guest with VMCS01
L1 hypervisor (KVM) creates VMCS12 to run a L2 guest
VMX instructions from L1 hypervisor trigger VMExits to L0 hypervisor:
L0 hypervisor runs a L2 guest with VMCS02
L0 caches VMCS12 in host memory
L0 merges VMCS01 and VMCS12 to create VMCS02
L2 guest runs until triggering VMExits to L0
L0 reflects most VMEXits to L1 hypervisor
L0 runs L1 guest with VMCS01 and VMCS02 as the shadow VMCS
Restrictions and Constraints
Nested virtualization is considered an experimental feature, and only tested on Tiger Lake and Kaby Lake platforms (See Supported Hardware.)
L1 VMs have the following restrictions:
KVM is the only L1 hypervisor supported by ACRN
KVM runs in 64-bit mode
KVM enables EPT for L2 guests
QEMU is used to launch L2 guests
Constraints on L1 guest configuration:
Local APIC passthrough must be enabled
Only the
SCHED_NOOPscheduler is supported. ACRN can’t receive timer interrupts on LAPIC passthrough pCPUs
Service OS VM configuration
ACRN only supports enabling the nested virtualization feature on the Service VM, not on pre-launched VMs.
The nested virtualization feature is disabled by default in ACRN. You can enable it using the Use the ACRN Configuration Editor with these settings:
Note
Normally you’d use the configuration tool GUI to edit the scenario XML file.
The tool wasn’t updated in time for the v2.5 release, so you’ll need to manually edit
the ACRN scenario XML configuration file to edit the SCHEDULER, NVMX_ENABLED,
pcpu_id , guest_flags, legacy_vuart, and console_vuart settings for
the Service VM (SOS), as shown below:
Configure system level features:
Edit
hv.FEATURES.NVMX_ENABLEDto y to enable nested virtualizationEdit
hv.FEATURES.SCHEDULERtoSCHED_NOOPto disable CPU sharing<FEATURES> <RELOC>y</RELOC> <SCHEDULER>SCHED_NOOP</SCHEDULER> <MULTIBOOT2>y</MULTIBOOT2> <ENFORCE_TURNOFF_AC>y</ENFORCE_TURNOFF_AC> <RDT> <RDT_ENABLED>n</RDT_ENABLED> <CDP_ENABLED>y</CDP_ENABLED> <CLOS_MASK>0xfff</CLOS_MASK> <CLOS_MASK>0xfff</CLOS_MASK> <CLOS_MASK>0xfff</CLOS_MASK> <CLOS_MASK>0xfff</CLOS_MASK> <CLOS_MASK>0xfff</CLOS_MASK> <CLOS_MASK>0xfff</CLOS_MASK> <CLOS_MASK>0xfff</CLOS_MASK> <CLOS_MASK>0xfff</CLOS_MASK> </RDT> <NVMX_ENABLED>y</NVMX_ENABLED> <HYPERV_ENABLED>y</HYPERV_ENABLED>
In each guest VM configuration:
Edit
vm.guest_flags.guest_flagon the SOS VM section and addGUEST_FLAG_NVMX_ENABLEDto enable the nested virtualization feature on the Service VM.Edit
vm.guest_flags.guest_flagand addGUEST_FLAG_LAPIC_PASSTHROUGHto enable local APIC passthrough on the Service VM.Edit
vm.cpu_affinity.pcpu_idto assignpCPUIDs to run the Service VM. If you are using debug build and need the hypervisor console, don’t assignpCPU0to the Service VM.<vm id="1"> <vm_type>SOS_VM</vm_type> <name>ACRN SOS VM</name> <cpu_affinity> <pcpu_id>1</pcpu_id> <pcpu_id>2</pcpu_id> <pcpu_id>3</pcpu_id> </cpu_affinity> <guest_flags> <guest_flag>GUEST_FLAG_NVMX_ENABLED</guest_flag> <guest_flag>GUEST_FLAG_LAPIC_PASSTHROUGH</guest_flag> </guest_flags>
The Service VM’s virtual legacy UART interrupt doesn’t work with LAPIC passthrough, which may prevent the Service VM from booting. Instead, we need to use the PCI-vUART for the Service VM. Refer to Enable vUART Configurations for more details about VUART configuration.
Edit
vm.legacy_vuart.baseinlegacy_vuart 0and set it toINVALID_LEGACY_PIOEdit
vm.console_vuart.baseinconsole_vuart 0and set it toPCI_VUART<legacy_vuart id="0"> <type>VUART_LEGACY_PIO</type> <base>INVALID_COM_BASE</base> <irq>COM1_IRQ</irq> </legacy_vuart> <legacy_vuart id="1"> <type>VUART_LEGACY_PIO</type> <base>INVALID_COM_BASE</base> <irq>COM2_IRQ</irq> <target_vm_id>1</target_vm_id> <target_uart_id>1</target_uart_id> </legacy_vuart> <console_vuart id="0"> <base>PCI_VUART</base> </console_vuart>
Remove CPU sharing VMs
Since CPU sharing is disabled, you may need to delete all
POST_STD_VMandKATA_VMVMs from the scenario configuration file, which may share pCPU with the Service OS VM.Follow instructions in Build ACRN From Source and build with this XML configuration.
Prepare for Service VM Kernel and rootfs
The service VM can run Ubuntu or other Linux distributions. Instructions on how to boot Ubuntu as the Service VM can be found in Getting Started Guide.
The Service VM kernel needs to be built from the acrn-kernel repo, and some changes
to the kernel .config are needed.
Instructions on how to build and install the Service VM kernel can be found
in Build and Install the ACRN Kernel.
Here is a summary of how to modify and build the kernel:
git clone https://github.com/projectacrn/acrn-kernel
cd acrn-kernel
cp kernel_config_uefi_sos .config
make olddefconfig
The following configuration entries are needed to launch nested guests on the Service VM:
CONFIG_KVM=y
CONFIG_KVM_INTEL=y
CONFIG_ACRN_GUEST=y
After you made these configuration modifications, build and install the kernel as described in Getting Started Guide.
Launch a Nested Guest VM
Create an Ubuntu KVM Image
Refer to Build the Ubuntu KVM Image on how to create an Ubuntu KVM image as the nested guest VM’s root filesystem. There is no particular requirement for this image, e.g., it could be of either qcow2 or raw format.
Prepare for Launch Scripts
Install QEMU on the Service VM that will launch the nested guest VM:
sudo apt-get install qemu-kvm qemu virt-manager virt-viewer libvirt-bin
Important
The QEMU -cpu host option is needed to launch a nested guest VM, and -nographics
is required to run nested guest VMs reliably.
You can prepare the script just like the one you use to launch a VM
on native Linux. For example, other than -hda, you can use the following option to launch
a virtio block based RAW image:
-drive format=raw,file=/root/ubuntu-20.04.img,if=virtio
Use the following option to enable Ethernet on the guest VM:
-netdev tap,id=net0 -device virtio-net-pci,netdev=net0,mac=a6:cd:47:5f:20:dc
The following is a simple example for the script to launch a nested guest VM.
sudo qemu-system-x86_64 \
  -enable-kvm \
  -cpu host \
  -nographic \
  -m 2G -smp 2 -hda /root/ubuntu-20.04.qcow2 \
  -net nic,macaddr=00:16:3d:60:0a:80 -net tap,script=/etc/qemu-ifup
Launch the Guest VM
You can launch the nested guest VM from the Service VM’s virtual serial console or from an SSH remote login.
If the nested VM is launched successfully, you should see the nested VM’s login prompt:
[  OK  ] Started Terminate Plymouth Boot Screen.
[  OK  ] Started Hold until boot process finishes up.
[  OK  ]  Starting Set console scheme...
[  OK  ] Started Serial Getty on ttyS0.
[  OK  ] Started LXD - container startup/shutdown.
[  OK  ] Started Set console scheme.
[  OK  ] Started Getty on tty1.
[  OK  ] Reached target Login Prompts.
[  OK  ] Reached target Multi-User System.
[  OK  ] Started Update UTMP about System Runlevel Changes.

Ubuntu 20.04 LTS ubuntu_vm ttyS0

ubuntu_vm login:
You won’t see the nested guest from a vcpu_list or vm_list command
on the ACRN hypervisor console because these commands only show level 1 VMs.
ACRN:\>vm_list

VM_UUID                          VM_ID VM_NAME           VM_STATE
================================ ===== ==========================
dbbbd4347a574216a12c2201f1ab0240   0   ACRN SOS VM       Running
ACRN:\>vcpu_list

VM ID    PCPU ID    VCPU ID    VCPU ROLE    VCPU STATE    THREAD STATE
=====    =======    =======    =========    ==========    ============
  0         1          0       PRIMARY      Running          RUNNING
  0         2          1       SECONDARY    Running          RUNNING
  0         3          2       SECONDARY    Running          RUNNING
On the nested guest VM console, run an lshw or dmidecode command
and you’ll see that this is a QEMU-managed virtual machine:
$ sudo lshw -c system
ubuntu_vm
   description: Computer
   product: Standard PC (i440FX + PIIX, 1996)
   vendor: QEMU
   version: pc-i440fx-5.2
   width: 64 bits
   capabilities: smbios-2.8 dmi-2.8 smp vsyscall32
   configuration: boot=normal
For example, compare this to the same command run on the L1 guest (Service VM):
$ sudo lshw -c system
localhost.localdomain
   description: Computer
   product: NUC7i5DNHE
   vendor: Intel Corporation
   version: J57828-507
   serial: DW1710099900081
   width: 64 bits
   capabilities: smbios-3.1 dmi-3.1 smp vsyscall32
   configuration: boot=normal family=Intel NUC uuid=36711CA2-A784-AD49-B0DC-54B2030B16AB