Introduction to ACRN Configuration
ACRN configuration is designed for System Integrators / Tier 1s to customize ACRN to meet their own needs. It allows users to adapt ACRN to target boards as well as configure hypervisor capabilities and provision VMs.
ACRN configuration consists of the following key components.
Configuration data saved as XML files.
A configuration toolset that helps users to generate and edit configuration data. The toolset includes:
A board inspector that collects board-specific information on target machines.
A configuration editor that lets you edit configuration data via a web-based UI.
The following sections introduce the concepts and tools of ACRN configuration from the aspects below.
Types of Configurations introduces the objectives and main contents of different types of configuration data.
Using ACRN Configuration Toolset overviews the steps to customize ACRN configuration using the configuration toolset.
ACRN Configuration Data explains the location and format of configuration data saved as XML files.
Use the ACRN Configuration Editor gives detailed instructions on using the configuration editor.
Types of Configurations
ACRN includes three types of configurations: board, scenario, and launch. The following sections briefly describe the objectives and main contents of each type.
Board Configuration
The board configuration stores hardware-specific information extracted on the target platform. It describes the capacity of hardware resources (such as processors and memory), platform power states, available devices, and BIOS versions. This information is used by ACRN configuration tool to check feature availability and allocate resources among VMs, as well as by ACRN hypervisor to initialize and manage the platform at runtime.
The board configuration is scenario-neutral by nature. Thus, multiple scenario configurations can be based on the same board configuration.
Scenario Configuration
The scenario configuration defines a working scenario by configuring hypervisor capabilities and defining VM attributes and resources. You can specify the following in scenario configuration.
Hypervisor capabilities
Availability and settings of hypervisor features, such as debugging facilities, scheduling algorithm, ivshmem, and security features.
Hardware management capacity of the hypervisor, such as maximum PCI devices and maximum interrupt lines supported.
Memory consumption of the hypervisor, such as the entry point and stack size.
VM attributes and resources
VM attributes, such as VM names.
Maximum number of VMs supported.
Resources allocated to each VM, such as number of vCPUs, amount of guest memory, and pass-through devices.
Guest OS settings, such as boot protocol and guest kernel parameters.
Settings of virtual devices, such as virtual UARTs.
For pre-launched VMs, the VM attributes and resources are exactly the amount of resource allocated to them. For post-launched VMs, the number of vCPUs define the upper limit the Service VM can allocate to them and settings of virtual devices still apply. Other resources are under the control of the Service VM and can be dynamically allocated to post-launched VMs.
The scenario configuration is used by ACRN configuration tool to reserve sufficient memory for the hypervisor to manage the VMs at build time, as well as by ACRN hypervisor to initialize its capabilities and set up the VMs at runtime.
Launch Configuration
The launch configuration defines the attributes and resources of a
post-launched VM. The main contents are similar to the VM attributes and
resources in scenario configuration. The launch configuration is used to generate shell scripts that
invoke acrn-dm to create post-launched VMs. Unlike board and scenario
configurations used at build time or by ACRN hypervisor, launch
configuration are used dynamically in the Service VM.
Using ACRN Configuration Toolset
ACRN configuration toolset is provided to create and edit configuration
data. The toolset can be found in misc/config_tools.
Here is the workflow to customize ACRN configurations using the configuration toolset.
Get the board info.
Set up a native Linux environment on the target board. Make sure the following tools are installed and the kernel boots with the following command line options.
Native Linux requirement:Release: Ubuntu 18.04+Tools: cpuid, rdmsr, lspci, lxml, dmidecode (optional)Kernel cmdline: “idle=nomwait intel_idle.max_cstate=0 intel_pstate=disable”Copy the
board_inspectordirectory into the target file system and then run thesudo python3 cli.py $(BOARD)command.A
$(BOARD).xmlthat includes all needed hardware-specific information is generated under the current working directory. Here,$(BOARD)is the specified board name.
Customize your needs.
Copy
$(BOARD).xmlto the host development machine.Run the ACRN configuration editor (available at
misc/config_tools/config_app/app.py) on the host machine and import the$(BOARD).xml. Select your working scenario under Scenario Setting and input the desired scenario settings. The tool will do validation checks on the input based on the$(BOARD).xml. The customized settings can be exported to your own$(SCENARIO).xml. If you have a customized scenario XML file, you can also import it to the editor for modification.In ACRN configuration editor, input the launch script parameters for the post-launched User VM under Launch Setting. The editor will validate the input based on both the
$(BOARD).xmland$(SCENARIO).xmland then export settings to your$(LAUNCH).xml.
Note
Refer to Use the ACRN Configuration Editor for more details on the configuration editor.
Build with your XML files. Refer to Build ACRN From Source to build the ACRN hypervisor with your XML files on the host machine.
Deploy VMs and run ACRN hypervisor on the target board.
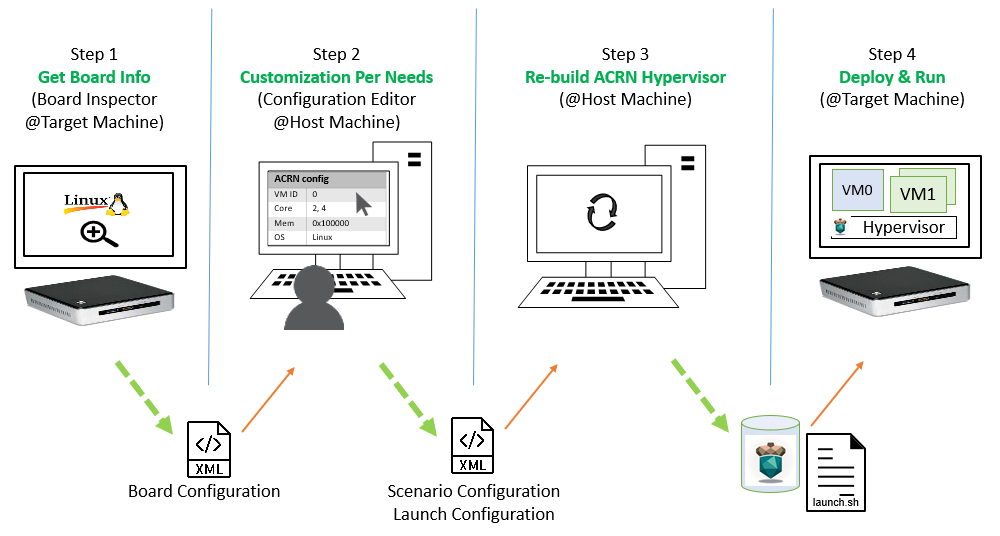
Figure 19 Configuration Workflow
Makefile Targets for Configuration
In addition to the BOARD and SCENARIO variables, ACRN source also
includes the following makefile targets to aid customization.
Target |
Description |
|---|---|
|
Generate configuration files (a bunch of C source files) in the build directory without building the hypervisor. This target can be used when you want to customize the configurations based on a predefined scenario. |
|
Print the target |
|
After modifying the generated configuration files, you can use this target to generate a patch that shows the differences made. |
|
Register a patch to be applied on the generated configuration files
every time they are regenerated. The |
The targets hvdiffconfig and hvapplydiffconfig
are provided for users who already have offline patches to the generated
configuration files. Prior to v2.4, the generated configuration files are also
in the repository. Some users may already have chosen to modify these files
directly to customize the configurations.
Note
We highly recommend new users save and maintain customized configurations in XML, not in patches to generated configuration files.
Here is an example how to use the hvdiffconfig to generate a patch and save
it to config.patch.
acrn-hypervisor$ make BOARD=ehl-crb-b SCENARIO=hybrid_rt hvdefconfig
...
acrn-hypervisor$ vim build/hypervisor/configs/scenarios/hybrid_rt/pci_dev.c
(edit the file manually)
acrn-hypervisor$ make hvdiffconfig
...
Diff on generated configuration files is available at /path/to/acrn-hypervisor/build/hypervisor/config.patch.
To make a patch effective, use 'applydiffconfig PATCH=/path/to/patch' to register it to a build.
...
acrn-hypervisor$ cp build/hypervisor/config.patch config.patch
The example below shows how to use hvapplydiffconfig to apply
config.patch to a new build.
acrn-hypervisor$ make clean
acrn-hypervisor$ make BOARD=ehl-crb-b SCENARIO=hybrid_rt hvdefconfig
...
acrn-hypervisor$ make hvapplydiffconfig PATCH=config.patch
...
/path/to/acrn-hypervisor/config.patch is registered for build directory /path/to/acrn-hypervisor/build/hypervisor.
Registered patches will be applied the next time 'make' is invoked.
To unregister a patch, remove it from /path/to/acrn-hypervisor/build/hypervisor/configs/.diffconfig.
...
acrn-hypervisor$ make hypervisor
...
Applying patch /path/to/acrn-hypervisor/config.patch:
patching file scenarios/hybrid_rt/pci_dev.c
...
ACRN Configuration Data
ACRN configuration data are saved in three XML files: board, scenario,
and launch XML. The board XML contains board configuration and is
generated by the board inspector on the target machine. The scenario and
launch XMLs, containing scenario and launch configurations respectively, can
be customized by using the configuration editor. End users can load their own
configurations by importing customized XMLs or by saving the configurations by
exporting XMLs.
The predefined XMLs provided by ACRN are located in the misc/config_tools/data/
directory of the acrn-hypervisor repo.
Board XML Format
The board XML has an acrn-config root element and a board attribute:
<acrn-config board="BOARD">
Board XML files are input to the configuration editor and the build system, and are not intended for end users to modify.
Scenario XML Format
The scenario XML has an acrn-config root element as well as board and
scenario attributes:
<acrn-config board="BOARD" scenario="SCENARIO">
See Scenario Configuration Options for a full explanation of available scenario XML elements. Users are recommended to tweak the configuration data by using ACRN configuration editor.
Launch XML Format
The launch XML has an acrn-config root element as well as board,
scenario and uos_launcher attributes:
<acrn-config board="BOARD" scenario="SCENARIO" uos_launcher="UOS_NUMBER">
Attributes of the uos_launcher specify the number of User VMs that the
current scenario has:
uos:Specify the User VM with its relative ID to Service VM by the
idattribute.uos_type:Specify the User VM type, such as
CLEARLINUX,ANDROID,ALIOS,PREEMPT-RT LINUX,GENERIC LINUX,WINDOWS,YOCTO,UBUNTU,ZEPHYRorVXWORKS.rtos_type:Specify the User VM Real-time capability: Soft RT, Hard RT, or none of them.
mem_size:Specify the User VM memory size in megabytes.
gvt_args:GVT arguments for the VM. Set it to
gvtdfor GVT-d, otherwise it’s for GVT-g arguments. The GVT-g input format:low_gm_size high_gm_size fence_sz, The recommendation is64 448 8. Leave it blank to disable the GVT.vbootloader:Virtual bootloader type; currently only supports OVMF.
vuart0:Specify whether the device model emulates the vUART0(vCOM1); refer to Enable vUART Configurations for details. If set to
Enable, the vUART0 is emulated by the device model; if set toDisable, the vUART0 is emulated by the hypervisor if it is configured in the scenario XML.poweroff_channel:Specify whether the User VM power off channel is through the IOC, power button, or vUART.
allow_trigger_s5:Allow VM to trigger s5 shutdown flow, this flag works with
poweroff_channelvuart1(pty)andvuart1(tty)only.enable_ptm:Enable the Precision Timing Measurement (PTM) feature.
usb_xhci:USB xHCI mediator configuration. Input format:
bus#-port#[:bus#-port#: ...], e.g.:1-2:2-4. Refer to USB Virtualization for details.shm_regions:List of shared memory regions for inter-VM communication.
shm_region(a child node ofshm_regions):configure the shared memory regions for current VM, input format:
hv:/<;shm name>; (or dm:/<shm_name>;), <;shm size in MB>;. Refer to ACRN Shared Memory Based Inter-VM Communication for details.console_vuart:Enable a PCI-based console vUART. Refer to Enable vUART Configurations for details.
communication_vuarts:List of PCI-based communication vUARTs. Refer to Enable vUART Configurations for details.
communication_vuart(a child node ofcommunication_vuarts):Enable a PCI-based communication vUART with its ID. Refer to Enable vUART Configurations for details.
passthrough_devices:Select the passthrough device from the lspci list. Currently we support:
usb_xdci,audio,audio_codec,ipu,ipu_i2c,cse,wifi,bluetooth,sd_card,ethernet,sata, andnvme.network(a child node ofvirtio_devices):The virtio network device setting. Input format:
tap_name,[vhost],[mac=XX:XX:XX:XX:XX:XX].block(a child node ofvirtio_devices):The virtio block device setting. Input format:
[blk partition:][img path]e.g.:/dev/sda3:./a/b.img.console(a child node ofvirtio_devices):The virtio console device setting. Input format:
[@]stdio|tty|pty|sock:portname[=portpath][,[@]stdio|tty|pty:portname[=portpath]].cpu_affinity:List of pCPU that this VM’s vCPUs are pinned to.
Note
The configurable and readonly attributes are used to mark
whether the item is configurable for users. When configurable="n"
and readonly="y", the item is not configurable from the web
interface. When configurable="n", the item does not appear on the
interface.
Use the ACRN Configuration Editor
The ACRN configuration editor provides a web-based user interface for the following:
reads board info
configures and validates scenario and launch configurations
generates launch scripts for the specified post-launched User VMs.
dynamically creates a new scenario configuration and adds or deletes VM settings in it
dynamically creates a new launch configuration and adds or deletes User VM settings in it
Prerequisites
Clone the ACRN hypervisor repo
$ git clone https://github.com/projectacrn/acrn-hypervisor
Install ACRN configuration editor dependencies:
$ cd ~/acrn-hypervisor/misc/config_tools/config_app
$ sudo pip3 install -r requirements
Instructions
Launch the ACRN configuration editor:
$ python3 app.py
Open a browser and navigate to the website http://127.0.0.1:5001/ automatically, or you may need to visit this website manually. Make sure you can connect to open network from browser because the editor needs to download some JavaScript files.
Note
The ACRN configuration editor is supported on Chrome, Firefox, and Microsoft Edge. Do not use Internet Explorer.
The website is shown below:

Set the board info:
Click Import Board info.

Upload the board XML you have generated from the ACRN board inspector.
After board XML is uploaded, you will see the board name from the Board info list. Select the board name to be configured.

Load or create the scenario configuration by selecting among the following:
Choose a scenario from the Scenario Setting menu that lists all user-defined scenarios for the board you selected in the previous step.
Click the Create a new scenario from the Scenario Setting menu to dynamically create a new scenario configuration for the current board.
Click the Load a default scenario from the Scenario Setting menu, and then select one default scenario configuration to load a predefined scenario XML for the current board.
The default scenario XMLs are located at
misc/config_tools/data/[board]/. You can edit the scenario name when creating or loading a scenario. If the current scenario name is duplicated with an existing scenario setting name, rename the current scenario name or overwrite the existing one after the confirmation message.
Note that you can also use a customized scenario XML by clicking Import XML. The configuration editor automatically directs to the new scenario XML once the import is complete.
The configurable items display after one scenario is created, loaded, or selected. Following is an industry scenario:
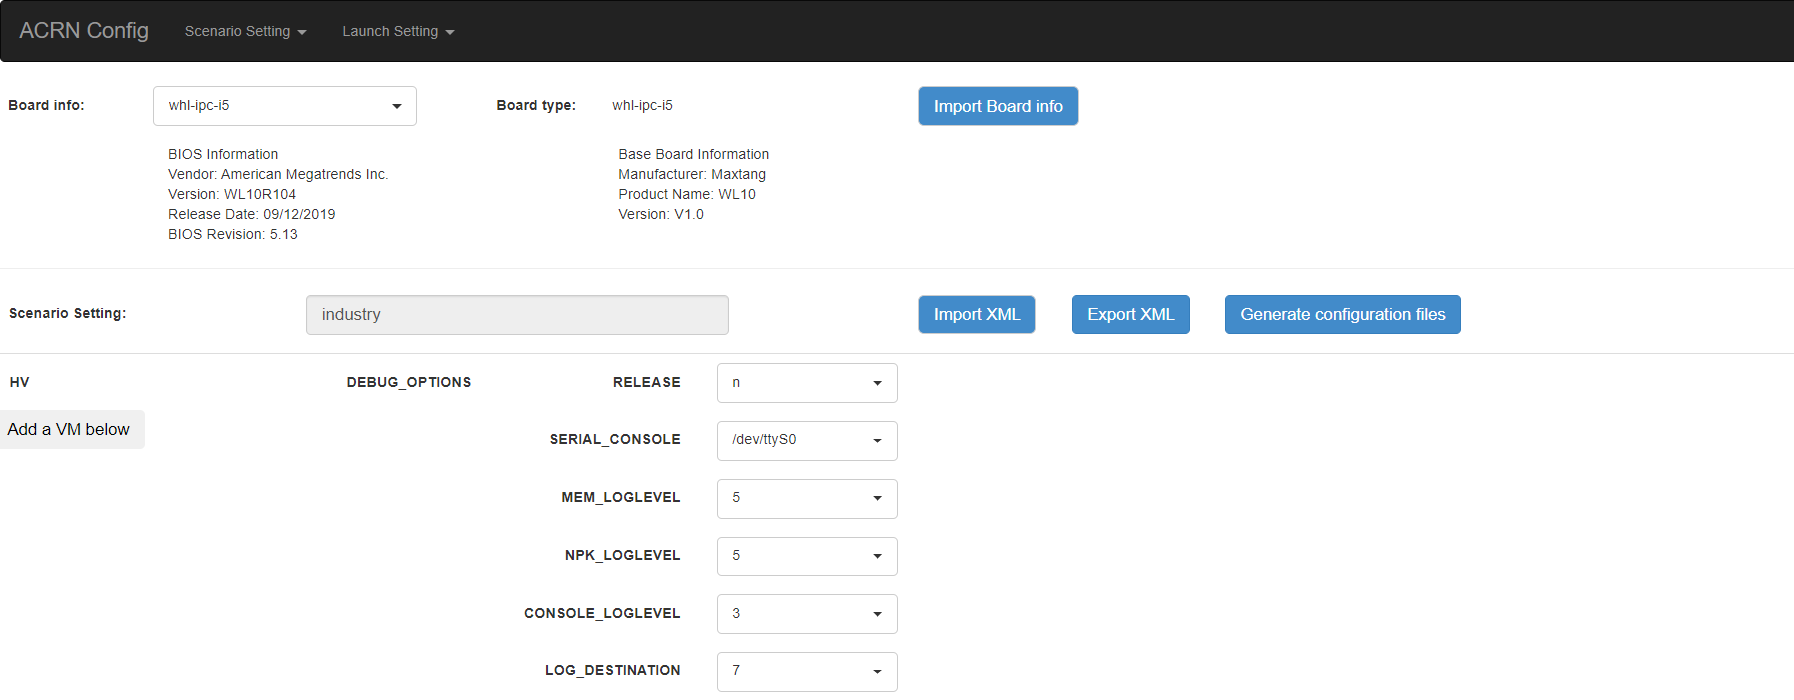
You can edit these items directly in the text boxes, or you can choose single or even multiple items from the drop-down list.
Read-only items are marked as gray.
Hover the mouse cursor over the item to display the description.
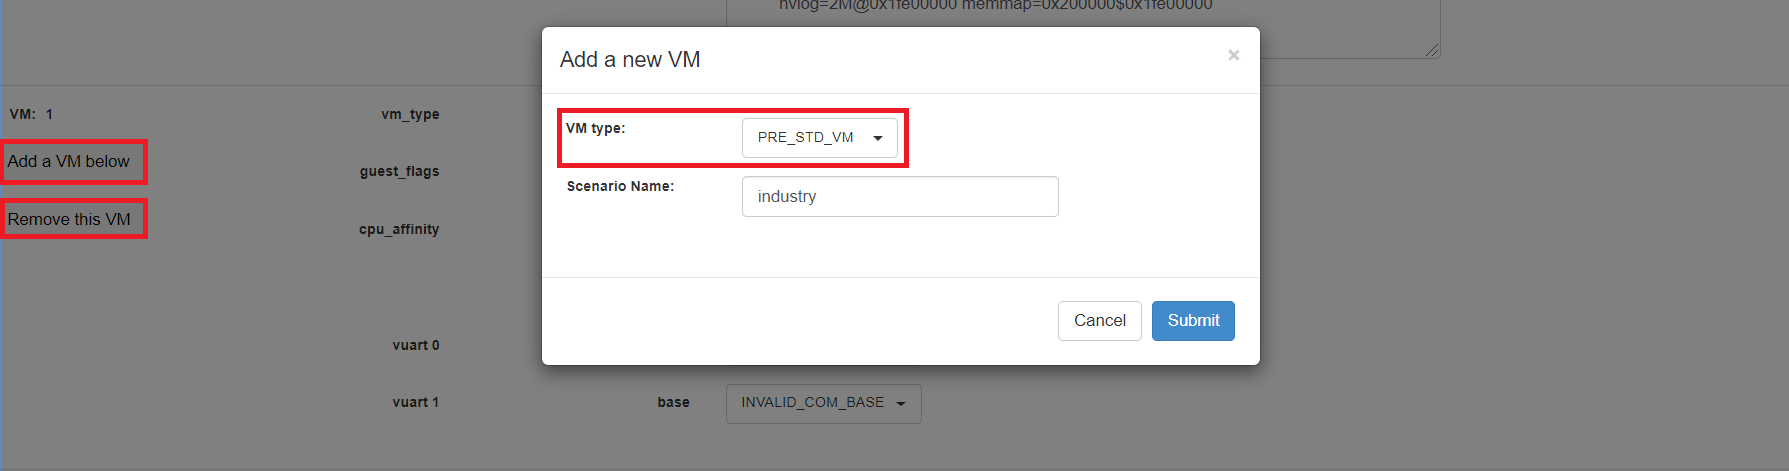
Dynamically add or delete VMs:
Click Add a VM below in one VM setting, and then select one VM type to add a new VM under the current VM.
Click Remove this VM in one VM setting to remove the current VM for the scenario setting.
When one VM is added or removed in the scenario, the configuration editor reassigns the VM IDs for the remaining VMs by the order of Pre-launched VMs, Service VMs, and Post-launched VMs.
Click Export XML to save the scenario XML; you can rename it in the pop-up model.
Note
All customized scenario XMLs will be in user-defined groups located in
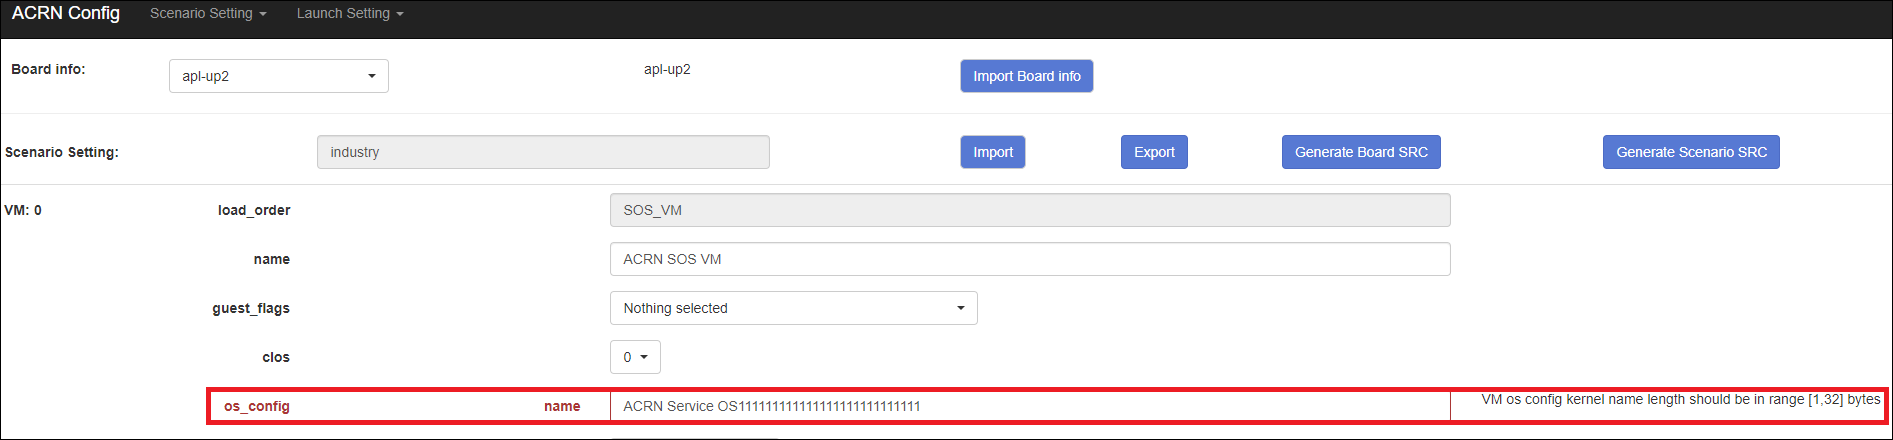
misc/config_tools/data/[board]/user_defined/.Before saving the scenario XML, the configuration editor validates the configurable items. If errors exist, the configuration editor lists all incorrectly configured items and shows the errors as below:
After the scenario is saved, the page automatically directs to the saved scenario XMLs. Delete the configured scenario by clicking Export XML -> Remove.
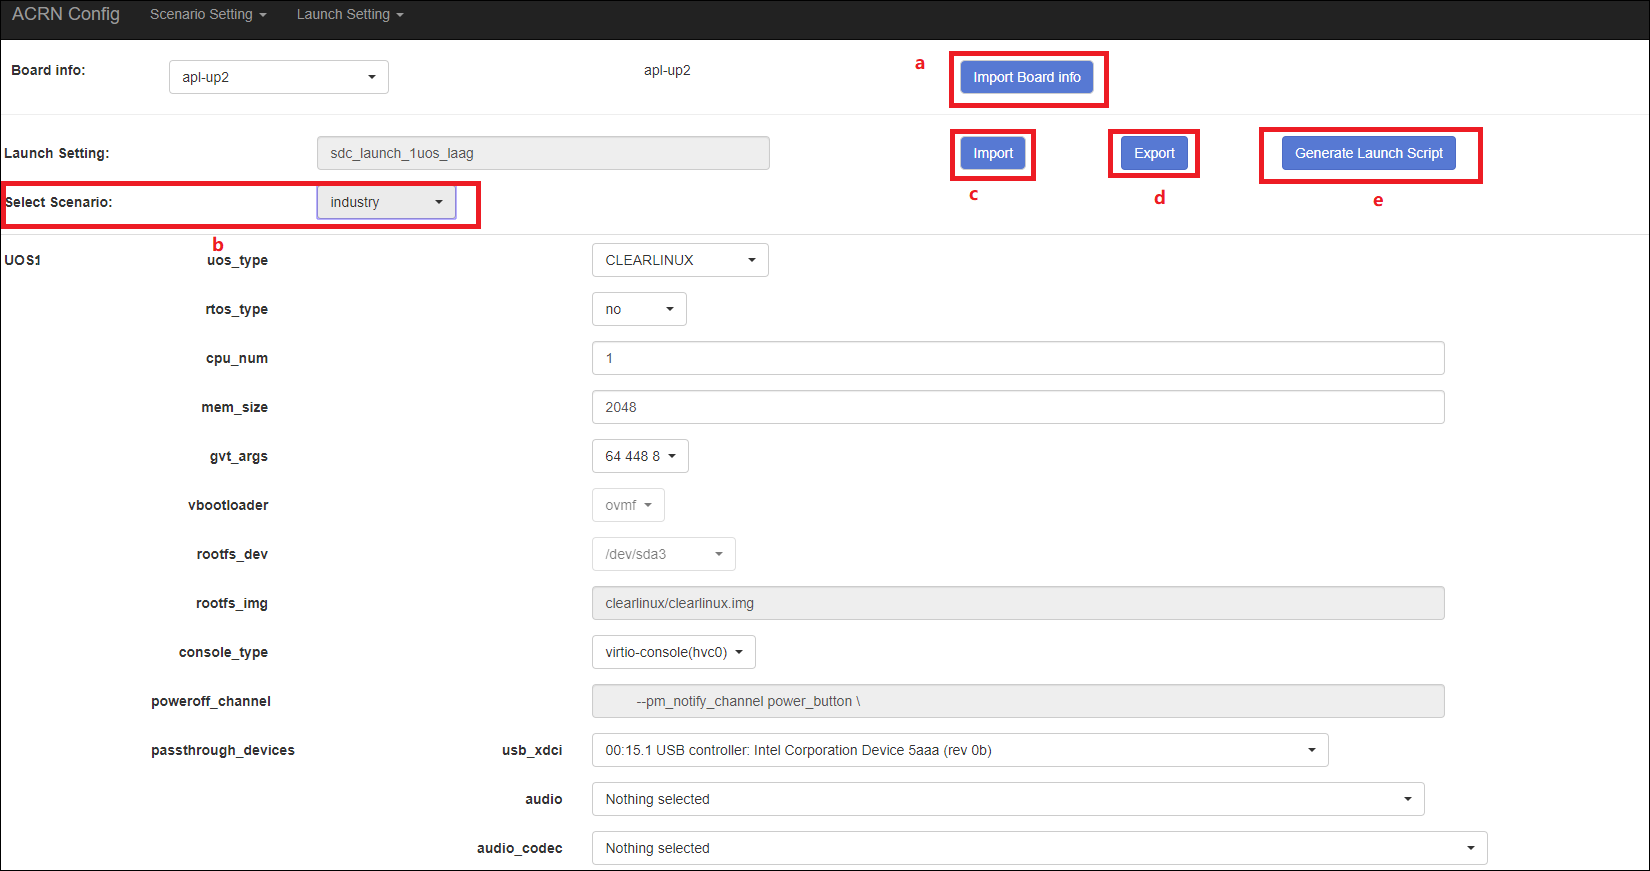
The Launch Setting is quite similar to the Scenario Setting:
Upload board XML or select one board as the current board.
Load or create one launch configuration by selecting among the following:
Click Create a new launch script from the Launch Setting menu.
Click Load a default launch script from the Launch Setting menu.
Select one launch XML from the menu.
Import a local launch XML by clicking Import XML.
Select one scenario for the current launch configuration from the Select Scenario drop-down box.
Configure the items for the current launch configuration.
Add or remove User VM (UOS) launch scripts:
Add a UOS launch script by clicking Configure an UOS below for the current launch configuration.
Remove a UOS launch script by clicking Remove this VM for the current launch configuration.
Save the current launch configuration to the user-defined XML files by clicking Export XML. The configuration editor validates the current configuration and lists all incorrectly configured items.
Click Generate Launch Script to save the current launch configuration and then generate the launch script.