Using SBL on UP2 Board
This document builds on the Getting started guide for UP2 board, and explains how to use SBL instead of UEFI to boot UP2 board.
Slim Bootloader is an open-source boot firmware solution, built from the ground up to be secure, lightweight, and highly optimized while leveraging robust tools and libraries from the EDK II framework. For more information about booting ACRN with SBL, please visit https://slimbootloader.github.io/how-tos/boot-acrn.html.

We show a verified Boot Sequence with SBL on an Intel Architecture platform UP2, and the boot process proceeds as follows:
- SBL verifies and boots the ACRN hypervisor and Service OS kernel
- Service OS kernel verifies and loads ACRN Device Model and vSBL
- vSBL starts the User-side verified boot process
Prerequisites
The following hardware and software are required to use SBL on an UP2 board:
- UP2 kit (Model N3350)
- USB 2.0 Pin Header Cable for debug UART output
- USB to TTL Serial Cable (PL2303TA for example) for debug UART output
- 3 Pin Male To Male Jumper Cable Dupont Wire for debug UART output
- Micro USB OTG Cable for flashing
- Linux host
- Internet access
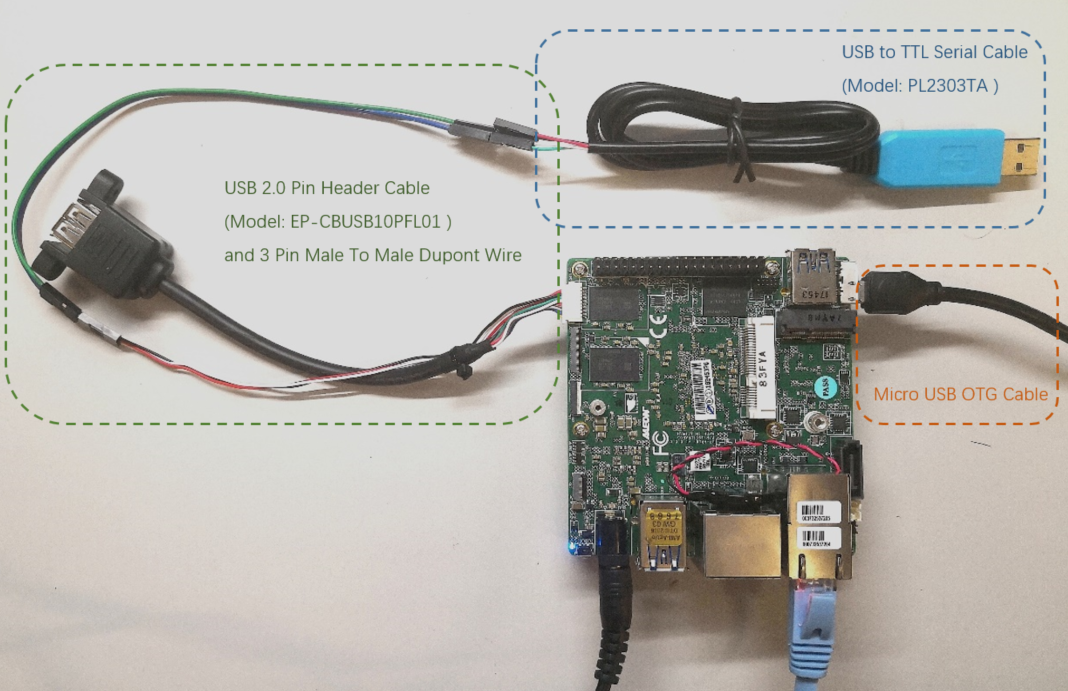
The connections between USB to TTL Serial Cable and USB 2.0 Pin Header Cable should be:

Build SBL
Follow the steps of Building
and Stitching
from https://slimbootloader.github.io/supported-hardware/up2.html to generate the
BIOS binary file <SBL_IFWI_IMAGE>, which is the new IFWI image with SBL in BIOS region.
Flash SBL on the UP2
Download the appropriate BIOS update for UP2 Board.
Put the empty USB flash drive in your PC and format it as FAT32.
Decompress the BIOS zip file into the formatted drive.
Attach the USB disk and keyboard to the board and power it on.
During boot, press F7 on the keyboard to enter the UEFI BIOS boot menu.
Navigate through the following menus and select
Built-in EFI shell.Please take note to which filesystem number
fs*your USB drive is mapped.Switch to that filesystem, e.g.
fs1:. (Don’t forget the colon.)Navigate to the path where you decompressed the update (the
cdandlscommands are available here, as if in an Unix shell).Fpt_3.1.50.2222.efi -f <SBL_IFWI_IMAGE> -y
Build ACRN for UP2
In Clear Linux, build out the SOS and LaaG image with these two files:
- create-up2-images.sh
$ wget https://raw.githubusercontent.com/projectacrn/acrn-hypervisor/master/doc/tutorials/create-up2-images.sh
- uos.json
An example of the configuration file uos.json:
{
    "DestinationType" : "virtual",
    "PartitionLayout" : [ { "disk" : "clearlinux.img", "partition" : 1, "size" : "100M", "type" : "EFI" },
                          { "disk" : "clearlinux.img", "partition" : 2, "size" : "10G", "type" : "linux" } ],
    "FilesystemTypes" : [ { "disk" : "clearlinux.img", "partition" : 1, "type" : "vfat" },
                          { "disk" : "clearlinux.img", "partition" : 2, "type" : "ext4" } ],
    "PartitionMountPoints" : [ { "disk" : "clearlinux.img", "partition" : 1, "mount" : "/boot" },
                               { "disk" : "clearlinux.img", "partition" : 2, "mount" : "/" } ],
    "Version": 31030,
    "Bundles": ["kernel-iot-lts2018", "openssh-server", "x11-server", "os-core", "os-core-update"]
}
Note
To generate the image with a specified version, modify
the “Version” argument, "Version": 3**** instead
of "Version": 31030 for example.
Build SOS and LaaG image:
$ sudo -s
# chmod +x create-up2-images.sh
# ./create-up2-images.sh --images-type all --clearlinux-version 31030 --laag-json uos.json
Note
You must have root privileges to run create-up2-images.sh.
If you want to build with your own acrn-hypervisor, add the --acrn-code-path
argument that specifies the directory where your acrn-hypervisor is found.
When building images, modify the --clearlinux-version argument
to a specific version (such as 31030). To generate the images of SOS only,
modify the --images-type argument to sos.
This step will generate the images of SOS and LaaG:
- sos_boot.img
- sos_rootfs.img
- up2_laag.img
Build the binary image partition_desc.bin for GPT partitions and change
the partition layout in partition_desc.ini if needed.
$ cd ~/acrn-hypervisor/doc/tutorials/doc/tutorials/
$ sudo -s
# python2 gpt_ini2bin.py partition_desc.ini>partition_desc.bin
We still need the configuration file flash_LaaG.json for flashing,
which is also in the directory ~/acrn-hypervisor/doc/tutorials/.
| Filename | Description |
|---|---|
| sos_boot.img | This SOS image contains the ACRN hypervisor and SOS kernel. |
| sos_rootfs.img | This is the root filesystem image for the SOS. it contains the Device Models implementation and SOS user space. |
| partition_desc.bin | This is the binary image for GPT partitions |
| up2_laag.img | This is the root filesystem image for the SOS. It has an integrated kernel and userspace. |
| flash_LaaG.json | Configuration file for Intel Platform Flash Tool to flash SOS image + hypervisor/SOS boot image + SOS userland |
Note
In this step, build SOS and LaaG images in Clear Linux rather than Ubuntu.
Download and install flash tool
- Download Intel Platform Flash Tool Lite from https://github.com/projectceladon/tools/tree/master/platform_flash_tool_lite/latest/.
- For the Ubuntu host, install platformflashtoollite_5.8.9.0_linux_x86_64.deb for example.
SOS and LaaG Installation
Connect a USB cable from the debug board to your Ubuntu host machine, and run the following command to verify that its USB serial port is discovered and showing under
/dev.$ ls /dev/ttyUSB* /dev/ttyUSB0
Connect to the board via
minicom, and use/dev/ttyUSB0. For example:$ sudo minicom -s /dev/ttyUSB0
Note
Verify that the minicom serial port settings are 115200 8N1 and both HW and SW flow control are turned off.
When the following console log displays, press any key to enter the shell command:
====================Os Loader====================


Press any key within 2 second(s) to enter the command shell

Shell>
Swap the boot sequence of
DevType: MEMtoIdx:0:Shell> boot Boot options (in HEX): Idx|ImgType|DevType|DevNum|Flags|HwPart|FsType|SwPart|File/Lbaoffset 0| 0| MMC | 0 | 0 | 0 | RAW | 1 | 0x0 1| 4| MEM | 0 | 0 | 0 | RAW | 0 | 0x0 SubCommand: s -- swap boot order by index a -- modify all boot options one by one q -- quit boot option change idx -- modify the boot option specified by idx (0 to 0x1) s Updated the Boot Option List Boot options (in HEX): Idx|ImgType|DevType|DevNum|Flags|HwPart|FsType|SwPart|File/Lbaoffset 0| 4| MEM | 0 | 0 | 0 | RAW | 0 | 0x0 1| 0| MMC | 0 | 0 | 0 | RAW | 1 | 0x0
Exit and reboot to fastboot mode:
Shell> exit

...

 40E0 |  175118 ms |     158 ms | Kernel setup
 40F0 |  175144 ms |      26 ms | FSP ReadyToBoot/EndOfFirmware notify
 4100 |  175144 ms |       0 ms | TPM IndicateReadyToBoot
------+------------+------------+----------------------------------

Starting MB Kernel ...

 abl cmd 00: console=ttyS0,115200
 abl cmd 00 length: 20
 abl cmd 01: fw_boottime=175922
 abl cmd 01 length: 18
boot target: 1
target=1
Enter fastboot mode ...
Start Send HECI Message: EndOfPost
HECI sec_mode 00000000
GetSeCMode successful
GEN_END_OF_POST size is 4
uefi_call_wrapper(SendwACK) =  0
Group    =000000FF
Command  =0000000C
IsRespone=00000001
Result   =00000000
RequestedActions   =00000000
USB for fastboot transport layer selected
When the UP2 board is in fastboot mode, you should be able see the device in the Platform Flash Tool. Select the file
flash_LaaG.jsonand modifyConfigurationtoSOS_and_LaaG. ClickStart to flashto flash images.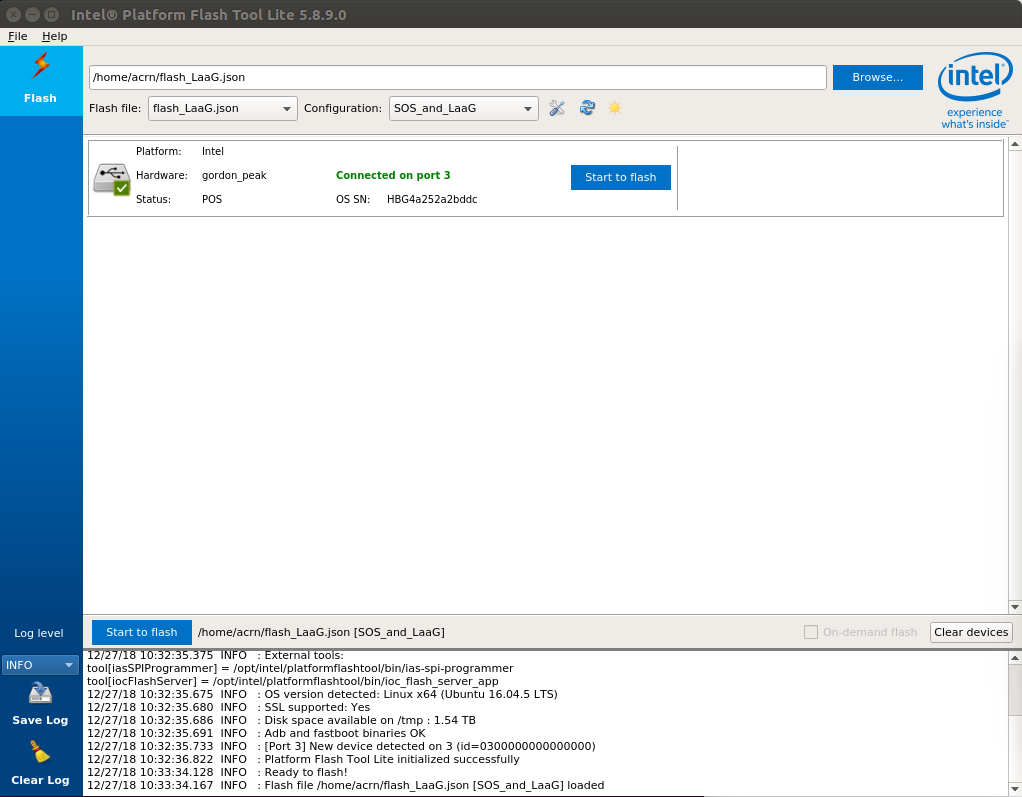
Boot to SOS
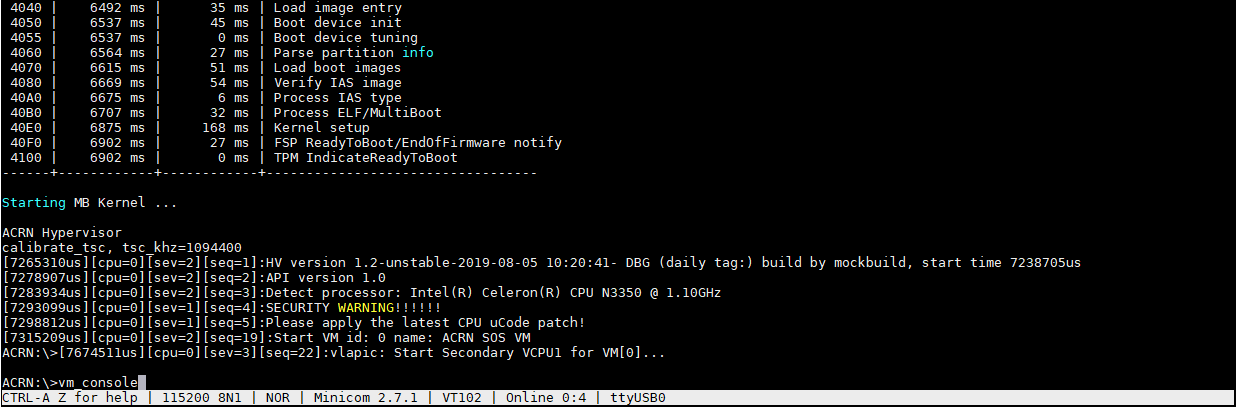
After flashing, UP2 board will automatically reboot and boot to the ACRN hypervisor. Log in to SOS by using the following command:
Launch UOS
Run the launch_uos.sh script to launch the UOS:
$ cd ~
$ wget https://raw.githubusercontent.com/projectacrn/acrn-hypervisor/master/doc/tutorials/launch_uos.sh
$ sudo ./launch_uos.sh -V 1
Congratulations, you are now watching the User OS booting up!