How to enable OVS in ACRN
Hypervisors need the ability to bridge network traffic between VMs and with the outside world. This tutorial describes how to use Open Virtual Switch (OVS) bridge in ACRN for this purpose.
Note
OVS is provided as part of the service-os
bundle. Use ClearLinux OS version 29660.
What is OVS
Open vSwitch (OVS) is an open-source implementation of a distributed virtual multilayer switch that provides a switching stack for hardware virtualization environments. OVS supports multiple protocols and standards used in computer networks. For more detailed OVS information, please refer to what-is-ovs.
Why OVS
Open vSwitch is targeted at multi-server virtualization deployments, a landscape not well suited for ACRN’s built-in L2 switch (the Linux bridge). These environments are often characterized by highly dynamic end-points, the maintenance of logical abstractions, and (sometimes) integration with or offloading to special purpose switching hardware. For more reasons about why Open vSwitch is used, please refer to why-ovs.
How to enable OVS in ACRN
The OVS service is included with the Clear Linux service-os bundle.
After booting the ACRN Service OS, disable the Clear Linux autoupdate feature before setting up the OVS bridge to prevent autoupdate from restoring the default bridge after a system update:
# swupd autoupdate --disable
You can then start the OVS service with the command:
# systemctl start openvswitch
To start OVS automatically after a reboot, you should also use this command:
# systemctl enable openvswitch
The default acrn-br0 bridge is created by the Service VM systemd and
supports the User VM network.
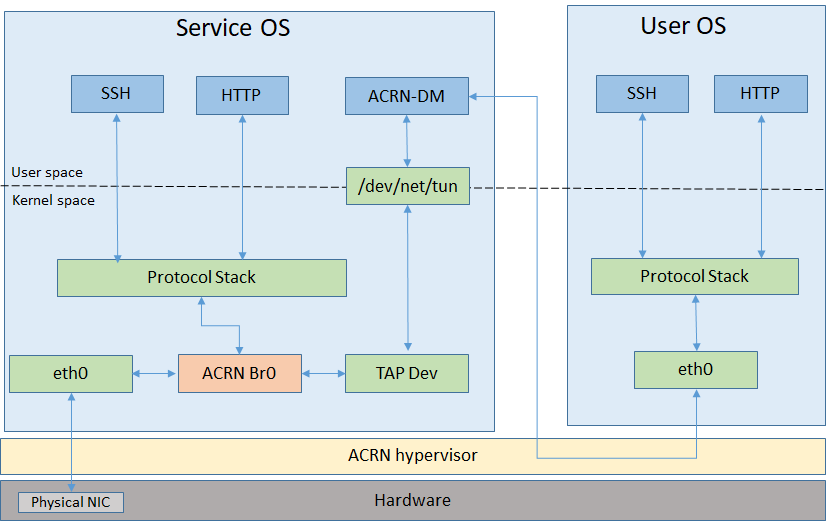
Figure 64 Default ACRN Network
How to use OVS bridge
Disable acrn network configuration:
# cd /usr/lib/systemd/network/
# mv 50-acrn.network 50-acrn.network_bak
Modify
50-eth.networkto enable DHCP on OVS bridge[Match] Name=ovs-br0 [Network] DHCP=ipv4
Create OVS bridge and
tap1network interface:# ovs-vsctl add-br ovs-br0 # ip tuntap add dev tap1 mode tap # ip link set dev tap1 down # ip link set dev tap1 up
Add
eno1,tap1into OVS bridge:# ovs-vsctl add-port ovs-br0 eno1 # ovs-vsctl add-port ovs-br0 tap1
Modify
launch_uos.shscript to enabletap1device before launching the User VM:# sed -i "s/virtio-net,tap0/virtio-net,tap1/" /usr/share/acrn/samples/nuc/launch_uos.sh
Note
If you set up the User VM via acrn_quick_setup.sh, then replace
/usr/share/acrn/samples/nuc/launch_uos.shwith/root/launch_uos_<version>.shinsedcommand above.The User VM and Service VM network will work after rebooting the host via
ovs-br0
Example for VLAN network based on OVS in ACRN
We will use the OVS bridge VLAN feature to support network isolation between VMs. Figure 65 shows an example with four VMs in two hosts, with the hosts directly connected by a network cable. The VMs are interconnected through statically configured IP addresses, and use VLAN id to put VM1 of HOST1 and VM1 of HOST2 into a VLAN. Similarly, VM2 of HOST1 and VM2 of HOST2 are put into a VLAN. In this configuration, the VM1s can communicate with each other, and VM2s can directly communicate with each other, but VM1s and VM2s cannot connect.
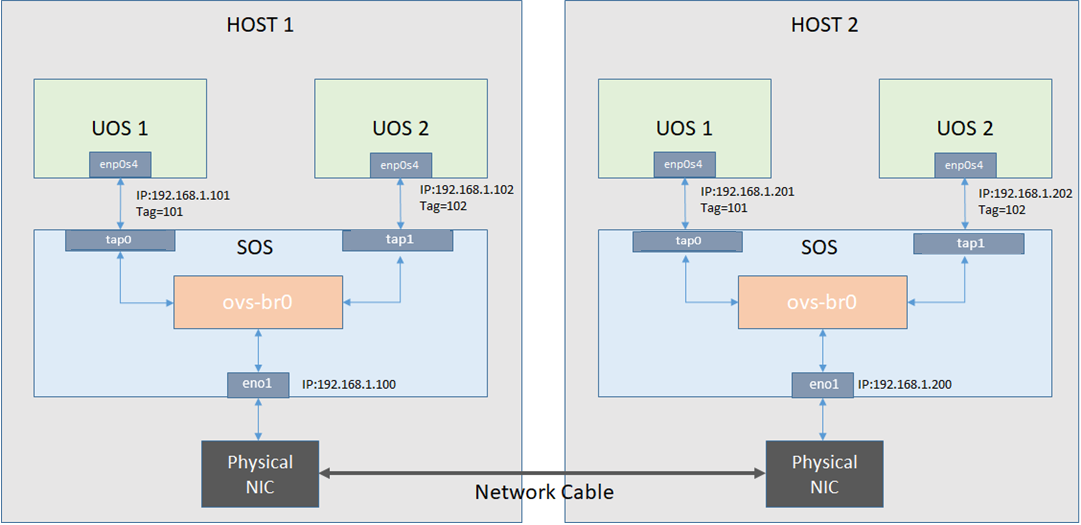
Figure 65 An example of OVS usage in ACRN
Follow these steps to set up OVS networks on both HOSTs:
Set up
ovs-br0instead ofacrn-br0, (refer to the the previous section How to enable OVS in ACRN for details).Add
eno1,tap<VM number>into OVS bridge:# ovs-vsctl add-port ovs-br0 eno1 # ovs-vsctl add-port ovs-br0 tap1 tag=101 # ovs-vsctl add-port ovs-br0 tap2 tag=102 # sed -i "s/virtio-net,tap0/virtio-net,tap1/" <1st launch_uos script> # sed -i "s/virtio-net,tap0/virtio-net,tap2/" <2nd launch_uos script> # reboot
Configure the static IP address on both HOSTs and it’s VMs:
# <HOST_1 Service VM>:
# ifconfig ovs-br0 192.168.1.100
# <HOST_1 User VM1>:
# ifconfig enp0s4 192.168.1.101
# <HOST_1 User VM2>:
# ifconfig enp0s4 192.168.1.102
#
# <HOST_2 Service VM>:
# ifconfig ovs-br0 192.168.1.200
# <HOST_2 User VM1>:
# ifconfig enp0s4 192.168.1.201
# <HOST_2 User VM2>:
# ifconfig enp0s4 192.168.1.202
After that, it will succeed to
pingfrom VM1 of HOST1 to VM1 of HOST2, but fail topingfrom VM1 of HOST1 to VM2 of HOST2.