Getting Started Guide for ACRN Industry Scenario
Verified version
- Clear Linux version: 32680
- ACRN-hypervisor tag: v1.6 (acrn-2020w12.5-140000p)
- ACRN-Kernel (Service VM kernel): 4.19.97-104.iot-lts2018-sos
Prerequisites
The example below is based on the Intel Whiskey Lake NUC platform with two disks, an NVMe disk for the Clear Linux-based Service VM and a SATA disk for the RTVM.
- Intel Whiskey Lake (aka WHL) NUC platform with two disks inside (refer to the tables for detailed information).
- com1 is the serial port on WHL NUC. If you are still using the KBL NUC and trying to enable the serial port on it, navigate to the troubleshooting section that discusses how to prepare the cable.
- Follow the steps below to install Clear Linux OS (ver: 32680) onto the NVMe disk of the WHL NUC.
Create a bootable USB drive on Linux*:
Download the Clear Linux OS Server image.
Plug in the USB drive.
Use the
lsblkcommand line to identify the USB drive:$ lsblk | grep sd* sda 8:0 0 931.5G 0 disk ├─sda1 8:1 0 512M 0 part /boot/efi ├─sda2 8:2 0 930.1G 0 part / └─sda3 8:3 0 977M 0 part [SWAP] sdc 8:32 1 57.3G 0 disk └─sdc1 8:33 1 57.3G 0 partUnmount all the
/dev/sdcpartitions and burn the image onto the USB drive:$ umount /dev/sdc* 2>/dev/null $ sudo dd if=./clear-32680-live-server.iso of=/dev/sdc oflag=sync status=progress bs=4MPlug in the USB drive to the WHL NUC and boot from USB.
Launch the Clear Linux OS installer boot menu.
With Clear Linux OS highlighted, select Enter.
Log in with your root account and new password.
Run the installer using the following command:
# clr-installerFrom the Main menu, select Configure Installation Media and set Destructive Installation to the NVMe disk.
Select Manage User and choose Add New User.
Select Telemetry to set Tab to highlight your choice.
Press A to show the Advanced options.
Select Select additional bundles and add bundles for network-basic, and user-basic.
Select Automatic OS Updates and choose No [Disable].
Select Install.
Select Confirm Install in the Confirm Installation window to start the installation.
Note
Refer to these step-by-step instructions from the Clear Linux OS installation guide.
Hardware Setup
| Platform (Intel x86) | Product/kit name | Hardware | Descriptions |
|---|---|---|---|
| Whiskey Lake | WHL-IPC-I7 | Processor |
|
| Graphics |
|
||
| System memory |
|
||
| Storage capabilities |
|
| [1] | The maximum supported memory size for ACRN is 16GB. If you are using 32GB memory, follow the How do I configure ACRN’s memory size? instructions to make a customized ACRN hypervisor that can support 32GB memory. For more detailed information about how to build ACRN from the source code, refer to this guide. |
Set up the ACRN Hypervisor for industry scenario
The ACRN industry scenario environment can be set up in several ways. The two listed below are recommended:
Use the pre-installed industry ACRN hypervisor
Note
Skip this section if you choose Using the ACRN industry out-of-the-box image.
Boot Clear Linux from NVMe disk.
Log in and download ACRN quick setup script:
$ wget https://raw.githubusercontent.com/projectacrn/acrn-hypervisor/master/doc/getting-started/acrn_quick_setup.sh
$ sudo chmod +x acrn_quick_setup.sh
Run the script to set up Service VM:
$ sudo ./acrn_quick_setup.sh -s 32680 -d -e /dev/nvme0n1p1 -i
Note
-ioption means the industry scenario efi image will be used, e.g.acrn.nuc7i7dnb.industry.efi. For the detailed usage of theacrn_quick_setup.shscript, refer to the quick setup ACRN guide or simply type./acrn_quick_setup.sh -h.Use
efibootmgr -vcommand to check the ACRN boot order:BootCurrent: 0005 Timeout: 1 seconds BootOrder: 0000,0003,0005,0001,0004 Boot0000* ACRN HD(1,GPT,cb72266b-c83d-4c56-99e3-3e7d2f4bc175,0x800,0x47000)/File(\EFI\acrn\acrn.efi)u.a.r.t.=.d.i.s.a.b.l.e.d. Boot0001* UEFI OS HD(1,GPT,335d53f0-50c1-4b0a-b58e-3393dc0389a4,0x800,0x47000)/File(\EFI\BOOT\BOOTX64.EFI)..BO Boot0003* Linux bootloader HD(3,GPT,af681d62-3a96-43fb-92fc-e98e850f867f,0xc1800,0x1dc31800)/File(\EFI\org.clearlinux\bootloaderx64.efi) Boot0004* Hard Drive BBS(HD,,0x0)..GO..NO........o.K.I.N.G.S.T.O.N. .R.B.U.S.N.S.8.1.8.0.S.3.1.2.8.G.J...................A..........................>..Gd-.;.A..MQ..L.0.5.2.0.B.6.6.7.2.8.F.F.3.D.1.0. . . . .......BO..NO........m.F.O.R.E.S.E.E. .2.5.6.G.B. .S.S.D...................A......................................0..Gd-.;.A..MQ..L.J.2.7.1.0.0.R.0.0.0.9.6.9.......BO Boot0005* UEFI OS HD(1,GPT,cb72266b-c83d-4c56-99e3-3e7d2f4bc175,0x800,0x47000)/File(\EFI\BOOT\BOOTX64.EFI)..BO
Note
Ensure that ACRN is first in the boot order, or you may use the
efibootmgr -o 1command to move it to the first position. If you need to enable the serial port, run the following command before rebooting:efibootmgr -c -l '\EFI\acrn\acrn.efi' -d /dev/nvme0n1 -p 1 -L ACRN -u "uart=port@0x3f8 "Note the extra space at the end of the EFI command-line options string. This is a workaround for a current efi-stub bootloader name issue. It ensures that the end of the string is properly detected.
Reboot WHL NUC.
Use the
dmesgcommand to ensure that the Service VM boots:$ sudo dmesg | grep ACRN [ 0.000000] Hypervisor detected: ACRN [ 1.252840] ACRNTrace: Initialized acrn trace module with 4 cpu [ 1.253291] ACRN HVLog: Failed to init last hvlog devs, errno -19 [ 1.253292] ACRN HVLog: Initialized hvlog module with 4
Note
If you want to log in to the Service VM with root privileges, use sudo passwd to create a root user
so that you can log in as root on the next reboot.
Use the ACRN industry out-of-the-box image
Note
If you are following the section above to set up the Service VM, jump to the next section.
Boot Clear Linux from SATA disk.
Download the Service VM industry image:
# wget https://github.com/projectacrn/acrn-hypervisor/releases/download/acrn-2020w12.5-140000p/sos-industry-32680.img.xz
Note
You may also follow Generate a Service VM image to build the image by yourself.
Decompress the .xz image:
# xz -d sos-industry-32680.img.xzBurn the Service VM image onto the NVMe disk:
# dd if=sos-industry-32680.img of=/dev/nvme0n1 bs=4M oflag=sync status=progress iflag=fullblock seek=0 conv=notruncConfigure the EFI firmware to boot the ACRN hypervisor by default:
# efibootmgr -c -l "\EFI\acrn\acrn.efi" -d /dev/nvme0n1 -p 1 -L "ACRN" -u "uart=disabled "Or use the following command to enable the serial port:
# efibootmgr -c -l "\EFI\acrn\acrn.efi" -d /dev/nvme0n1 -p 1 -L "ACRN" -u "uart=port@0x3f8 "Note
Note the extra space at the end of the EFI command-line options strings above. This is a workaround for a current efi-stub bootloader name issue. It ensures that the end of the string is properly detected.
Reboot the test machine. After the Clear Linux OS boots, log in as “root” for the first time.
Install and launch the Preempt-RT VM
In this section, we will use Virtio-blk to launch the Preempt-RT VM. If you need better performance, follow Building ACRN in Docker to build the ACRN kernel for the Service VM, and then passthrough the SATA disk to launch the Preempt-RT VM.
Log in to the Service VM with root privileges.
Download the Preempt-RT VM image:
# wget https://github.com/projectacrn/acrn-hypervisor/releases/download/acrn-2020w12.5-140000p/preempt-rt-32680.img.xz
Note
You may also follow Generate a User VM Preempt-RT image to build the Preempt-RT VM image by yourself.
Decompress the xz image:
# xz -d preempt-rt-32680.img.xzBurn the Preempt-RT VM image onto the SATA disk:
# dd if=preempt-rt-32680.img of=/dev/sda bs=4M oflag=sync status=progress iflag=fullblock seek=0 conv=notruncModify the script to use the virtio device.
# NVME pass-through
#echo ${passthru_vpid["nvme"]} > /sys/bus/pci/drivers/pci-stub/new_id
#echo ${passthru_bdf["nvme"]} > /sys/bus/pci/devices/${passthru_bdf["nvme"]}/driver/unbind
#echo ${passthru_bdf["nvme"]} > /sys/bus/pci/drivers/pci-stub/bind
/usr/bin/acrn-dm -A -m $mem_size -s 0:0,hostbridge \ --lapic_pt \ --rtvm \ --virtio_poll 1000000 \ -U 495ae2e5-2603-4d64-af76-d4bc5a8ec0e5 \ -s 2,virtio-blk,/dev/sda \ -s 3,virtio-console,@stdio:stdio_port \ $pm_channel $pm_by_vuart \ --ovmf /usr/share/acrn/bios/OVMF.fd \ hard_rtvm }Upon deployment completion, launch the RTVM directly onto your WHL NUC:
# /usr/share/acrn/samples/nuc/launch_hard_rt_vm.sh
RT Performance Test
Cyclictest introduction
The cyclictest is most commonly used for benchmarking RT systems. It is one of the most frequently used tools for evaluating the relative performance of real-time systems. Cyclictest accurately and repeatedly measures the difference between a thread’s intended wake-up time and the time at which it actually wakes up in order to provide statistics about the system’s latencies. It can measure latencies in real-time systems that are caused by hardware, firmware, and the operating system. The cyclictest is currently maintained by Linux Foundation and is part of the test suite rt-tests.
Pre-Configurations
Firmware update on the NUC
If you need to update to the latest UEFI firmware for the NUC hardware. Follow these BIOS Update Instructions for downloading and flashing an updated BIOS for the NUC.
Recommended BIOS settings
| Hyper-Threading | Intel Advanced Menu -> CPU Configuration | Disabled |
| Intel VMX | Intel Advanced Menu -> CPU Configuration | Enable |
| Speed Step | Intel Advanced Menu -> Power & Performance -> CPU - Power Management Control | Disabled |
| Speed Shift | Intel Advanced Menu -> Power & Performance -> CPU - Power Management Control | Disabled |
| C States | Intel Advanced Menu -> Power & Performance -> CPU - Power Management Control | Disabled |
| RC6 | Intel Advanced Menu -> Power & Performance -> GT - Power Management | Disabled |
| GT freq | Intel Advanced Menu -> Power & Performance -> GT - Power Management | Lowest |
| SA GV | Intel Advanced Menu -> Memory Configuration | Fixed High |
| VT-d | Intel Advanced Menu -> System Agent Configuration | Enable |
| Gfx Low Power Mode | Intel Advanced Menu -> System Agent Configuration -> Graphics Configuration | Disabled |
| DMI spine clock gating | Intel Advanced Menu -> System Agent Configuration -> DMI/OPI Configuration | Disabled |
| PCH Cross Throttling | Intel Advanced Menu -> PCH-IO Configuration | Disabled |
| Legacy IO Low Latency | Intel Advanced Menu -> PCH-IO Configuration -> PCI Express Configuration | Enabled |
| PCI Express Clock Gating | Intel Advanced Menu -> PCH-IO Configuration -> PCI Express Configuration | Disabled |
| Delay Enable DMI ASPM | Intel Advanced Menu -> PCH-IO Configuration -> PCI Express Configuration | Disabled |
| DMI Link ASPM | Intel Advanced Menu -> PCH-IO Configuration -> PCI Express Configuration | Disabled |
| Aggressive LPM Support | Intel Advanced Menu -> PCH-IO Configuration -> SATA And RST Configuration | Disabled |
| USB Periodic Smi | Intel Advanced Menu -> LEGACY USB Configuration | Disabled |
| ACPI S3 Support | Intel Advanced Menu -> ACPI Settings | Disabled |
| Native ASPM | Intel Advanced Menu -> ACPI Settings | Disabled |
Note
BIOS settings depend on the platform and BIOS version; some may not be applicable.
Configure RDT
In addition to setting the CAT configuration via HV commands, we allow developers to add CAT configurations to the VM config and configure automatically at the time of RTVM creation. Refer to RDT Configuration for details on RDT configuration and RDT Allocation Feature Supported by Hypervisor for details on RDT high-level design.
Set up the core allocation for the RTVM
In our recommended configuration, two cores are allocated to the RTVM: core 0 for housekeeping and core 1 for RT tasks. In order to achieve this, follow the below steps to allocate all housekeeping tasks to core 0:
Launch RTVM:
# /usr/share/acrn/samples/nuc/launch_hard_rt_vm.shLog in to RTVM as root and run the script as below:
#!/bin/bash
# Copyright (C) 2019 Intel Corporation.
# SPDX-License-Identifier: BSD-3-Clause
# Move all IRQs to core 0.
for i in `cat /proc/interrupts | grep '^ *[0-9]*[0-9]:' | awk {'print $1'} | sed 's/:$//' `;
do
    echo setting $i to affine for core zero
    echo 1 > /proc/irq/$i/smp_affinity
done

# Move all rcu tasks to core 0.
for i in `pgrep rcu`; do taskset -pc 0 $i; done

# Change realtime attribute of all rcu tasks to SCHED_OTHER and priority 0
for i in `pgrep rcu`; do chrt -v -o -p 0 $i; done

# Change realtime attribute of all tasks on core 1 to SCHED_OTHER and priority 0
for i in `pgrep /1`; do chrt -v -o -p 0 $i; done

# Change realtime attribute of all tasks to SCHED_OTHER and priority 0
for i in `ps -A -o pid`; do chrt -v -o -p 0 $i; done

echo disabling timer migration
echo 0 > /proc/sys/kernel/timer_migration
Note
You can ignore the error messages during the script running.
Run cyclictest
Refer to the troubleshooting section below that discusses how to enable the network connection for RTVM.
Launch RTVM and log in as root.
Install the
cyclictesttool:# swupd bundle-add dev-utilsUse the following command to start cyclictest:
# cyclictest -a 1 -p 80 -m -N -D 1h -q -H 30000 --histfile=test.logParameter descriptions:
-a 1: to bind the RT task to core 1 -p 80: to set the priority of the highest prio thread -m: lock current and future memory allocations -N: print results in ns instead of us (default us) -D 1h: to run for 1 hour, you can change it to other values -q: quiee mode; print a summary only on exit -H 30000 –histfile=test.log: dump the latency histogram to a local file
Troubleshooting
Use serial port on KBL NUC
You can enable the serial console on the KBL NUC (NUC7i7DNH). The KBL NUC has a serial port header you can expose with a serial DB9 header cable. You can build this cable yourself; refer to the KBL NUC product specification as shown below:
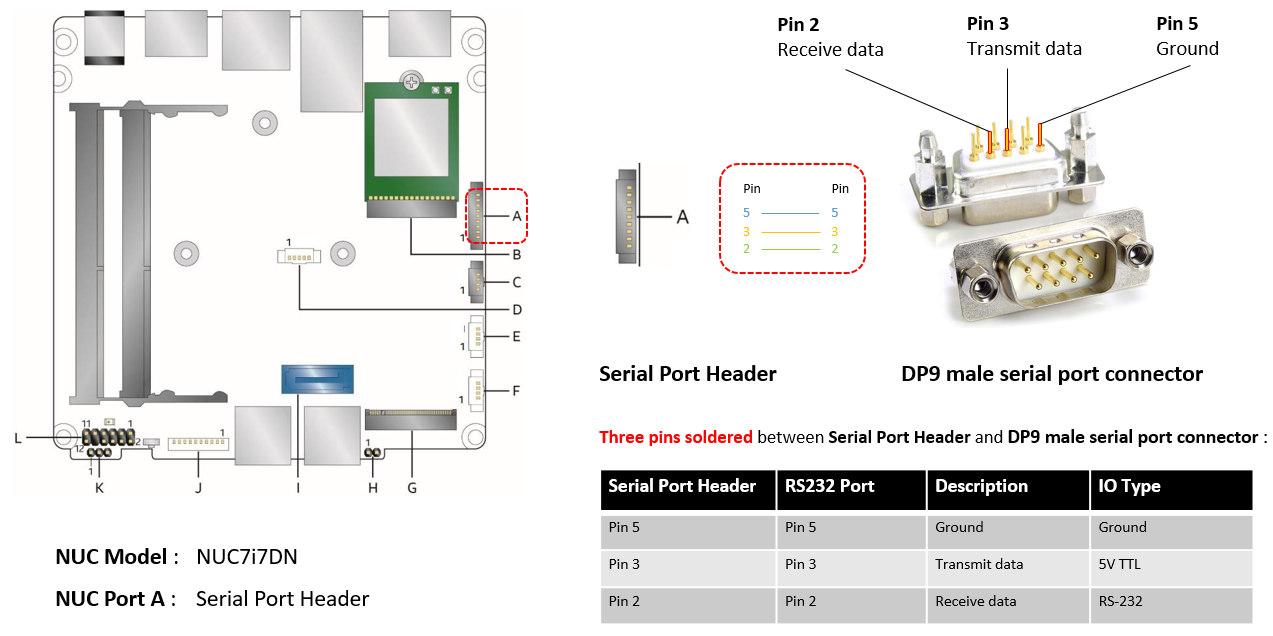
Figure 21 KBL serial port header details

Figure 22 KBL serial port header to RS232 cable
Or you can purchase such a cable.
You’ll also need an RS232 DB9 female to USB cable, or an RS232 DB9 female/female (NULL modem) cross-over cable to connect to your host system.
Note that If you want to use the RS232 DB9 female/female cable, choose the cross-over
type rather than straight-through type.
EFI image doesn’t exist
You might see the error message if you are running the acrn_quick_setup.sh script
on an older Clear Linux OS ( < 31470 ):
/usr/lib/acrn/acrn.wl10.industry.efi doesn't exist.
Use one of these efi images from /usr/lib/acrn.
------
/usr/lib/acrn/acrn.nuc7i7dnb.industry.efi
------
Copy the efi image to /usr/lib/acrn/acrn.wl10.industry.efi, then run the script again.
To fix it, just rename the existing efi image to /usr/lib/acrn/acrn.wl10.industry.efi and
then run the script again:
$ sudo cp /usr/lib/acrn/acrn.nuc7i7dnb.industry.efi /usr/lib/acrn/acrn.wl10.industry.efi
$ sudo ./acrn_quick_setup.sh -s <target OS version> -d -e <target EFI partition> -i
Enabling the network on RTVM
If you need to access the internet, you must add the following command line to the
launch_hard_rt_vm.sh script before launch it:
/usr/bin/acrn-dm -A -m $mem_size -s 0:0,hostbridge \
   --lapic_pt \
   --rtvm \
   --virtio_poll 1000000 \
   -U 495ae2e5-2603-4d64-af76-d4bc5a8ec0e5 \
   -s 2,passthru,02/0/0 \
   -s 3,virtio-console,@stdio:stdio_port \
   -s 8,virtio-net,tap0 \
   $pm_channel $pm_by_vuart \
   --ovmf /usr/share/acrn/bios/OVMF.fd \
   hard_rtvm
}
Passthrough a hard disk to the RTVM
Use the
lspcicommand to ensure that the correct SATA device IDs will be used for the passthrough before launching the script:# lspci -nn | grep -i sata 00:17.0 SATA controller [0106]: Intel Corporation Cannon Point-LP SATA Controller [AHCI Mode] [8086:9dd3] (rev 30)
Modify the script to use the correct SATA device IDs and bus number:
# vim /usr/share/acrn/samples/nuc/launch_hard_rt_vm.sh

passthru_vpid=(
["eth"]="8086 156f"
["sata"]="8086 9d03"
["nvme"]="8086 f1a6"
)
passthru_bdf=(
["eth"]="0000:00:1f.6"
["sata"]="0000:00:17.0"
["nvme"]="0000:02:00.0"
)

# SATA pass-through
echo ${passthru_vpid["sata"]} > /sys/bus/pci/drivers/pci-stub/new_id
echo ${passthru_bdf["sata"]} > /sys/bus/pci/devices/${passthru_bdf["sata"]}/driver/unbind
echo ${passthru_bdf["sata"]} > /sys/bus/pci/drivers/pci-stub/bind

# NVME pass-through
#echo ${passthru_vpid["nvme"]} > /sys/bus/pci/drivers/pci-stub/new_id
#echo ${passthru_bdf["nvme"]} > /sys/bus/pci/devices/${passthru_bdf["nvme"]}/driver/unbind
#echo ${passthru_bdf["nvme"]} > /sys/bus/pci/drivers/pci-stub/bind
   --rtvm \
   --virtio_poll 1000000 \
   -U 495ae2e5-2603-4d64-af76-d4bc5a8ec0e5 \
   -s 2,passthru,00/17/0 \
   -s 3,virtio-console,@stdio:stdio_port \
   -s 8,virtio-net,tap0 \
   $pm_channel $pm_by_vuart \
   --ovmf /usr/share/acrn/bios/OVMF.fd \
   hard_rtvm

 }
Upon deployment completion, launch the RTVM directly onto your WHL NUC:
# /usr/share/acrn/samples/nuc/launch_hard_rt_vm.sh