Configuration and Development Overview
This overview is for developers who are new to ACRN and are responsible for configuring and building the hypervisor and the VMs for applications. It will introduce you to the general development process, including ACRN components and tools.
The overview covers the process at an abstract and universal level.
Abstract: the overall structure rather than detailed instructions
Universal: applicable to most use cases
This overview complements the Getting Started Guide. The guide provides step-by-step instructions to enable an ACRN example for first-time use, while the overview provides background information and serves as a gateway to additional features and resources that can help you develop your solution.
See What Is ACRN for information about ACRN benefits, use cases, and architecture.
Development Environment
The recommended development environment for ACRN consists of two machines:
Development computer where you configure and build ACRN images
Target system where you install and run ACRN images
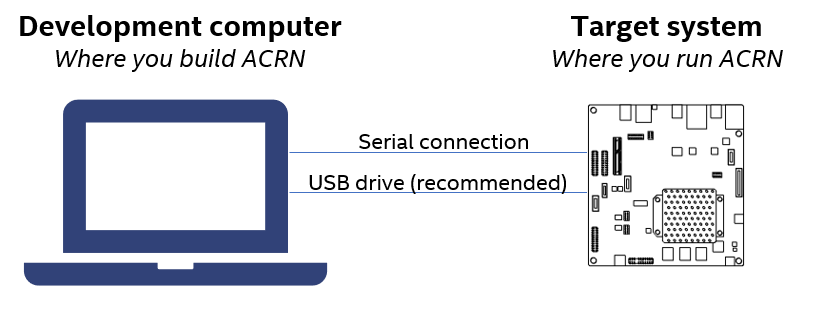
ACRN requires a serial output from the target system to the development computer for debugging and system messaging. If your target doesn’t have a serial output, here are some tips for connecting a serial output.
You need a way to copy the built ACRN images and other files between the development computer and target system. ACRN documentation, such as the Getting Started Guide, offers steps for copying via USB disk as a simple solution.
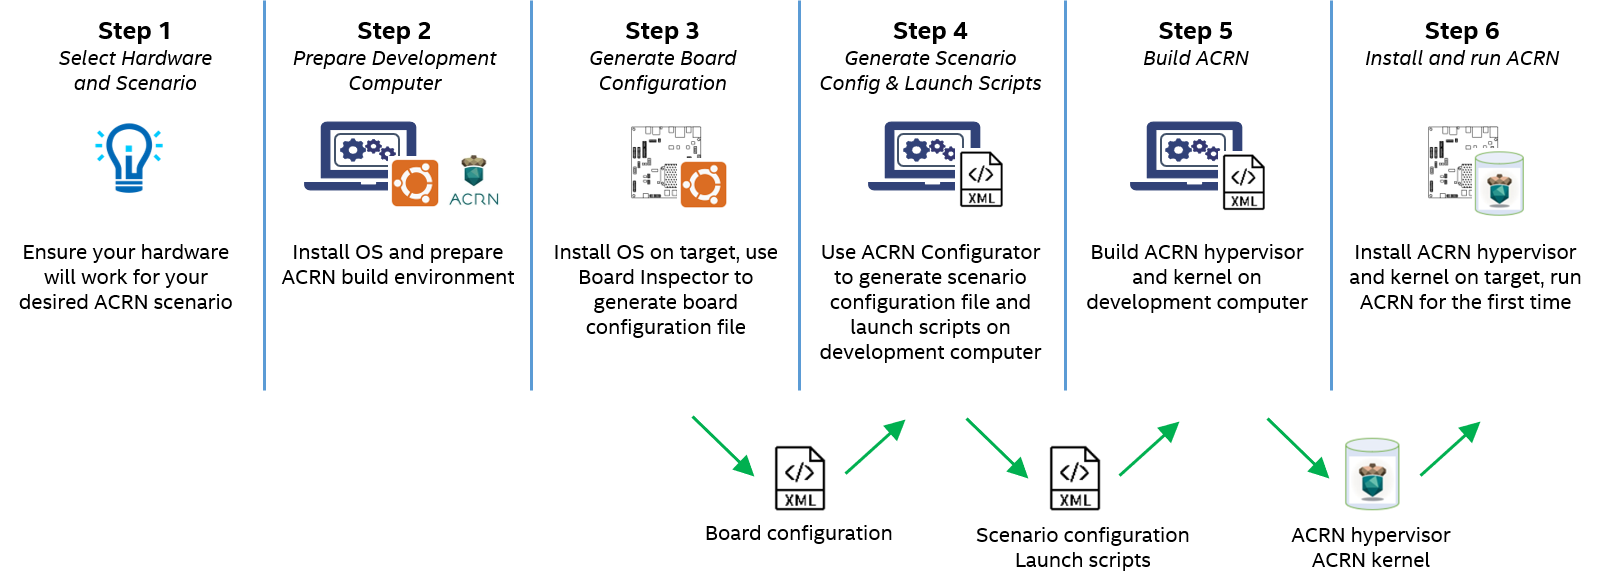
General Process for Building an ACRN Hypervisor
The general process for configuring and building an ACRN hypervisor is illustrated in the following figure. Additional details follow.
 Step 1: Select Hardware and Scenario
ACRN configuration is hardware and scenario specific. You will need to learn about supported ACRN hardware and scenarios, and select the right ones for your needs.
Select Your Hardware
ACRN supports certain Intel processors. Development kits are widely available. See Supported Hardware.
Select Your Scenario
A scenario defines a specific ACRN configuration, such as the type and number of VMs that can be run, their attributes, and the resources they have access to.
This image shows an example of an ACRN scenario to illustrate the types of VMs that ACRN offers:
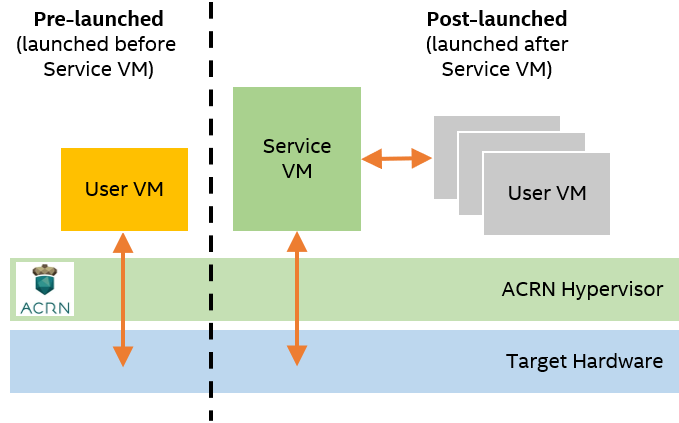
ACRN offers three types of VMs:
Pre-launched User VMs: These VMs are automatically launched at boot time by the hypervisor. They run independently of other VMs and own dedicated hardware resources, such as a CPU core, memory, and I/O devices. Other VMs, including the Service VM, may not even be aware of a pre-launched VM’s existence. The configuration of pre-launched VMs is static and must be defined at build time. They are well-suited for safety-critical applications and where very strict isolation, including from the Service VM, is desirable.
Service VM: A special VM, required for scenarios that have post-launched User VMs. The Service VM can access hardware resources directly by running native drivers and provides device sharing services to post-launched User VMs through the ACRN Device Model (DM)
acrn-dmapplication. The Device Model runs inside the Service VM and is responsible for creating and launching a User VM and then performing device emulation for the devices configured for sharing with that User VM. ACRN supports one Service VM.Post-launched User VMs: These VMs typically share hardware resources via the Service VM and Device Model. They can also access hardware devices directly if they’ve been configured as passthrough devices. Unlike pre-launched VMs, you can change the configuration at runtime. They are well-suited for non-safety applications, including human machine interface (HMI), artificial intelligence (AI), computer vision, real-time, and others.
The names “pre-launched” and “post-launched” refer to the boot order of these VMs. The ACRN hypervisor launches the pre-launched VMs first, then launches the Service VM. The Service VM launches the post-launched VMs.
Due to the static configuration of pre-launched VMs, they are recommended only if you need complete isolation from the rest of the system. Most use cases can meet their requirements without pre-launched VMs. Even if your application has stringent real-time requirements, start by testing the application on a post-launched VM before considering a pre-launched VM.
Predefined Scenarios
To help accelerate the configuration process, ACRN offers the following predefined sample scenarios:
Shared scenario: This scenario represents a traditional computing, memory, and device resource sharing model among VMs. It has post-launched User VMs and the required Service VM. There are no pre-launched VMs in this scenario.
Partitioned scenario: This scenario has pre-launched User VMs to demonstrate VM partitioning: the User VMs are independent and isolated, and they do not share resources. There is no need for the Service VM or Device Model because all partitioned VMs run native device drivers and directly access their configured resources.
Hybrid scenario: This scenario simultaneously supports both sharing and partitioning on the consolidated system. It has pre-launched and post-launched VMs, along with the Service VM.
ACRN provides predefined configuration files and documentation to help you set up these scenarios. You can customize the files for your use case, as described later in Step 4: Generate a Scenario Configuration File and Launch Scripts.
 Step 2: Prepare the Development Computer
Your development computer requires certain dependencies to configure and build ACRN:
Ubuntu OS (ACRN development is not supported on Windows.)
Build tools
ACRN hypervisor source code
If your scenario has a Service VM: ACRN kernel source code
 Step 3: Generate a Board Configuration File
The Board Inspector Tool board_inspector.py, found in the ACRN
hypervisor source code, enables you to generate a board configuration file on
the target system.
A board configuration file stores hardware-specific information extracted from the target system. This XML file describes the capacity of hardware resources (such as processors and memory), platform power states, available devices, and BIOS settings. The file is used to configure and build the ACRN hypervisor, because each hypervisor instance is specific to your target hardware.
The following sections provide an overview and important information to keep in mind when using the Board Inspector.
Configure BIOS Settings
You must configure all of your target’s BIOS settings before running the Board Inspector tool, because the tool records the current BIOS settings in the board configuration file.
ACRN requires the BIOS settings listed in Prepare the Target and Generate a Board Configuration File of the Getting Started Guide.
Use the Board Inspector to Generate a Board Configuration File
The Board Inspector requires certain dependencies to be present on the target system:
Ubuntu OS
Tools and kernel command-line options that allow the Board Inspector to collect information about the target hardware
After setting up the dependencies, you run the Board Inspector via command-line. The tool generates the board configuration file specific to your hardware.
Important
Whenever you change the configuration of the board, such as BIOS settings or PCI ports, you must generate a new board configuration file.
You will need the board configuration file in Step 4: Generate a Scenario Configuration File and Launch Scripts and Step 5: Build ACRN.
Step 4: Generate a Scenario Configuration File and Launch Scripts
The ACRN Configurator Tool acrn_configurator.py enables you to
configure your ACRN hypervisor and VMs via a web-based user interface on your
development computer. Using the tool, you define your scenario settings and save
them to a scenario configuration file. For scenarios with post-launched User
VMs, you must also configure and generate launch scripts.
The following sections provide an overview and important information to keep in mind when using the ACRN Configurator.
Generate a Scenario Configuration File
A scenario configuration file defines a working scenario by configuring hypervisor capabilities and defining some VM attributes and resources. We call these settings “static” because they are used to build the hypervisor. The file contains:
All hypervisor settings
All pre-launched User VM settings
All Service VM settings
Some post-launched User VM settings, while other settings are in the launch script
Before using the ACRN Configurator to generate a scenario configuration file, be sure you have the board configuration file that you generated in Step 3: Generate a Board Configuration File. The tool needs the board configuration file to validate that your custom scenario is supported by the target hardware.
You can use the tool to create a new scenario configuration file or modify an existing one, such as a predefined scenario described in Step 1: Select Hardware and Scenario. The tool’s GUI enables you to edit the configurable items in the file, such as adding VMs, modifying VM attributes, or deleting VMs. The tool validates your inputs against your board configuration file. After validation is successful, the tool generates your custom scenario configuration file in XML format.
Generate Launch Scripts
A launch script invokes the Service VM’s Device Model to create a post-launched User VM. The launch script defines settings needed to launch the User VM and emulate the devices configured for sharing with that User VM. We call these settings “dynamic” because they are used at runtime.
Before using the ACRN Configurator to generate a launch script, be sure you have your board configuration file and scenario configuration file. The tool needs both files to validate your launch script configuration.
The process of generating launch scripts begins by choosing to create a new launch configuration or modify an existing one. You then use the GUI to edit the configurable settings of each post-launched User VM in your scenario. The tool validates your inputs against your board configuration file and scenario configuration file. After validation is successful, the tool generates your custom launch configuration file in XML format. You then use the tool to generate the launch scripts. The tool creates one launch script for each VM defined in the launch configuration file.
Note
The ACRN Configurator may not show all editable parameters for scenario configuration files and launch scripts. You can edit the parameters manually. See ACRN Configuration Data.
Step 5: Build ACRN
The ACRN hypervisor source code provides a makefile to build the ACRN hypervisor
binary and associated components. In the make command, you need to specify
your board configuration file and scenario configuration file. The build
typically takes a few minutes.
If your scenario has a Service VM, you also need to build the ACRN kernel for the Service VM. The ACRN kernel source code provides a predefined configuration file and a makefile to build the ACRN kernel binary and associated components. The kernel build can take 15 minutes or less on a fast computer, but could take an hour or more depending on the performance of your development computer. For more information about the kernel parameters, see ACRN Kernel Parameters.
Step 6: Install and Run ACRN
The last step is to make final changes to the target system configuration and then boot ACRN.
At a high level, you will:
Copy the built ACRN hypervisor files, Service VM kernel files, and launch scripts from the development computer to the target.
Configure GRUB to boot the ACRN hypervisor, pre-launched VMs, and Service VM. Reboot the target, and launch ACRN.
If your scenario contains a post-launched VM, install an OS image for the post-launched VM and run the launch script you created in Step 4: Generate a Scenario Configuration File and Launch Scripts.
Learn More
To get ACRN up and running for the first time, see the Getting Started Guide for step-by-step instructions.
If you have already completed the Getting Started Guide , see the Advanced Guides for more information about complex scenarios, advanced features, and debugging.