User VM Guide
The ACRN hypervisor uses a Linux-based Service VM and can run User VMs simultaneously, providing a powerful software platform to build complex computing systems. A User VM can run a variety of OSs including Linux or Windows, or an RTOS such as Zephyr or VxWorks. As shown in the Getting Started Guide, you use the ACRN Configurator to define options used to build the static configuration of your ACRN system based on your system design, available capabilities of your target hardware, and performance characteristics such as those required for real-time needs. The Configurator also lets you define dynamic settings for launching User VMs and specifying the resources they need access to.
ACRN provides a framework called the ACRN Device Model, for sharing physical system resources and providing virtual device emulation with rich I/O mediators. The Device Model also supports non-emulated device passthrough access to satisfy time-sensitive requirements and low-latency access needs of real-time applications.
In this and accompanying documents, we provide guidance for configuring and deploying post-launched User VMs, and additional information about OS-specific settings based on your User VM OS choice. We also show how to configure the system for accessing virtual devices emulated by the ACRN Device Model or passthrough resources dedicated to a specific VM.
ACRN also supports pre-launched User VMs, with dedicated resources that are not shared with other VMs. Pre-launched VMs are configured statically using the Configurator, with their own boot devices, CPU, memory, and other system resources. We’ll discuss pre-launched VMs separately.
User VM OS Choices
ACRN has no restrictions on what OS is used by a User VM. The ACRN team has tested Standard User VMs running Ubuntu 20.04 and Windows 10, and real-time User VMs running Zephyr, VxWorks, Xenomai, and Linux VMs running on a PREEMPT_RT-patched kernel.
The ACRN Service VM and its Device Model run on Ubuntu 20.04 using a patched kernel built from the acrn-kernel GitHub repository. The Service VM can access hardware resources directly by running native drivers and provides device sharing services to post-launched User VMs. The Service VM is not dependent on any settings in your User VM configuration and is used for both Standard and Real-time post-launched User VMs. The Service VM is not used by pre-launched User VMs.
Configuration Overview
In the following sections, we provide general guidance and then link to OS-specific guidance documents based on your choice of User VM OS.
Separately, and out of scope for this document, you’ll need to create a combined application and User VM OS image for each User VM.
The ACRN Device Model within the Service VM starts your User VM image using a launch script created by the ACRN Configurator, based on the settings you provided. These settings include the location on the target system storage device for that image, User VM memory size, console, vUART settings for communication, virtual I/O devices your application uses, and more. Available launch script options are documented in the Device Model Parameters and the Scenario Configuration Options documentation. We’ll also provide examples for selected capabilities in our OS-specific guidance.
This guide assumes you’ve already followed the Getting Started Guide and have followed steps to prepare the development computer and installed development system prerequisites, prepared the target and generated a board configuration file, and have installed the ACRN Configurator.
Using the ACRN Configurator
Independent of your User VM OS choice, run the ACRN Configurator and create a scenario with a Post-launched VM for each User VM you will be running. We use one Ubuntu-based User VM in this overview:

Figure 8 Creating a new scenario in the Configurator
Use the Configurator to give the VM a name, and define configuration options specific for this VM, such as memory and VM type (Standard or Real-time):
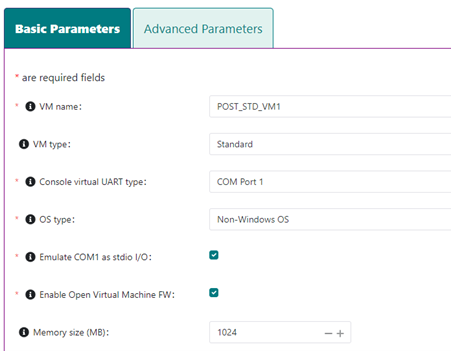
Figure 9 Set VM basic configuration options
And define where the User VM image will be on the target system (in this example, an Ubuntu 20.04 desktop ISO image):
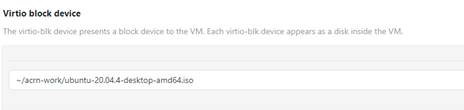
Figure 10 Set VM image using virtio block device
After the configuration settings are to your liking, save the configuration. When saving, the ACRN Configurator first validates your scenario configuration and reports any issues that need your attention. If successful, it writes out the updated scenario XML file and launch script to your working directory. You’ll use this launch script to start the User VM on the target.
Rebuild the ACRN Hypervisor
After exiting the ACRN Configurator, build the ACRN hypervisor (based on the static configuration parameters in your scenario) on your development computer, as was done in the Getting Started Guide:
cd ~/acrn-work/acrn-hypervisor
make clean && make BOARD=~/acrn-work/MyConfiguration/my_board.board.xml SCENARIO=~/acrn-work/MyConfiguration/scenario.xml
The build typically takes a few minutes. When done, the build generates a Debian
package in the ./build directory.
This Debian package contains the ACRN hypervisor and tools to ease installing ACRN on the target.
Transfer Files to the Target, Install, and Reboot
We’ll need to get the Debian package containing the hypervisor files we built to
the target system, along with the launch scripts and User VM images. In the
Getting Started Guide, we used a USB stick, but you could also use the network to copy
files using scp. Install the Debian package and reboot to run ACRN and the
Service VM. Then use the launch script to start each User VM.
User VM Persistence
In the Getting Started Guide (and in the previous overview), we used a standard Ubuntu 20.04 ISO image as our User VM image. By its nature, an ISO image is read-only. This means that when you reboot the ACRN system, any changes you made to the User VM such as installing a new package, would be lost; the unmodified ISO image is used again for the User VM when the system is rebooted. While this could be the usage model you’d like, an alternative is to set up the User VM image as read-write so it will retain any changes made while it was running and return to that state after a reboot.
One way to create a persistent VM image is by using KVM to define virtual disk partitions, boot the underlying OS, add additional packages and even an application to that image, and then save and convert that QCOW2 image to a raw format we can use with ACRN.
In separate companion documentation, we provide detail guides for running User VMs with different OSs, and provide considerations for each of those standard and real-time OS configurations.
Standard VM OS Considerations
Here is a list of Standard User VM OS guides with details and topics to consider when using one of these OSs:
Real-time VM OS Considerations
Here is a list of real-time User VM OS guides with details and topics to consider when using one of these OSs:
We also recommend reading these RTVM performance guides: