Getting Started Guide
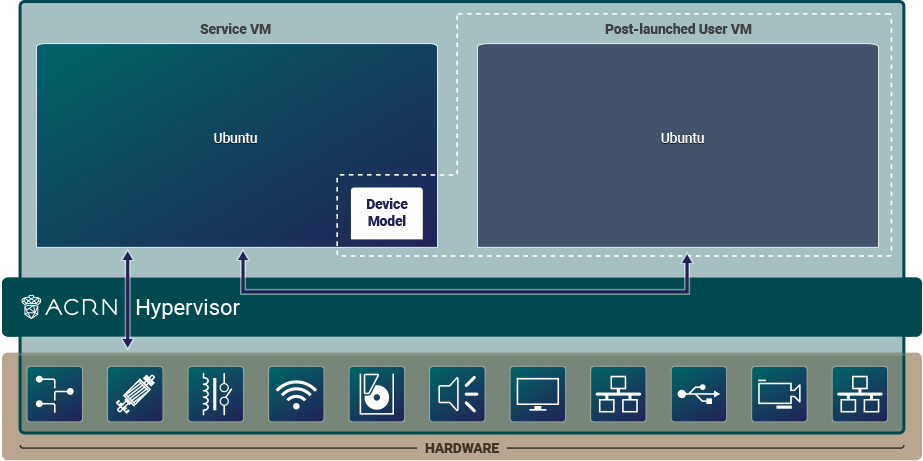
This guide will help you get started with ACRN. We’ll show how to prepare a build environment on your development computer. Then we’ll walk through the steps to set up a simple ACRN configuration on a target system. The configuration is an ACRN shared scenario and consists of an ACRN hypervisor, Service VM, and one post-launched User VM as illustrated in this figure:
Throughout this guide, you will be exposed to some of the tools, processes, and components of the ACRN project. Let’s get started.
Prerequisites
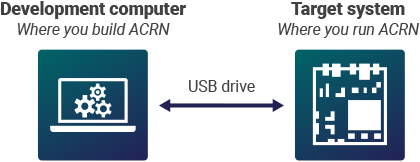
You will need two machines: a development computer and a target system. The development computer is where you configure and build ACRN and your application. The target system is where you deploy and run ACRN and your application.
Before you begin, make sure your machines have the following prerequisites:
Development computer:
Hardware specifications
A PC with Internet access (A fast system with multiple cores and 16GB memory or more will make the builds go faster.)
Software specifications
Ubuntu Desktop 20.04 LTS (ACRN development is not supported on Windows.)
Target system:
Hardware specifications
Target board (see Selecting Hardware)
Ubuntu Desktop 20.04 LTS bootable USB disk: download the latest Ubuntu Desktop 20.04 LTS ISO image and follow the Ubuntu documentation for creating the USB disk.
USB keyboard and mouse
Monitor
Ethernet cable and Internet access
A second USB disk with minimum 1GB capacity to copy files between the development computer and target system (this guide offers steps for copying via USB disk, but you can use another method if you prefer)
Local storage device (NVMe or SATA drive, for example)
Prepare the Development Computer
To set up the ACRN build environment on the development computer:
On the development computer, run the following command to confirm that Ubuntu Desktop 20.04 is running:
cat /etc/os-release
If you have an older version, see Ubuntu documentation to install a new OS on the development computer.
Download the information database about all available package updates for your Ubuntu release. We’ll need it to get the latest tools and libraries used for ACRN builds:
sudo apt update
This next command upgrades packages already installed on your system with minor updates and security patches. This command is optional as there is a small risk that upgrading your system software can introduce unexpected issues:
sudo apt upgrade -y #optional command to upgrade systemInstall the necessary ACRN build tools:
sudo apt install -y gcc \
     git \
     make \
     vim \
     libssl-dev \
     libpciaccess-dev \
     uuid-dev \
     libsystemd-dev \
     libevent-dev \
     libxml2-dev \
     libxml2-utils \
     libusb-1.0-0-dev \
     python3 \
     python3-pip \
     python3.8-venv \
     libblkid-dev \
     e2fslibs-dev \
     pkg-config \
     libnuma-dev \
     libcjson-dev \
     liblz4-tool \
     flex \
     bison \
     xsltproc \
     clang-format \
     bc \
     libpixman-1-dev \
     libsdl2-dev \
     libegl-dev \
     libgles-dev \
     libdrm-dev
Install Python package dependencies:
sudo pip3 install "elementpath==2.5.0" lxml xmlschema defusedxml tqdmCreate a working directory:
mkdir ~/acrn-work
Install the iASL compiler/disassembler used for advanced power management, device discovery, and configuration (ACPI) within the host OS:
cd ~/acrn-work
wget https://acpica.org/sites/acpica/files/acpica-unix-20210105.tar.gz
tar zxvf acpica-unix-20210105.tar.gz
cd acpica-unix-20210105
make clean && make iasl
sudo cp ./generate/unix/bin/iasl /usr/sbin
Get the ACRN hypervisor and kernel source code.
cd ~/acrn-work
git clone https://github.com/projectacrn/acrn-hypervisor.git
cd acrn-hypervisor
git checkout v3.0

cd ..
git clone https://github.com/projectacrn/acrn-kernel.git
cd acrn-kernel
git checkout acrn-v3.0
Prepare the Target and Generate a Board Configuration File
In this step, you will use the Board Inspector to generate a board configuration file.
A board configuration file is an XML file that stores hardware-specific information extracted from the target system. The file is used to configure the ACRN hypervisor, because each hypervisor instance is specific to your target hardware.
Important
Before running the Board Inspector, you must set up your target hardware and BIOS exactly as you want it, including connecting all peripherals, configuring BIOS settings, and adding memory and PCI devices. For example, you must connect all USB devices; otherwise, the Board Inspector will not detect the USB devices for passthrough. If you change the hardware or BIOS configuration, or add or remove USB devices, you must run the Board Inspector again to generate a new board configuration file.
Set Up the Target Hardware
To set up the target hardware environment:
Connect all USB devices, such as a mouse and keyboard.
Connect the monitor and power supply cable.
Connect the target system to the LAN with the Ethernet cable.
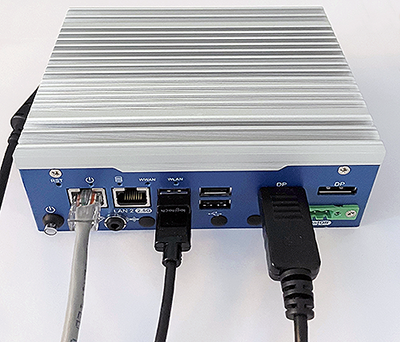
Example of a target system with cables connected:
Install OS on the Target
The target system needs Ubuntu Desktop 20.04 LTS to run the Board Inspector tool.
To install Ubuntu 20.04:
Insert the Ubuntu bootable USB disk into the target system.
Power on the target system, and select the USB disk as the boot device in the UEFI menu. Note that the USB disk label presented in the boot options depends on the brand/make of the USB drive. (You will need to configure the BIOS to boot off the USB device first, if that option isn’t available.)
After selecting the language and keyboard layout, select the Normal installation and Download updates while installing Ubuntu (downloading updates requires the target to have an Internet connection).
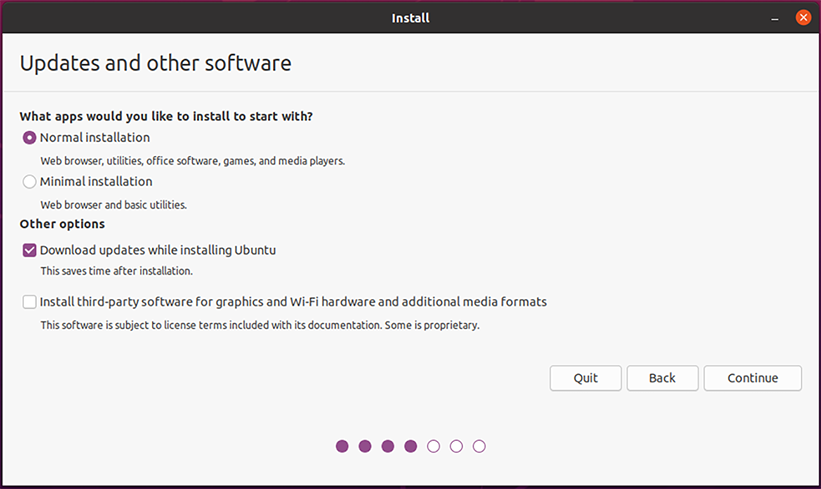
Use the check boxes to choose whether you’d like to install Ubuntu alongside another operating system, or delete your existing operating system and replace it with Ubuntu:
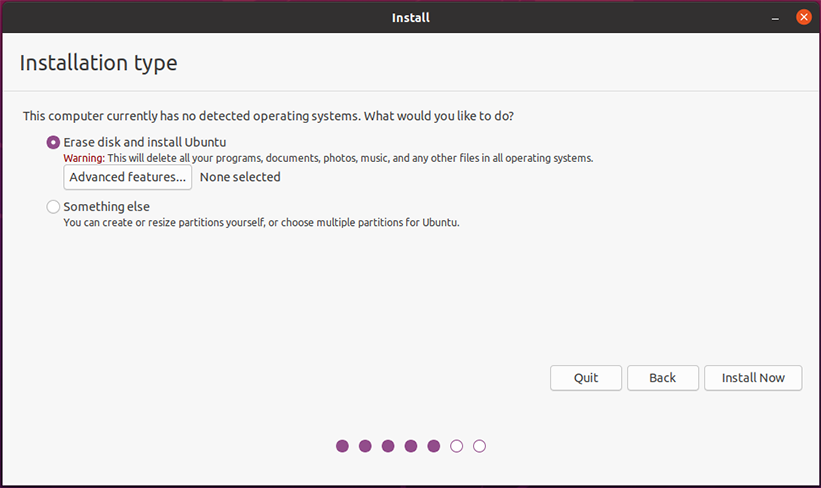
Complete the Ubuntu installation and create a new user account
acrnand set a password.The next section shows how to configure BIOS settings.
Configure Target BIOS Settings
Boot your target and enter the BIOS configuration editor.
Tip: When you are booting your target, you’ll see an option (quickly) to enter the BIOS configuration editor, typically by pressing F2 during the boot and before the GRUB menu (or Ubuntu login screen) appears.
Configure these BIOS settings:
Enable VMX (Virtual Machine Extensions, which provide hardware assist for CPU virtualization).
Enable VT-d (Intel Virtualization Technology for Directed I/O, which provides additional support for managing I/O virtualization).
Disable Secure Boot. This setting simplifies the steps for this example.
The names and locations of the BIOS settings differ depending on the target hardware and BIOS version.
Generate a Board Configuration File
Build the Board Inspector Debian package on the development computer:
Move to the development computer.
On the development computer, go to the
acrn-hypervisordirectory:cd ~/acrn-work/acrn-hypervisorBuild the Board Inspector Debian package:
make clean && make board_inspectorWhen done, the build generates a Debian package in the
./builddirectory.
Copy the Board Inspector Debian package from the development computer to the target system via USB disk as follows:
On the development computer, insert the USB disk that you intend to use to copy files.
Ensure that there is only one USB disk inserted by running the following command:
ls /media/$USERConfirm that only one disk name appears. You’ll use that disk name in the following steps.
Copy the Board Inspector Debian package to the USB disk:
cd ~/acrn-work/
disk="/media/$USER/"$(ls /media/$USER)
cp -r acrn-hypervisor/build/acrn-board-inspector*.deb "$disk"/
sync && sudo umount "$disk"
Insert the USB disk into the target system.
Copy the Board Inspector Debian package from the USB disk to the target:
mkdir -p ~/acrn-work
disk="/media/$USER/"$(ls /media/$USER)
cp -r "$disk"/acrn-board-inspector*.deb  ~/acrn-work
Install the Board Inspector Debian package on the target system:
cd  ~/acrn-work
sudo apt install -y ./acrn-board-inspector*.deb
Reboot the system:
reboot
Run the Board Inspector to generate the board configuration file. This example uses the parameter
my_boardas the file name.cd ~/acrn-work sudo board_inspector.py my_boardNote
If you get an error that mentions Pstate and editing the GRUB configuration, reboot the system and run this command again.
Confirm that the board configuration file
my_board.xmlwas generated in the current directory:ls ./my_board.xml
Copy
my_board.xmlfrom the target to the development computer via USB disk as follows:Make sure the USB disk is connected to the target.
Copy
my_board.xmlto the USB disk:disk="/media/$USER/"$(ls /media/$USER) cp ~/acrn-work/my_board.xml "$disk"/ sync && sudo umount "$disk"
Insert the USB disk into the development computer.
Copy
my_board.xmlfrom the USB disk to the development computer:disk="/media/$USER/"$(ls /media/$USER) cp "$disk"/my_board.xml ~/acrn-work sync && sudo umount "$disk"
Generate a Scenario Configuration File and Launch Script
In this step, you will download, install, and use the ACRN Configurator to generate a scenario configuration file and launch script.
A scenario configuration file is an XML file that holds the parameters of a specific ACRN configuration, such as the number of VMs that can be run, their attributes, and the resources they have access to.
A launch script is a shell script that is used to configure and create a post-launched User VM. Each User VM has its own launch script.
On the development computer, download and install the ACRN Configurator Debian package:
cd ~/acrn-work
wget https://github.com/projectacrn/acrn-hypervisor/releases/download/v3.0/acrn-configurator-3.0.deb
If you already have a previous version of the acrn-configurator installed, you should first remove it:
sudo apt purge acrn-configurator
Then you can install this new version:
sudo apt install -y ./acrn-configurator-3.0.deb
Launch the ACRN Configurator:
acrn-configurator
Under Start a new configuration, confirm that the working folder is
<path to>/acrn-work/MyConfiguration. Click Use This Folder.
Import your board configuration file as follows:
In the 1. Import a board configuration file panel, click Browse for file.
Browse to
~/acrn-work/my_board.xmland click Open.Click Import Board File.
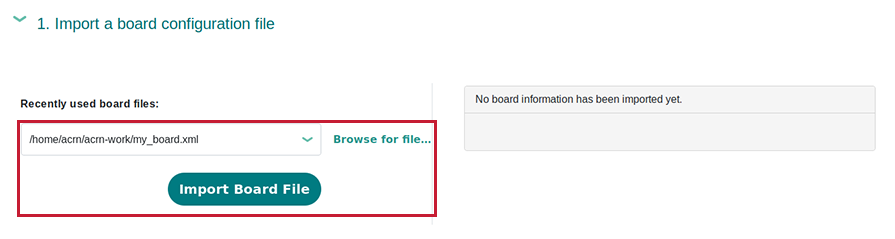
The ACRN Configurator makes a copy of your board file, changes the file extension to
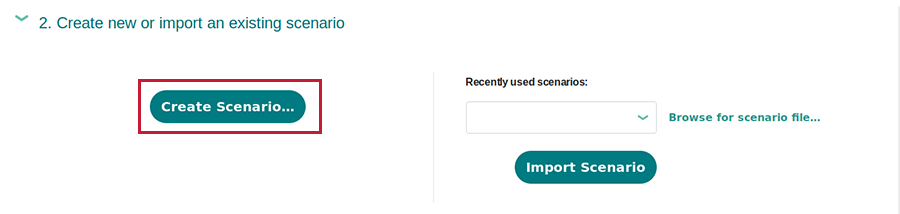
.board.xml, and saves the file to the working folder.Create a new scenario as follows:
In the 2. Create new or import an existing scenario panel, click Create Scenario.
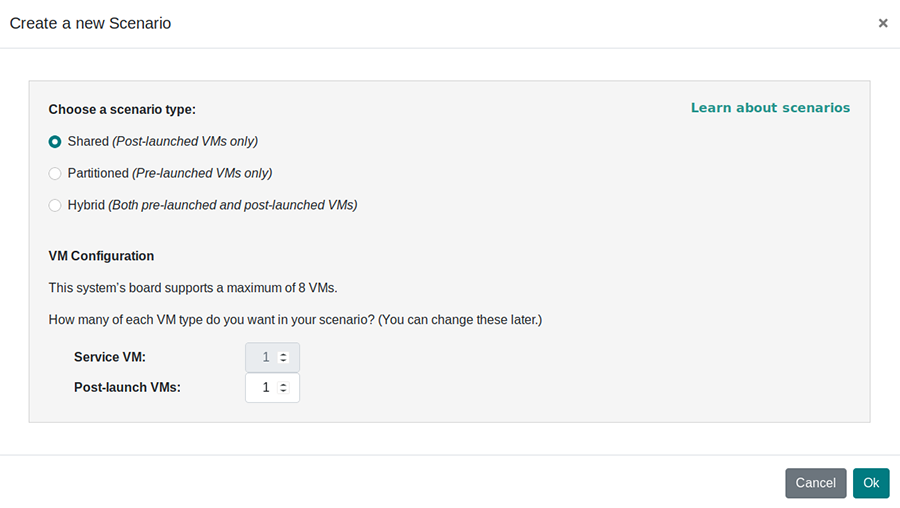
In the dialog box, confirm that Shared (Post-launched VMs only) is selected.
Confirm that one Service VM and one post-launched VM are selected.
Click Ok.
In the 3. Configure settings for scenario and launch scripts panel, the scenario’s configurable items appear. Feel free to look through all the available configuration settings. This is where you can change the settings to meet your application’s particular needs. But for now, you will update only a few settings for functional and educational purposes.
You may see some error messages from the configurator, such as shown here:

The configurator does consistency and validation checks when you load or save a scenario. Notice the Hypervisor and VM1 tabs both have an error icon, meaning there are issues with configuration options in two areas. Since the Hypervisor tab is currently highlighted, we’re seeing an issue we can resolve on the Hypervisor settings. Once we resolve all the errors and save the scenario (forcing a full validation of the schema again), these error indicators and messages will go away.
Click the Hypervisor Global Settings > Basic Parameters tab, select the
Debugbuild type, and select the serial console port (the example shows/dev/ttyS0, but yours may be different). If your board doesn’t have a serial console port, select theReleasebuild type. The Debug build type requires a serial console port (and is reporting an error because a serial console port hasn’t been configured yet).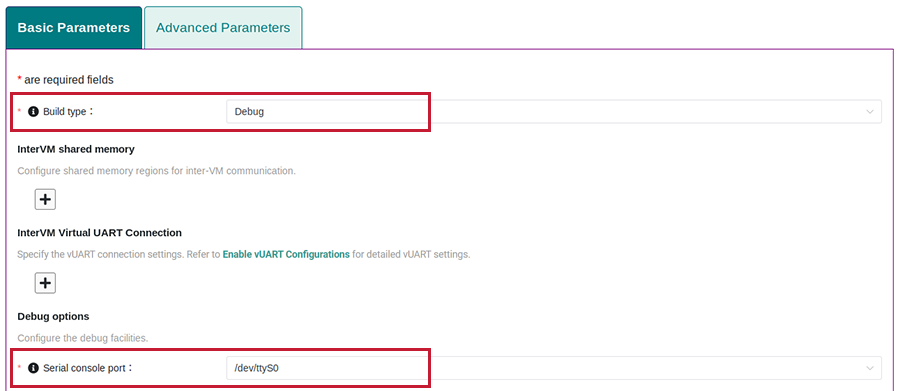
Click the VM0 ServiceVM > Basic Parameters tab and change the VM name to
ACRN_Service_VMfor this example.
Configure the post-launched VM as follows:
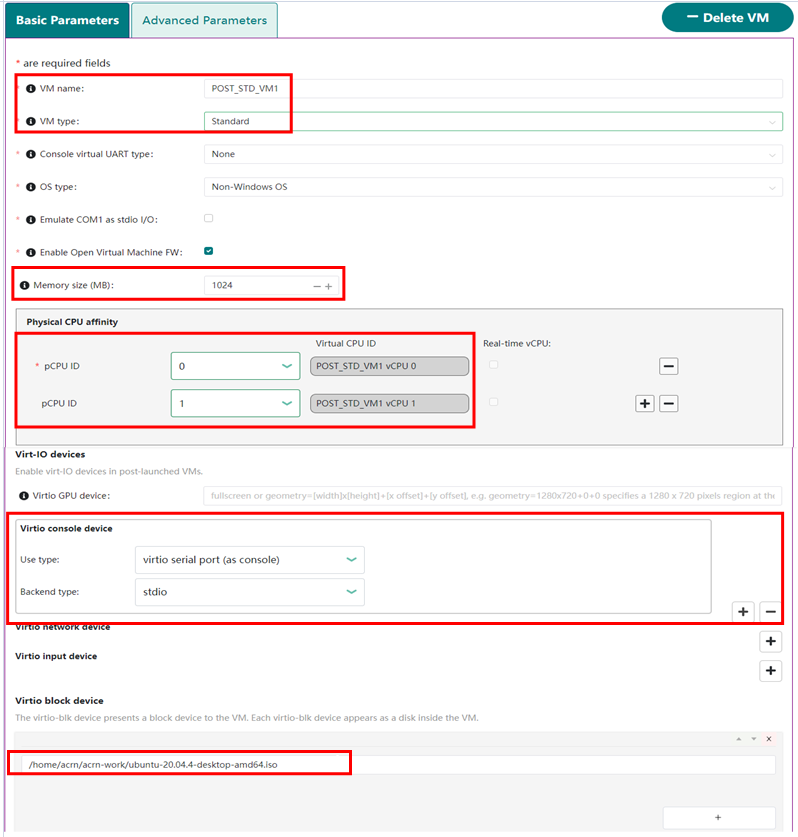
Click the VM1 Post-launched > Basic Parameters tab and change the VM name to
POST_STD_VM1for this example.Confirm that the VM type is
Standard. In the previous step,STDin the VM name is short for Standard.Scroll down to Memory size (MB) and change the value to
1024. For this example, we will use Ubuntu 20.04 to boot the post-launched VM. Ubuntu 20.04 needs at least 1024 MB to boot.For Physical CPU affinity, select pCPU ID
0, then click + and select pCPU ID1to affine (or pin) the VM to CPU cores 0 and 1. (That will resolve the initial physical CPU affinity assignment error.)For Virtio console device, click + to add a device and keep the default options. This parameter specifies the console that you will use to log in to the User VM later in this guide.
For Virtio block device, click + and enter
/home/acrn/acrn-work/ubuntu-20.04.4-desktop-amd64.iso. This parameter specifies the VM’s OS image and its location on the target system. Later in this guide, you will save the ISO file to that directory.
Scroll up to the top of the panel and click Save Scenario And Launch Scripts to generate the scenario configuration file and launch script.
Click the x in the upper-right corner to close the ACRN Configurator.
Confirm that the scenario configuration file
scenario.xmlappears in the working directory:ls ~/acrn-work/MyConfiguration/scenario.xml
Confirm that the launch script appears in the working directory:
ls ~/acrn-work/MyConfiguration/launch_user_vm_id1.sh
Build ACRN
On the development computer, build the ACRN hypervisor:
cd ~/acrn-work/acrn-hypervisor
make clean && make BOARD=~/acrn-work/MyConfiguration/my_board.board.xml SCENARIO=~/acrn-work/MyConfiguration/scenario.xml
The build typically takes a few minutes. When done, the build generates a Debian package in the
./builddirectory:cd ./build ls *.deb acrn-my_board-MyConfiguration*.debThe Debian package contains the ACRN hypervisor and tools to ease installing ACRN on the target. The Debian file name contains the board name (
my_board) and the working folder name (MyConfiguration).Build the ACRN kernel for the Service VM:
If you have built the ACRN kernel before, run the following command to remove all artifacts from the previous build. Otherwise, an error will occur during the build.
cd ~/acrn-work/acrn-kernel
make distclean
Build the ACRN kernel:
cd ~/acrn-work/acrn-kernel
cp kernel_config_service_vm .config
make olddefconfig
make -j $(nproc) deb-pkg
The kernel build can take 15 minutes or less on a fast computer, but could take an hour or more depending on the performance of your development computer. When done, the build generates four Debian packages in the directory above the build root directory:
cd ..
ls *.deb
   linux-headers-5.10.115-acrn-service-vm_5.10.115-acrn-service-vm-1_amd64.deb
   linux-image-5.10.115-acrn-service-vm_5.10.115-acrn-service-vm-1_amd64.deb
   linux-image-5.10.115-acrn-service-vm-dbg_5.10.115-acrn-service-vm-1_amd64.deb
   linux-libc-dev_5.10.115-acrn-service-vm-1_amd64.deb
Copy all the necessary files generated on the development computer to the target system by USB disk as follows:
Insert the USB disk into the development computer and run these commands:
disk="/media/$USER/"$(ls /media/$USER)
cp ~/acrn-work/acrn-hypervisor/build/acrn-my_board-MyConfiguration*.deb "$disk"/
cp ~/acrn-work/*acrn-service-vm*.deb "$disk"/
cp ~/acrn-work/MyConfiguration/launch_user_vm_id1.sh "$disk"/
cp ~/acrn-work/acpica-unix-20210105/generate/unix/bin/iasl "$disk"/
sync && sudo umount "$disk"
Insert the USB disk you just used into the target system and run these commands to copy the files locally:
disk="/media/$USER/"$(ls /media/$USER)
cp "$disk"/acrn-my_board-MyConfiguration*.deb ~/acrn-work
cp "$disk"/*acrn-service-vm*.deb ~/acrn-work
cp "$disk"/launch_user_vm_id1.sh ~/acrn-work
sudo cp "$disk"/iasl /usr/sbin/
sudo chmod a+x /usr/sbin/iasl
sync && sudo umount "$disk"
Install ACRN
Install the ACRN Debian package and ACRN kernel Debian packages using these commands:
cd ~/acrn-work
sudo apt install ./acrn-my_board-MyConfiguration*.deb
sudo apt install ./*acrn-service-vm*.deb
Reboot the system:
reboot
Confirm that you see the GRUB menu with the “ACRN multiboot2” entry. Select it and proceed to booting ACRN. (It may be autoselected, in which case it will boot with this option automatically in 5 seconds.)
                        GNU GRUB version 2.04
────────────────────────────────────────────────────────────────────────────────
Ubuntu
Advanced options for Ubuntu
UEFI Firmware Settings
*ACRN multiboot2
Run ACRN and the Service VM
The ACRN hypervisor boots the Ubuntu Service VM automatically.
On the target, log in to the Service VM. (It will look like a normal Ubuntu session.)
Verify that the hypervisor is running by checking
dmesgin the Service VM:dmesg | grep -i hypervisorYou should see “Hypervisor detected: ACRN” in the output. Example output of a successful installation (yours may look slightly different):
[ 0.000000] Hypervisor detected: ACRNEnable and start the Service VM’s system daemon for managing network configurations, so the Device Model can create a bridge device (acrn-br0) that provides User VMs with wired network access:
sudo systemctl enable --now systemd-networkd
Launch the User VM
Go to the official Ubuntu website to get the Ubuntu Desktop 20.04 LTS ISO image
ubuntu-20.04.4-desktop-amd64.isofor the User VM. (The same image you specified earlier in the ACRN Configurator UI.)Put the ISO file in the path
~/acrn-work/on the target system.Launch the User VM:
sudo chmod +x ~/acrn-work/launch_user_vm_id1.sh
sudo ~/acrn-work/launch_user_vm_id1.sh
It may take about one minute for the User VM to boot and start running the Ubuntu image. You will see a lot of output, then the console of the User VM will appear as follows:
Ubuntu 20.04.4 LTS ubuntu hvc0

ubuntu login:
Log in to the User VM. For the Ubuntu 20.04 ISO, the user is
ubuntu, and there’s no password.Confirm that you see output similar to this example:
Welcome to Ubuntu 20.04.4 LTS (GNU/Linux 5.13.0-30-generic x86_64)

* Documentation:  https://help.ubuntu.com
* Management:     https://landscape.canonical.com
* Support:        https://ubuntu.com/advantage

0 packages can be updated.
0 updates are security updates.

Your Hardware Enablement Stack (HWE) is supported until April 2025.

The programs included with the Ubuntu system are free software;
the exact distribution terms for each program are described in the
individual files in /usr/share/doc/*/copyright.

Ubuntu comes with ABSOLUTELY NO WARRANTY, to the extent permitted by
applicable law.

To run a command as administrator (user "root"), use "sudo <command>".
See "man sudo_root" for details.

ubuntu@ubuntu:~$
This User VM and the Service VM are running different Ubuntu images. Use this command to see that the User VM is running the downloaded Ubuntu ISO image:
ubuntu@ubuntu:~$ uname -r
5.13.0-30-generic
Then open a new terminal window and use the command to see that the Service VM is running the
acrn-kernelService VM image:acrn@vecow:~$ uname -r 5.10.115-acrn-service-vm
The User VM has launched successfully. You have completed this ACRN setup.
(Optional) To shut down the User VM, run this command in the terminal that is connected to the User VM:
sudo poweroff
Next Steps
Configuration and Development Overview describes the ACRN configuration process, with links to additional details.