Getting started guide for Intel NUC
The Intel® NUC is the primary tested platform for ACRN development, and its setup is described below.
Hardware setup
Intel Apollo Lake NUC (APL) and Intel Kaby Lake NUC (KBL), described in Supported Hardware, are currently supported for ACRN development:
- We can enable the serial console on KBL (NUC7i7DN), but this is not supported on APL (NUC6CAYH).
Connecting to the serial port
If you don’t need a serial console you can ignore this section.
Neither the APL or KBL NUCs present an external serial port interface. However, the KBL NUC does have a serial port header you can expose with a serial DB9 header cable. You can build this cable yourself, referring to the KBL NUC product specification as shown below:
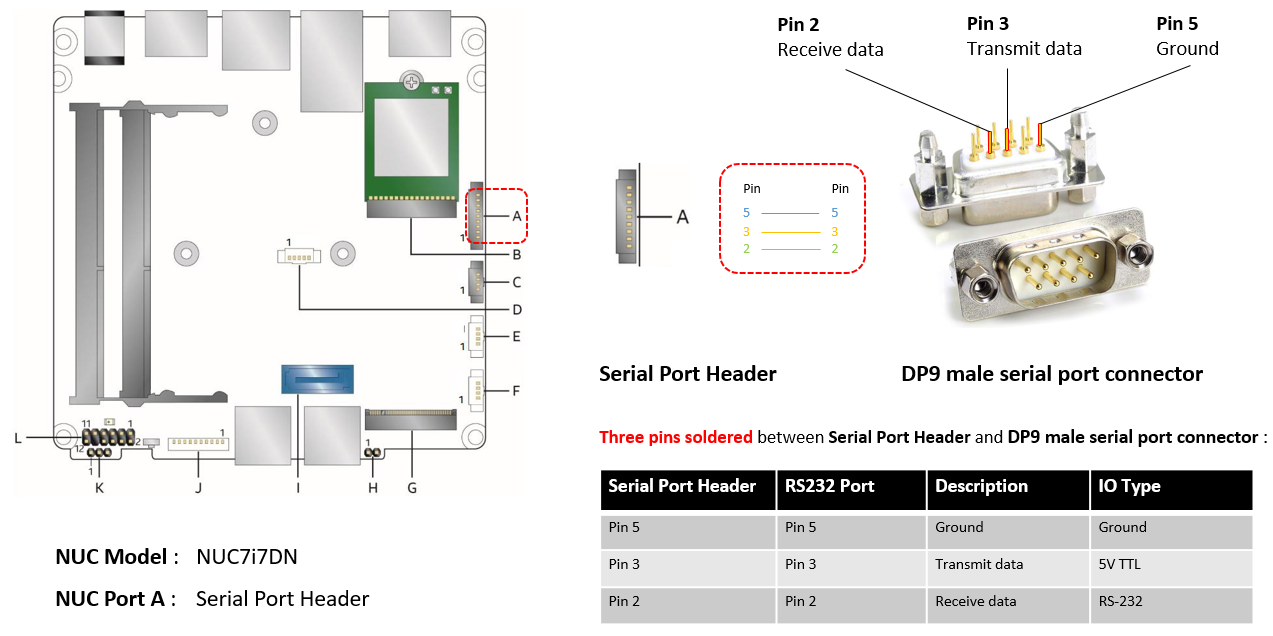
Figure 11 KBL serial port header details
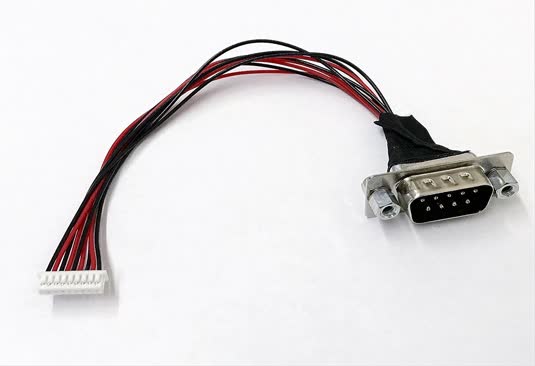
Figure 12 KBL serial port header to RS232 cable
Or you can purchase such a cable.
You’ll also need an RS232 DB9 female to USB cable, or an RS232 DB9 female/female (NULL modem) cross-over cable to connect to your host system.
Note
If you want to use the RS232 DB9 female/female cable, please choose
the cross-over type rather than straight-through type.
Firmware update on the NUC
You may need to update to the latest UEFI firmware for the NUC hardware. Follow these BIOS Update Instructions for downloading and flashing an updated BIOS for the NUC.
Software setup
Set up a Clear Linux Operating System
We begin by installing Clear Linux* as the development OS on the NUC.
The Clear Linux release includes an acrn.efi hypervisor application
that will be added to the EFI partition (by the quick setup script or
manually, as described below).
Note
Please refer to the ACRN Release Notes for the Clear Linux OS version number tested with a specific ACRN release. Adjust the instruction below to reference the appropriate version number of Clear Linux OS (we use version 28960 as an example).
Download the compressed Clear Linux OS installer image from https://download.clearlinux.org/releases/28960/clear/clear-28960-installer.img.xz and follow the Clear Linux OS installation guide as a starting point for installing Clear Linux OS onto your platform. Follow the recommended options for choosing an Advanced options installation type, and using the platform’s storage as the target device for installation (overwriting the existing data).
When setting up Clear Linux on your NUC:
- Launch the Clear Linux OS installer boot menu
- With Clear Linux OS highlighted, select Enter.
- From the Main Menu, select “Configure Media” and set “Auto Partition” to your desired hard disk.
- Press A to show the “Advanced options”.
- Select “Additional Bundle Selection” to add bundles for “desktop-autostart”, “editors”, “network-basic”, “user-basic”
- Select “User Manager” to add an administrative user “clear” and password.
- Select “Assign Hostname” to set the hostname as “clr-sos-guest”
- Select Confirm to start installation.
After installation is complete, boot into Clear Linux OS, login as clear (using the password you set earlier).
The instructions below provide details for setting up the ACRN Hypervisor, Service OS, and Guest OS. Along with the manual step details, We also provide an automated script that does all these steps for you, so you can skip these manual steps. See the quick-setup-guide section below to use the automated setup script.
Use the script to set up ACRN automatically
We provide an acrn_quick_setup.sh script in the ACRN GitHub repo to quickly and automatically set up the SOS and UOS and generate a customized script for launching the UOS.
This script requires the Clear Linux version number you’d like to set up for the ACRN SOS and UOS. The version specified must be greater than or equal to the Clear Linux version currently installed on the NUC. You can see your current Clear Linux version with the command:
$ cat /etc/os-release
Note
In the following steps, we’re using Clear Linux version 28960. You should specify the Clear Linux version you want to use.
Here are the steps to install Clear Linux on your NUC, set up the SOS
and UOS using the acrn_quick_setup.sh script, and launch the UOS:
Installing Clear Linux and login system
Open a terminal
Download
acrn_quick_setup.shscript to set up the SOS. (If you don’t need a proxy to get the script, you can just skip theexportcommand.)$ export https_proxy=https://myproxy.mycompany.com:port $ cd ~ $ wget https://raw.githubusercontent.com/projectacrn/acrn-hypervisor/master/doc/getting-started/acrn_quick_setup.sh $ sudo sh acrn_quick_setup.sh -s 28960 Password: Upgrading SOS... Disable auto update... Clear Linux version 28960 is already installed. Continuing to setup SOS... Adding the service-os and kernel-iot-lts2018 bundles... ...100% ...100% ...100% none Add /mnt/EFI/acrn folder Copy /usr/share/acrn/samples/nuc/acrn.conf /mnt/loader/entries/ Copy /usr/lib/acrn/acrn.efi to /mnt/EFI/acrn Check ACRN efi boot event Clean all ACRN efi boot event Check linux bootloader event Clean all Linux bootloader event Add new ACRN efi boot event Create loader.conf Add default (5 seconds) boot wait time Add default boot to ACRN Getting latest Service OS kernel version: kernel-org.clearlinux.iot-lts2018-sos.4.19.34-45 Getting current Service OS kernel version: kernel-org.clearlinux.iot-lts2018-sos.4.19.13-1901141830 Replacing root partition uuid in acrn.conf Replace with new SOS kernel in acrn.conf Service OS setup done! Rebooting Service OS to take effects. Rebooting.
Note
This script is using
/dev/sda1as default EFI System Partition ESP). If the ESP is different based on your hardware, you can specify it using-eoption. For example, to set up the SOS on an NVMe SSD, you could specify:sudo sh acrn_quick_setup.sh -s 28960 -e /dev/nvme0n1p1
Note
If you don’t need to reboot automatically after setting up the SOS, you can specify the
-dparameter (don’t reboot)After the system reboots, login as the clear user. You can verify the SOS booted successfully by checking the
dmesglog:$ dmesg | grep ACRN [ 0.000000] Hypervisor detected: ACRN [ 1.220887] ACRNTrace: Initialized acrn trace module with 4 cpu [ 1.224401] ACRN HVLog: Initialized hvlog module with 4 cpu
Continue by setting up a Guest OS using the
acrn_quick_setup.shscript with the-uoption (and the same Clear Linux version number):$ sudo sh acrn_quick_setup.sh -u 28960 Password: Upgrading UOS... Downloading UOS image: https://download.clearlinux.org/releases/28960/clear/clear-28960-kvm.img.xz % Total % Received % Xferd Average Speed Time Time Time Current Dload Upload Total Spent Left Speed 14 248M 14 35.4M 0 0 851k 0 0:04:57 0:00:42 0:04:15 293k
After the download is completed, you’ll get this output.
Unxz UOS image: clear-28960-kvm.img.xz
Get UOS image: clear-28960-kvm.img
Upgrade UOS done...
Now you can run this command to start UOS...
$ sudo /root/launch_uos_28960.sh
Now you can launch the UOS using the customized launch_uos script (with sudo):
$ sudo /root/launch_uos_28960.sh
Password:
cpu1 online=0
cpu2 online=0
cpu3 online=0
passed gvt-g optargs low_gm 64, high_gm 448, fence 8
SW_LOAD: get kernel path /usr/lib/kernel/default-iot-lts2018
SW_LOAD: get bootargs root=/dev/vda3 rw rootwait maxcpus=1 nohpet console=tty0 console=hvc0   console=ttyS0 no_timer_check ignore_loglevel log_buf_len=16M   consoleblank=0 tsc=reliable i915.avail_planes_per_pipe=0x070F00   i915.enable_hangcheck=0 i915.nuclear_pageflip=1 i915.enable_guc_loading=0   i915.enable_guc_submission=0 i915.enable_guc=0
VHM api version 1.0
open hugetlbfs file /run/hugepage/acrn/huge_lv1/D279543825D611E8864ECB7A18B34643
open hugetlbfs file /run/hugepage/acrn/huge_lv2/D279543825D611E8864ECB7A18B34643
level 0 free/need pages:512/0 page size:0x200000
level 1 free/need pages:1/2 page size:0x40000000
to reserve more free pages:
to reserve pages (+orig 1): echo 2 > /sys/kernel/mm/hugepages/hugepages-1048576kB/nr_hugepages
now enough free pages are reserved!

try to setup hugepage with:
    level 0 - lowmem 0x0, biosmem 0x0, highmem 0x0
    level 1 - lowmem 0x80000000, biosmem 0x0, highmem 0x0
total_size 0x180000000

mmap ptr 0x0x7efef33bb000 -> baseaddr 0x0x7eff00000000
mmap 0x40000000@0x7eff00000000
touch 1 pages with pagesz 0x40000000
mmap 0x40000000@0x7eff40000000
touch 512 pages with pagesz 0x200000
...
[  OK  ] Started Login Service.
[  OK  ] Started Network Name Resolution.
[  OK  ] Reached target Network.
         Starting Permit User Sessions...
[  OK  ] Reached target Host and Network Name Lookups.
[  OK  ] Started Permit User Sessions.
[  OK  ] Started Serial Getty on ttyS0.
[  OK  ] Started Getty on tty1.
[  OK  ] Started Serial Getty on hvc0.
[  OK  ] Reached target Login Prompts.
[  OK  ] Reached target Multi-User System.
[  OK  ] Reached target Graphical Interface.

clr-0d449d5327d64aee8a6b8a3484dcd880 login:
Login as root (and specify the new password). You can verify you’re running in the UOS by checking the kernel release version or seeing if acrn devices are visible:
# uname -r
4.19.34-45.iot-lts2018
# ls /dev/acrn*
ls: cannot access '/dev/acrn*': No such file or directory
In the UOS there won’t be any
/dev/acrn*devices. If you’re in the SOS, you’d see results such as these:# uname -r 4.19.34-45.iot-lts2018-sos # ls /dev/acrn* /dev/acrn_hvlog_cur_0 /dev/acrn_hvlog_cur_2 /dev/acrn_trace_0 /dev/acrn_trace_2 /dev/acrn_vhm /dev/acrn_hvlog_cur_1 /dev/acrn_hvlog_cur_3 /dev/acrn_trace_1 /dev/acrn_trace_3
With that you’ve successfully set up Clear Linux at the Service and User OS and started up a UOS VM.
Manual setup ACRN guide
Instead of using the quick setup script, you can also set up ACRN, SOS, and UOS manually following these steps:
After installing Clear Linux on the NUC, login as the clear user and open a terminal window.
Clear Linux OS is set to automatically update itself. We recommend that you disable this feature to have more control over when updates happen. Use this command to disable the autoupdate feature:
$ sudo swupd autoupdate --disable
Note
The Clear Linux OS installer will automatically check for updates and install the latest version available on your system. If you wish to use a specific version (such as 28960), you can achieve that after the installation has completed using
sudo swupd verify --fix --picky -m 28960If you have an older version of Clear Linux OS already installed on your hardware, use this command to upgrade Clear Linux OS to version 28960 (or newer):
$ sudo swupd update -m 28960 # or newer version
Use the
sudo swupd bundle-addcommand and add these Clear Linux OS bundles:$ sudo swupd bundle-add service-os kernel-iot-lts2018
Table 1 Clear Linux OS bundles¶ Bundle Description service-os Add the acrn hypervisor, acrn devicemodel, and Service OS kernel kernel-iot-lts2018 Run the Intel kernel “kernel-iot-lts2018” which is enterprise-style kernel with backports
Add the ACRN hypervisor to the EFI Partition
In order to boot the ACRN SOS on the platform, you’ll need to add it to the EFI partition. Follow these steps:
Mount the EFI partition and verify you have the following files:
$ sudo ls -1 /boot/EFI/org.clearlinux
bootloaderx64.efi
kernel-org.clearlinux.native.4.20.11-702
kernel-org.clearlinux.iot-lts2018-sos.4.19.23-19
kernel-org.clearlinux.iot-lts2018.4.19.23-19
loaderx64.efi
Note
On Clear Linux OS, the EFI System Partition (e.g.:
/dev/sda1) is mounted under/bootby default The Clear Linux project releases updates often, sometimes twice a day, so make note of the specific kernel versions (iot-lts2018 and *iot-lts2018-sos) listed on your system, as you will need them later.Note
The EFI System Partition (ESP) may be different based on your hardware. It will typically be something like
/dev/mmcblk0p1on platforms that have an on-board eMMC or/dev/nvme0n1p1if your system has a non-volatile storage media attached via a PCI Express (PCIe) bus (NVMe).Put the
acrn.efihypervisor application (included in the Clear Linux OS release) on the EFI partition with:$ sudo mkdir /boot/EFI/acrn $ sudo cp /usr/lib/acrn/acrn.efi /boot/EFI/acrn/
Configure the EFI firmware to boot the ACRN hypervisor by default
The ACRN hypervisor (
acrn.efi) is an EFI executable loaded directly by the platform EFI firmware. It then in turns loads the Service OS bootloader. Use theefibootmgrutility to configure the EFI firmware and add a new entry that loads the ACRN hypervisor.$ sudo efibootmgr -c -l "\EFI\acrn\acrn.efi" -d /dev/sda -p 1 -L "ACRN"
Note
Be aware that a Clear Linux OS update that includes a kernel upgrade will reset the boot option changes you just made. A Clear Linux OS update could happen automatically (if you have not disabled it as described above), if you later install a new bundle to your system, or simply if you decide to trigger an update manually. Whenever that happens, double-check the platform boot order using
efibootmgr -vand modify it if needed.The ACRN hypervisor (
acrn.efi) accepts three command-line parameters that tweak its behavior:bootloader=: this sets the EFI executable to be loaded once the hypervisor is up and running. This is typically the bootloader of the Service OS and the default value is to use the Clear Linux OS bootloader, i.e.:\EFI\org.clearlinux\bootloaderx64.efi.uart=: this tells the hypervisor where the serial port (UART) is found or whether it should be disabled. There are three forms for this parameter:uart=disabled: this disables the serial port completelyuart=bdf@<BDF value>: this sets the PCI serial port based on its BDF. For example, usebdf@0:18.1for a BDF of 0:18.1 ttyS1.uart=port@<port address>: this sets the serial port address
Note
uart=port@<port address>is required if you want to enable the serial console. You should rundmesg |grep ttyS0to get port address from the output, and then add theuartparameter into theefibootmgrcommand.vuart=ttySn@irqN: this tells the hypervisor which virtual serial device SOS will use and its IRQ number. This is used to avoid conflict with SOS passthrough devices’ interrupt. If UART is set to ttyS1, and its native IRQ is 5, you’d better setvuart=ttyS1@irq5(Use ‘dmesg | grep tty’ to get IRQ information). Also setconsole=ttyS1inacrn.confto match the SOS boot args.
Here is a more complete example of how to configure the EFI firmware to load the ACRN hypervisor and set these parameters.
$ sudo efibootmgr -c -l "\EFI\acrn\acrn.efi" -d /dev/sda -p 1 -L "ACRN NUC Hypervisor" \
      -u "bootloader=\EFI\org.clearlinux\bootloaderx64.efi uart=disabled"
And also here is the example of how to enable a serial console for KBL NUC.
$ sudo efibootmgr -c -l "\EFI\acrn\acrn.efi" -d /dev/sda -p 1 -L "ACRN NUC Hypervisor" \
      -u "bootloader=\EFI\org.clearlinux\bootloaderx64.efi uart=port@0x3f8"
Create a boot entry for the ACRN Service OS by copying a provided
acrn.confand editing it to account for the kernel versions noted in a previous step.It must contain these settings:
Setting Description title Text to show in the boot menu linux Linux kernel for the Service OS (*-sos) options Options to pass to the Service OS kernel (kernel parameters) A starter acrn.conf configuration file is included in the Clear Linux OS release and is also available in the acrn-hypervisor/hypervisor GitHub repo as acrn.conf as shown here:
title The ACRN Service OS
linux   /EFI/org.clearlinux/kernel-org.clearlinux.iot-lts2018-sos.4.19.13-1901141830
options console=tty0 console=ttyS0 root=PARTUUID=<UUID of rootfs partition> rw rootwait ignore_loglevel no_timer_check consoleblank=0 i915.nuclear_pageflip=1 i915.avail_planes_per_pipe=0x01010F i915.domain_plane_owners=0x011111110000 i915.enable_gvt=1 i915.enable_guc=0 hvlog=2M@0x1FE00000
On the platform, copy the
acrn.conffile to the EFI partition we mounted earlier:$ sudo cp /usr/share/acrn/samples/nuc/acrn.conf /boot/loader/entries/
You will need to edit this file to adjust the kernel version (
linuxsection), insert thePARTUUIDof your/dev/sda3partition (root=PARTUUID=<UUID of rootfs partition>) in theoptionssection, and add thehugepagesz=1G hugepages=2at end of theoptionssection.Use
blkidto find out what your/dev/sda3PARTUUIDvalue is. Here is a handy one-line command to do that:# sed -i "s/<UUID of rootfs partition>/`blkid -s PARTUUID -o value \ /dev/sda3`/g" /boot/loader/entries/acrn.confNote
It is also possible to use the device name directly, e.g.
root=/dev/sda3Add a timeout period for Systemd-Boot to wait, otherwise it will not present the boot menu and will always boot the base Clear Linux OS
$ sudo clr-boot-manager set-timeout 20
$ sudo clr-boot-manager update
Reboot and select “The ACRN Service OS” to boot, as shown below:
=> The ACRN Service OS
Clear Linux OS for Intel Architecture (Clear-linux-iot-lts2018-4.19.23-19)
Clear Linux OS for Intel Architecture (Clear-linux-iot-lts2018-sos-4.19.23-19)
Clear Linux OS for Intel Architecture (Clear-linux-native.4.20.11-702)
EFI Default Loader
Reboot Into Firmware Interface
After booting up the ACRN hypervisor, the Service OS will be launched automatically by default, and the Clear Linux OS desktop will be showing with user “clear”, (or you can login remotely with an “ssh” client). If there is any issue which makes the GNOME desktop doesn’t show successfully, then the system will go to shell console.
From ssh client, login as user “clear” using the password you set previously when you installed Clear Linux OS.
After rebooting the system, check that the ACRN hypervisor is running properly with:
$ dmesg | grep ACRN
[    0.000000] Hypervisor detected: ACRN
[    1.687128] ACRNTrace: acrn_trace_init, cpu_num 4
[    1.693129] ACRN HVLog: acrn_hvlog_init
If you see log information similar to this, the ACRN hypervisor is running properly
and you can start deploying a User OS. If not, verify the EFI boot options, SOS
kernel, and acrn.conf settings are correct (as described above).
ACRN Network Bridge
ACRN bridge has been setup as a part of systemd services for device communication. The default
bridge creates acrn_br0 which is the bridge and tap0 as an initial setup. The files can be
found in /usr/lib/systemd/network. No additional setup is needed since systemd-networkd is
automatically enabled after a system restart.
Set up Reference UOS
On your platform, download the pre-built reference Clear Linux OS UOS image version 28960 (or newer) into your (root) home directory:
$ cd ~
$ mkdir uos
$ cd uos
$ curl https://download.clearlinux.org/releases/28960/clear/clear-28960-kvm.img.xz -o uos.img.xz
Note
In case you want to use or try out a newer version of Clear Linux OS as the UOS, you can download the latest from http://download.clearlinux.org/image. Make sure to adjust the steps described below accordingly (image file name and kernel modules version).
Uncompress it:
$ unxz uos.img.xz
Deploy the UOS kernel modules to UOS virtual disk image (note: you’ll need to use the same iot-lts2018 image version number noted in step 1 above):
$ sudo losetup -f -P --show uos.img
$ sudo mount /dev/loop0p3 /mnt
$ sudo cp -r /usr/lib/modules/"`readlink /usr/lib/kernel/default-iot-lts2018 | awk -F '2018.' '{print $2}'`.iot-lts2018" /mnt/lib/modules
$ sudo umount /mnt
$ sync
Edit and Run the
launch_uos.shscript to launch the UOS.A sample launch_uos.sh is included in the Clear Linux OS release, and is also available in the acrn-hypervisor/devicemodel GitHub repo (in the samples folder) as shown here:
#!/bin/bash

offline_path="/sys/class/vhm/acrn_vhm"

# Check the device file of /dev/acrn_hsm to determine the offline_path
if [ -e "/dev/acrn_hsm" ]; then
offline_path="/sys/class/acrn/acrn_hsm"
fi

function launch_clear()
{
mac=$(cat /sys/class/net/e*/address)
vm_name=vm$1
mac_seed=${mac:9:8}-${vm_name}

#check if the vm is running or not
vm_ps=$(pgrep -a -f acrn-dm)
result=$(echo $vm_ps | grep "${vm_name}")
if [[ "$result" != "" ]]; then
  echo "$vm_name is running, can't create twice!"
  exit
fi

#for memsize setting
mem_size=2048M

acrn-dm -A -m $mem_size -c $2 -s 0:0,hostbridge -s 1:0,lpc -l com1,stdio \
  -s 2,pci-gvt -G "$3" \
  -s 5,virtio-console,@pty:pty_port \
  -s 6,virtio-hyper_dmabuf \
  -s 3,virtio-blk,/home/clear/uos/uos.img \
  -s 4,virtio-net,tap0 \
  --mac_seed $mac_seed \
  -k /usr/lib/kernel/default-iot-lts2018 \
  -B "root=/dev/vda3 rw rootwait maxcpus=$2 nohpet console=tty0 console=hvc0 \
  console=ttyS0 no_timer_check ignore_loglevel log_buf_len=16M \
  consoleblank=0 tsc=reliable i915.avail_planes_per_pipe=$4 \
  i915.enable_hangcheck=0 i915.nuclear_pageflip=1 i915.enable_guc_loading=0 \
  i915.enable_guc_submission=0 i915.enable_guc=0" $vm_name
}

# offline SOS CPUs except BSP before launch UOS
for i in `ls -d /sys/devices/system/cpu/cpu[1-99]`; do
        online=`cat $i/online`
        idx=`echo $i | tr -cd "[1-99]"`
        echo cpu$idx online=$online
        if [ "$online" = "1" ]; then
                echo 0 > $i/online
		# during boot time, cpu hotplug may be disabled by pci_device_probe during a pci module insmod
		while [ "$online" = "1" ]; do
			sleep 1
			echo 0 > $i/online
			online=`cat $i/online`
		done
                echo $idx > ${offline_path}/offline_cpu
        fi
done

launch_clear 1 1 "64 448 8" 0x070F00
By default, the script is located in the
/usr/share/acrn/samples/nuc/directory. You can run it to launch the User OS:$ cd /usr/share/acrn/samples/nuc/ $ sudo ./launch_uos.sh
At this point, you’ve successfully booted the ACRN hypervisor, SOS, and UOS:
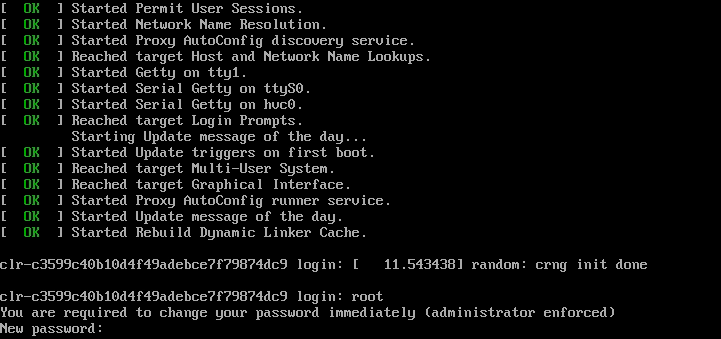
Figure 13 Successful boot