ACRN Configuration Tool
The ACRN configuration tool is designed for System Integrators / Tier 1s to
customize ACRN to meet their own needs. It consists of two tools, the
Kconfig tool and the acrn-config tool. The latter allows users to provision
VMs via a web interface and configure the hypervisor from XML files at build time.
Introduction
ACRN includes three types of configurations: Hypervisor, Board, and VM. Each are discussed in the following sections.
Hypervisor configuration
The hypervisor configuration selects a working scenario and target board by configuring the hypervisor image features and capabilities such as setting up the log and the serial port.
The hypervisor configuration uses the Kconfig make
menuconfig mechanism. The configuration file is located in the
acrn-hypervisor/hypervisor/arch/x86/configs/ folder.
The board-specific defconfig file,
acrn-hypervisor/hypervisor/arch/x86/configs/$(BOARD).config
is loaded first; it is the default Kconfig for the specified board.
Board configuration
The board configuration stores board-specific settings referenced by the
ACRN hypervisor. This includes scenario-relevant information such as
board settings, root device selection, and the kernel cmdline. It also includes
scenario-irrelevant hardware-specific information such as ACPI/PCI
and BDF information. The board configuration is organized as
*.c/*.h files located in the
acrn-hypervisor/hypervisor/arch/x86/configs/$(BOARD)/ folder.
VM configuration
VM configuration includes scenario-based VM configuration information that is used to describe the characteristics and attributes for VMs on each user scenario. It also includes launch script-based VM configuration information, where parameters are passed to the device model to launch post-launched User VMs.
Scenario based VM configurations are organized as *.c/*.h files
located in the acrn-hypervisor/hypervisor/scenarios/$(SCENARIO)/
folder.
User VM launch script samples are located in the
acrn-hypervisor/devicemodel/samples/ folder.
ACRN configuration XMLs
The ACRN configuration includes three kinds of XML files for acrn-config
usage: board, scenario, and launch XML. All
scenario-irrelevant hardware-specific information for the board
configuration is stored in the board XML. The XML is generated by
misc/acrn-config/target/board_parser.py, which runs on the target
board. The scenario-relevant board and scenario-based VM configurations
are stored in the scenario XML. The launch script-based VM
configuration is stored in the launch XML. These two XMLs can be
customized by using the web interface tool at
misc/acrn-config/config-app/app.py. End users can load their own
configurations by importing customized XMLs or by saving the
configurations by exporting XMLs.
Board XML format
The board XMLs are located in the
acrn-hypervisor/misc/acrn-config/xmls/board-xmls/ folder.
The board XML has an acrn-config root element and a board attribute:
<acrn-config board="BOARD">
As an input for the acrn-config tool, end users do not need to care
about the format of board XML and should not modify it.
Scenario XML format
The scenario XMLs are located in the
acrn-hypervisor/misc/acrn-config/xmls/config-xmls/ folder. The
scenario XML has an acrn-config root element as well as board
and scenario attributes:
<acrn-config board="BOARD" scenario="SCENARIO">
Additional scenario XML elements:
vm:- Specify the VM with VMID by its “id” attribute.
load_order:- Specify the VM by its load order: PRE_LAUNCHED_VM, SOS_VM or POST_LAUNCHED_VM.
nameunder parent ofvm:- Specify the VM name which will be shown in the hypervisor console command: vm_list.
uuid:- UUID of the VM. It is for internal use and is not configurable.
guest_flags:- Select all applicable flags for the VM.
vcpu_affinity:- vCPU affinity map. Each vCPU will pin to the selected pCPU ID. A different vCPU cannot pin to the same pCPU.
sizeunder parent ofepc_section:- SGX EPC section base; must be page aligned.
baseunder parent ofepc_section:- SGX EPC section size in Bytes; must be page aligned.
clos:- Class of Service for Cache Allocation Technology. Refer to the SDM 17.19.2 for details and use with caution.
start_hpa:- The start physical address in host for the VM.
sizeunder parent ofmemory:- The memory size in Bytes for the VM.
nameunder parent ofos_config:- Specify the OS name of VM; currently, it is not referenced by the hypervisor code.
kern_type:- Specify the kernel image type so that the hypervisor can load it correctly. Currently supports KERNEL_BZIMAGE and KERNEL_ZEPHYR.
kern_mod:- The tag for the kernel image that acts as a multiboot module; it must exactly match the module tag in the GRUB multiboot cmdline.
bootargsunder parent ofos_config:- For internal use and is not configurable. Specify the kernel boot arguments in bootargs under the parent of board_private.
vuart:- Specify the vuart (A.K.A COM) with the vUART ID by its “id” attribute. Refer to vUART Configuration for detailed vUART settings.
typeunder parent ofvuart:- vUART (A.K.A COM) type, currently only supports the legacy PIO mode.
baseunder parent ofvuart:- vUART (A.K.A COM) enabling switch. Enable by exposing its COM_BASE (SOS_COM_BASE for Service VM); disable by returning INVALID_COM_BASE.
irqunder parent ofvuart:- vCOM irq.
target_vm_id:- COM2 is used for VM communications. When it is enabled, specify which target VM the current VM connects to.
target_uart_id:- Target vUART ID that vCOM2 connects to.
pci_dev_num:- PCI devices number of the VM; it is hard-coded for each scenario so it is not configurable for now.
pci_devs:- PCI devices list of the VM; it is hard-coded for each scenario so it is not configurable for now.
board_private:- Stores scenario-relevant board configuration.
rootfs:- rootfs for the Linux kernel.
console:- ttyS console for the Linux kernel.
bootargsunder parent ofboard_private:- Specify kernel boot arguments.
Launch XML format
The launch XMLs are located in the
acrn-hypervisor/misc/acrn-config/xmls/config-xmls/ folder.
The launch XML has an acrn-config root element as well as
board, scenario and uos_launcher attributes:
<acrn-config board="BOARD" scenario="SCENARIO" uos_launcher="UOS_NUMBER">
Attributes of the uos_launcher specify the number of User VMs that the current scenario has:
uos:- Specify the User VM with its relative ID to Service VM by the “id” attribute.
uos_type:- Specify the User VM type, such as CLEARLINUX, ANDROID, or VXWORKS.
rtos_type:- Specify the User VM Realtime capability: Soft RT, Hard RT, or none of them.
mem_size:- Specify the User VM memory size in Mbyte.
gvt_args:- GVT argument for the VM.
vbootloader:- Virtual bootloader type; currently only supports OVMF.
rootfs_dev:- The device where User VM rootfs located.
rootfs_img:- User VM rootfs image file including path.
console_type:- Specify whether the User VM console is virtio or vUART; refer to vUART Configuration for details.
poweroff_channel:- Specify whether the User VM power off channel is through the IOC, Powerbutton, or vUART.
passthrough_devices:- Select the passthrough device from the lspci list; currently we support: usb_xdci, audio, audio_codec, ipu, ipu_i2c, cse, wifi, Bluetooth, sd_card, ethernet, wifi, sata, and nvme.
Note
The configurable and readonly attributes are used to mark
whether the items is configurable for users. When configurable="0"
and readonly="true", the item is not configurable from the web
interface. When configurable="0". the item does not appear on the
interface.
Configuration tool workflow
Hypervisor configuration workflow
The hypervisor configuration is based on the Kconfig make menuconfig
mechanism. Begin by creating a board-specific defconfig file to
set up the default Kconfig values for the specified board.
Next, configure the hypervisor build options using the make
menuconfig graphical interface. The resulting .config file is
used by the ACRN build process to create a configured scenario- and
board-specific hypervisor image.

Figure 23 defconfig file sample

Figure 24 menuconfig interface sample
Refer to Step 4: Build the hypervisor configuration for detailed configuration steps.
Board and VM configuration workflow
Python offline tools are provided to configure Board and VM configurations.
The tool source folder is acrn-hypervisor/misc/acrn-config/.
Here is the offline configuration tool workflow:
Get the board info.
Set up a native Linux environment on the target board.
Copy the
targetfolder into the target file system and then run thesudo python3 board_parser.py $(BOARD)command.A $(BOARD).xml that includes all needed hardware-specific information is generated in the
./out/folder. (Here$(BOARD)is the specified board name)Native Linux requirement:Release: Ubuntu 18.04+ or Clear Linux 30210+Tools: cpuid, rdmsr, lspci, dmidecode (optional)Kernel cmdline: “idle=nomwait intel_idle.max_cstate=0 intel_pstate=disable”
Customize your needs.
- Copy
$(BOARD).xmlto the host development machine. - Run the
misc/acrn-config/config-app/app.pytool on the host machine and import the $(BOARD).xml. Select your working scenario under Scenario Setting and input the desired scenario settings. The tool will do a sanity check on the input based on the $(BOARD).xml. The customized settings can be exported to your own $(SCENARIO).xml. - In the configuration tool UI, input the launch script parameters for the post-launched User VM under Launch Setting. The tool will sanity check the input based on both the $(BOARD).xml and $(SCENARIO).xml and then export settings to your $(LAUNCH).xml.
- The user defined XMLs can be imported by acrn-config for modification.
Note
Refer to Use the ACRN configuration app for more details on the configuration tool UI.
- Copy
Auto generate the code.
Python tools are used to generate configurations in patch format. The patches are applied to your local
acrn-hypervisorgit tree automatically.Generate a patch for the board-related configuration:
cd misc/acrn-config/board_config
python3 board_cfg_gen.py --board $(BOARD).xml --scenario $(SCENARIO).xml
Note that this can also be done by clicking Generate Board SRC in the acrn-config UI.
Generate a patch for scenario-based VM configuration:
cd misc/acrn-config/scenario_config
python3 scenario_cfg_gen.py --board $(BOARD).xml --scenario $(SCENARIO).xml
Note that this can also be done by clicking Generate Scenario SRC in the acrn-config UI.
Generate the launch script for the specified post-launch User VM:
cd misc/acrn-config/launch_config
python3 launch_cfg_gen.py --board $(BOARD).xml --scenario $(SCENARIO).xml --launch $(LAUNCH).xml --uosid xx
Note that this can also be done by clicking Generate Launch Script in the acrn-config UI.
Re-build the ACRN hypervisor. Refer to Build ACRN from Source to re-build the ACRN hypervisor on the host machine.
Deploy VMs and run ACRN hypervisor on the target board.
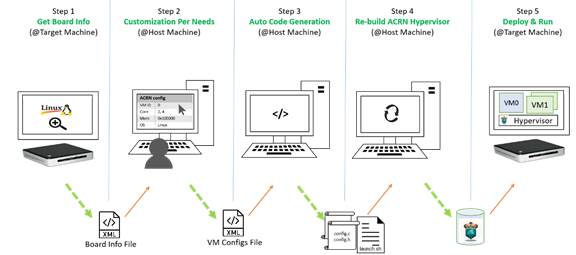
Figure 25 Offline tool workflow
Use the ACRN configuration app
The ACRN configuration app is a web user interface application that performs the following:
- reads board info
- configures and validates scenario settings
- automatically generates patches for board-related configurations and scenario-based VM configurations
- configures and validates launch settings
- generates launch scripts for the specified post-launched User VMs.
Prerequisites
Clone acrn-hypervisor:
$git clone https://github.com/username/acrn-hypervisor.git
Install ACRN configuration app dependencies:
$ cd ~/acrn-hypervisor/misc/acrn-config/config_app
$ sudo pip3 install -r requirements
Instructions
Launch the ACRN configuration app:
$ python3 app.py
Open a browser and navigate to the website http://127.0.0.1:5001/ automatically, or you may need to visit this website manually. Make sure you can connect to open network from browser because the app needs to download some JavaScript files.
Note
The ACRN configuration app is supported on Chrome, Firefox, and MS Edge. Do not use IE.
The website is shown below:

Set the board info:
Click Import Board info.

Upload the board info you have generated from the ACRN config tool.
After board info is uploaded, you will see the board name from the Board info list. Select the board name to be configured.

Choose a scenario from the Scenario Setting menu which lists all the scenarios, including the default scenarios and the user-defined scenarios for the board you selected in the previous step. The scenario configuration xmls are located at
acrn-hypervisor/misc/xmls/config-xmls/[board]/.
Note that you can also use a customized scenario xml by clicking Import. The configuration app automatically directs to the new scenario xml once the import is complete.
The configurable items display after one scenario is selected. Here is the example of “SDC” scenario:
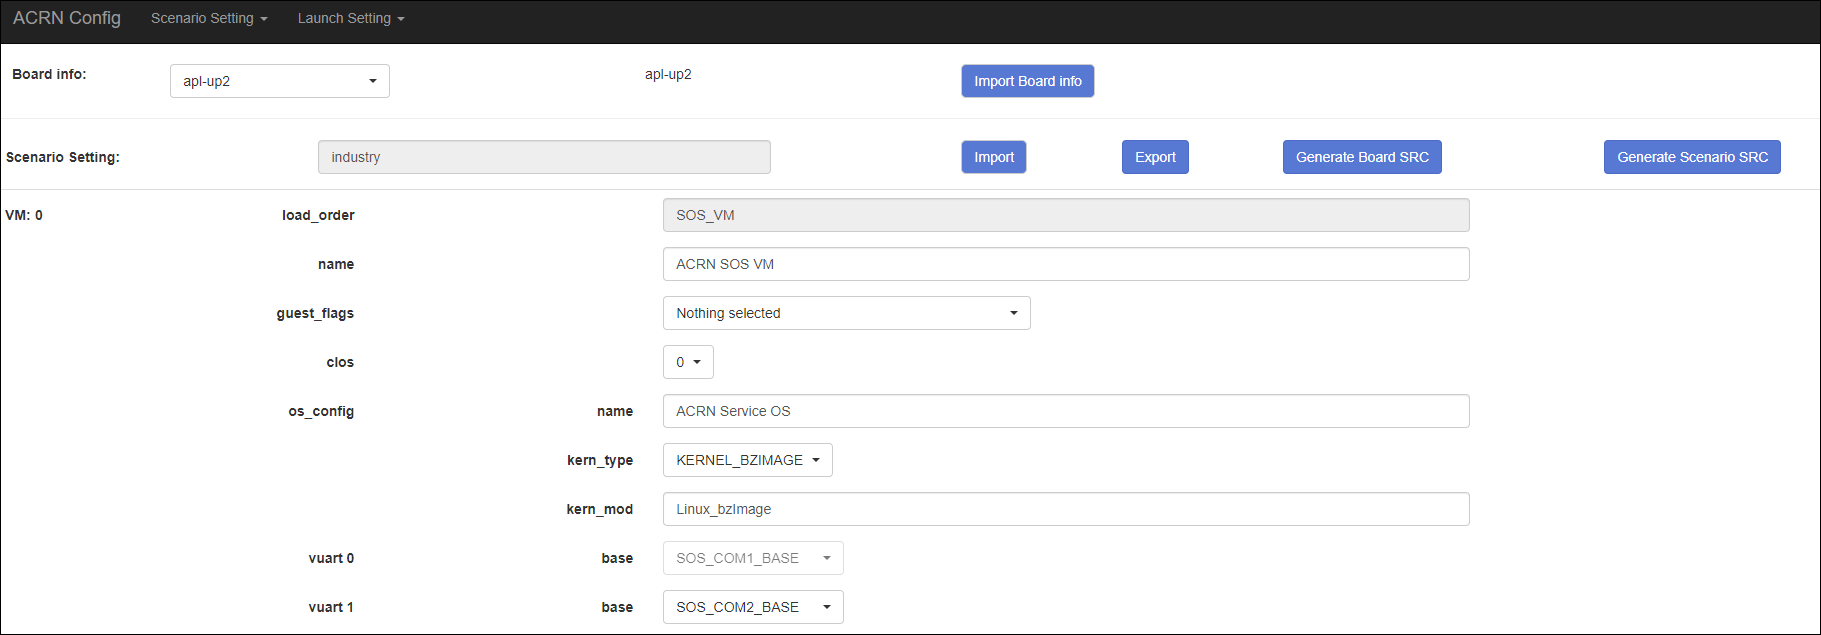
- You can edit these items directly in the text boxes, cor you can choose single or even multiple items from the drop down list.
- Read-only items are marked as grey.
- Hover the mouse pointer over the item to display the description.
Click Export to save the scenario xml; you can rename it in the pop-up modal.
Note
All customized scenario xmls will be in user-defined groups which located in
acrn-hypervisor/misc/xmls/config-xmls/[board]/user_defined/.Before saving the scenario xml, the configuration app will validate the configurable items. If errors exist, the configuration app lists all wrong configurable items and shows the errors as below:
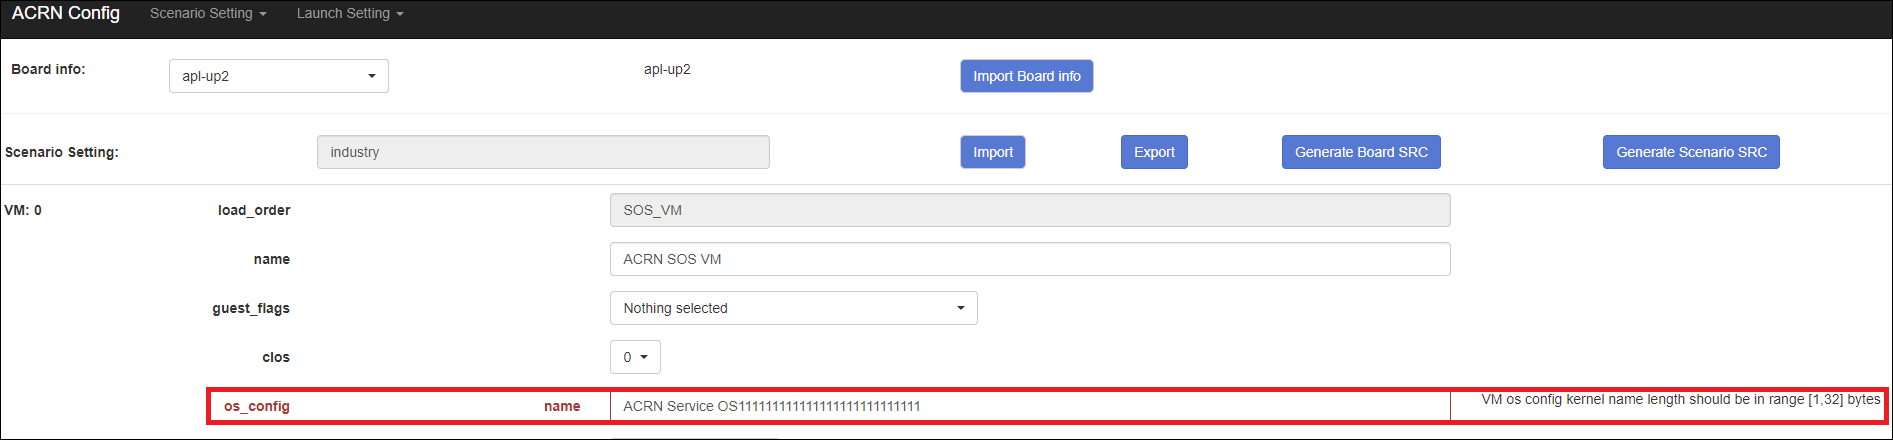
After the scenario is saved, the page automatically directs to the saved scenario xmls. You can delete the configured scenario by clicking Export -> Remove.
Click Generate Board SRC to save the current scenario setting and then generate a patch for the board-related configuration source codes in
acrn-hypervisor/hypervisor/arch/x86/configs/[board]/.Click Generate Scenario SRC to save the current scenario setting and then generate a patch for the scenario-based VM configuration scenario source codes in
acrn-hypervisor/hypervisor/scenarios/[scenario]/.
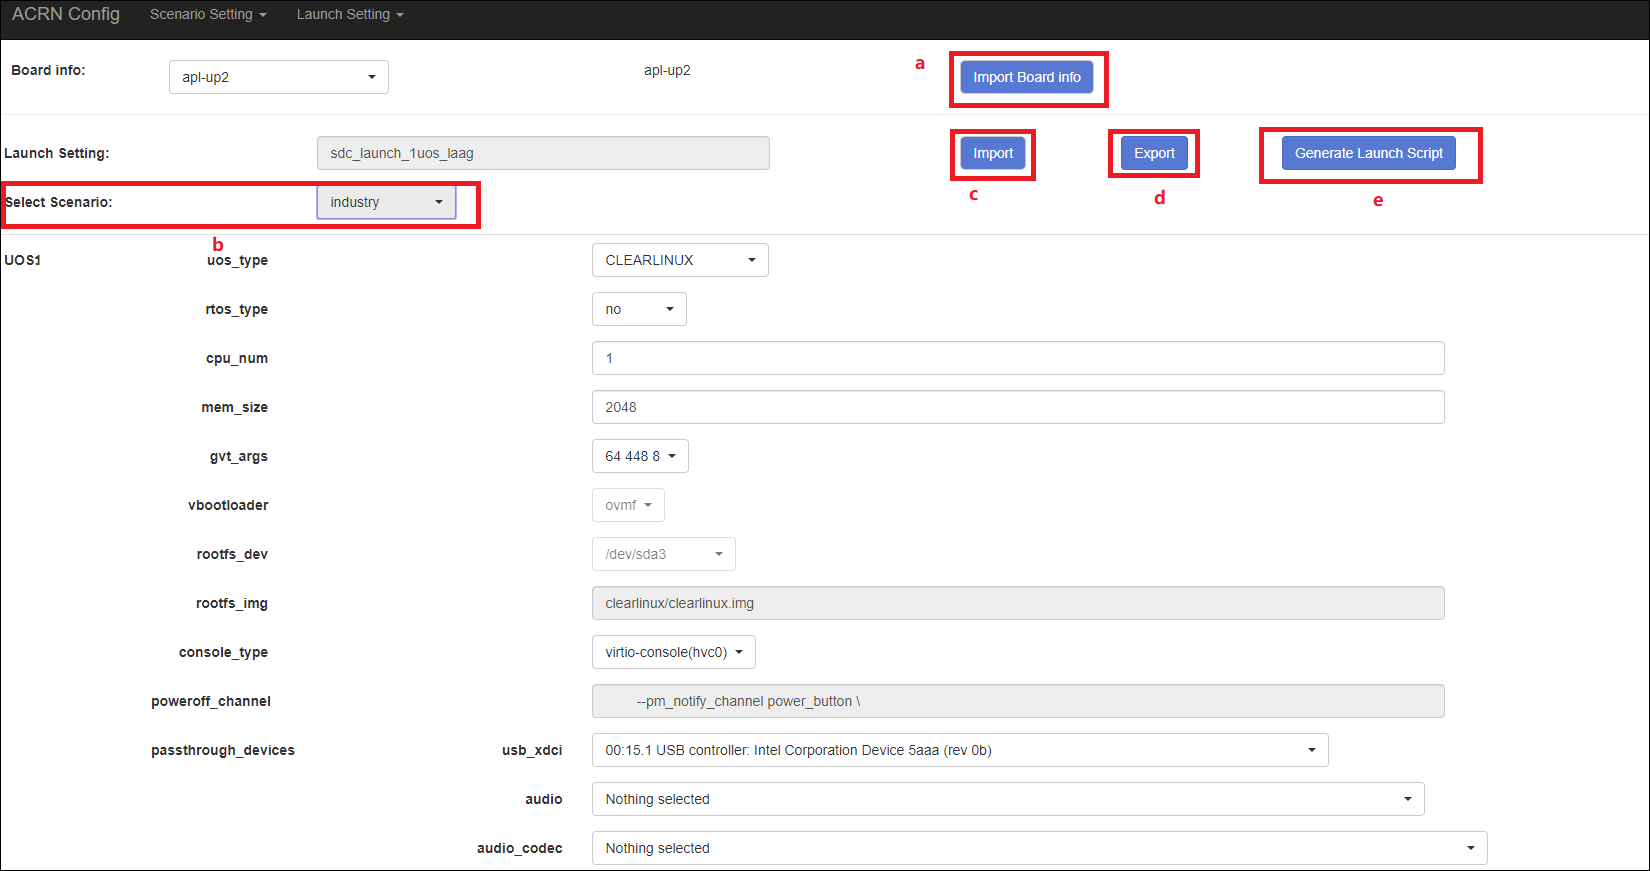
The Launch Setting is quite similar to the Scenario Setting:
Upload board info or select one board as the current board.
Import your local launch setting xml by clicking Import or selecting one launch setting xml from the menu.
Select one scenario for the current launch setting from the Select Scenario drop down box.
Configure the items for the current launch setting.
Save the current launch setting to the user-defined xml files by clicking Export. The configuration app validates the current configuration and lists all wrong configurable items and shows errors.
Click Generate Launch Script to save the current launch setting and then generate the launch script.