Using PREEMPT_RT-Linux for real-time UOS
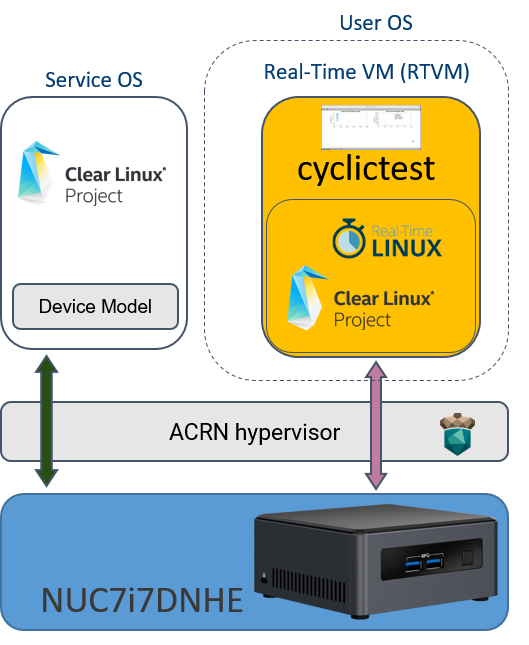
The ACRN project uses various techniques to support a User OS (UOS) running as virtual machine (VM) with real-time characteristics, also called a “RTVM” in ACRN terminology. Some of these techniques include device passthrough and cache allocation technology (CAT), as shown in Figure 51.
To benefit from these techniques, the OS running in the VM should also behave as a real-time system. In this tutorial, we explain how to run a Privileged VM based on a modified Clear Linux* OS using PREEMPT_RT real-time kernel patches from the Real-Time Linux collaborative project.
The PREEMPT_RT patch add preemption models to the mainline Linux kernel. The “Fully Preemptible Kernel” model is the one that turns Linux into an RTOS, allowing the system to react to an external event such as an interrupt within a defined time frame.
The RTVM exclusively owns its passthrough devices, so in addition to the controller and file system used by the SOS, a dedicated storage controller and device are needed to host the RTVM’s root filesystem. The two storage devices should be under different PCI controllers because the system can only pass through PCI-based devices to a guest OS. The Intel NUC7ixDNHE NUC (KBL) is a good platform to set up a real-time system because it has both an NVMe and a SATA controller. You will need both NVMe and SATA storage devices in order to proceed.
The following procedures show an example for setting up a real-time
system on Intel KBL NUC with a SATA SSD as /dev/sda and an NVME SSD as
/dev/nvme0n1p.
Follow the Set up a Clear Linux Operating System instructions in the Getting Started Guide for the Intel NUC to:
- Install Clear Linux (version 29400) onto the NVMe
- Install Clear Linux (version 29400) onto the SATA SSD
- Set up Clear Linux on the SATA SSD as the Service OS (SOS) following the Add the ACRN hypervisor to the EFI Partition instructions in the same guide.
Set up and launch a Real-Time Linux guest
Add kernel-lts2018-preempt-rt bundle (as root):
# swupd bundle-add kernel-lts2018-preempt-rtCopy preempt-rt module to NVMe disk:
# mount /dev/nvme0n1p3 /mnt
# ls -l /usr/lib/modules/
4.19.31-6.iot-lts2018-preempt-rt/
4.19.36-48.iot-lts2018/
4.19.36-48.iot-lts2018-sos/
5.0.14-753.native/
# cp -r /usr/lib/modules/4.19.31-6.iot-lts2018-preempt-rt /mnt/lib/modules/
# cd ~ && umount /mnt && sync
Get your NVMe pass-through IDs (in our example they are
[01:00.0]and[8086:f1a6]):# lspci -nn | grep SSD 01:00.0 Non-Volatile memory controller [0108]: Intel Corporation SSD Pro 7600p/760p/E 6100p Series [8086:f1a6] (rev 03)
Modify
launch_hard_rt_vm.shscript:# vim /usr/share/acrn/samples/nuc/launch_hard_rt_vm.sh <Modify the passthru_bdf and passthru_vpid with your NVMe pass-through IDs> passthru_vpid=( ["eth"]="8086 156f" ["sata"]="8086 9d03" ) passthru_bdf=( ["eth"]="0000:00:1f.6" ["sata"]="0000:00:17.0" ) TO: passthru_vpid=( ["eth"]="8086 156f" ["sata"]="8086 f1a6" ) passthru_bdf=( ["eth"]="0000:00:1f.6" ["sata"]="0000:01:00.0" ) <Modify NVMe pass-through id> -s 2,passthru,0/17/0 \ TO: -s 2,passthru,01/00/0 \ <Modify rootfs to NVMe> -B "root=/dev/sda3 rw rootwait maxcpus=$1 nohpet console=hvc0 \ TO: -B "root=/dev/nvme0n1p3 rw rootwait maxcpus=$1 nohpet console=hvc0 \
Get IP address in real-time VM if you need it (There is no IP by default)
Method 1
virtio-net NIC:# vim /usr/share/acrn/samples/nuc/launch_hard_rt_vm.sh <add below line into acrn-dm boot args> -s 4,virtio-net,tap0 \
Method 2
pass-through NIC:<Get your ethernet IDs first(in our example they are ``[00:1f.6]`` and ``[8086:15e3]``)> # lspci -nn | grep Eth 00:1f.6 Ethernet controller [0200]: Intel Corporation Ethernet Connection (5) I219-LM [8086:15e3] # vim /usr/share/acrn/samples/nuc/launch_hard_rt_vm.sh <Modify the passthru_bdf and passthru_vpid with your ethernet IDs> passthru_vpid=( ["eth"]="8086 156f" ["sata"]="8086 f1a6" ) passthru_bdf=( ["eth"]="0000:00:1f.6" ["sata"]="0000:01:00.0" ) TO: passthru_vpid=( ["eth"]="8086 15e3" ["sata"]="8086 f1a6" ) passthru_bdf=( ["eth"]="0000:00:1f.6" ["sata"]="0000:01:00.0" ) <Uncomment the following three lines> #echo ${passthru_vpid["eth"]} > /sys/bus/pci/drivers/pci-stub/new_id #echo ${passthru_bdf["eth"]} > /sys/bus/pci/devices/${passthru_bdf["eth"]}/driver/unbind #echo ${passthru_bdf["eth"]} > /sys/bus/pci/drivers/pci-stub/bind TO: echo ${passthru_vpid["eth"]} > /sys/bus/pci/drivers/pci-stub/new_id echo ${passthru_bdf["eth"]} > /sys/bus/pci/devices/${passthru_bdf["eth"]}/driver/unbind echo ${passthru_bdf["eth"]} > /sys/bus/pci/drivers/pci-stub/bind <add below line into acrn-dm boot args,behind is your ethernet ID> -s 4,passthru,00/1f/6 \
Note
method 1 will give both the Service VM and User VM network connectivity
method 2 will give the User VM a network interface, the Service VM will loose it
Start the Real-Time Linux guest:
# sh /usr/share/acrn/samples/nuc/launch_hard_rt_vm.shAt this point, you’ve successfully launched the real-time VM and Guest OS. You can verify a preemptible kernel was loaded using the
uname -acommand:root@rtvm-02 ~ # uname -a Linux clr-de362ed3fd444586b99968b5ceb22275 4.19.31-6.iot-lts2018-preempt-rt #1 SMP PREEMPT Mon May 20 16:00:51 UTC 2019 x86_64 GNU/Linux
Now you can run all kinds of performance tools to experience real-time performance. One popular tool is
cyclictest. You can install this tool and run it with:swupd bundle-add dev-utils cyclictest -N -p80 -D30 -M > log.txt cat log.txt
To achieve better real-time performance, the following is the recommended BIOS setting. You may not see all the settings because some of them may be hidden by different BIOS vendors.
Table 6 Recommended BIOS Settings¶ Item Setting VMX Enabled VT-d Enabled Hyper-Threading Disabled Speed Step Disabled Speed Shift Disabled C-State Disabled Voltage Optimization Disabled GT RC6 Disabled Gfx Low Power Mode Disabled SA GV Disabled Aggressive LPM Support Disabled ACPI S3 Support Disabled Native ASPM Disabled
