Using partition mode on NUC
ACRN hypervisor supports logical partition scenario, in which the User OS (such as Clear Linux) running in a pre-launched VM can bypass the ACRN hypervisor and directly access isolated PCI devices. The following guidelines provide step by step instructions on how to set up the ACRN hypervisor logical partition scenario on Intel NUC running two pre-launched VMs. The logical partition scenario on Intel NUC is shown in Figure 235.
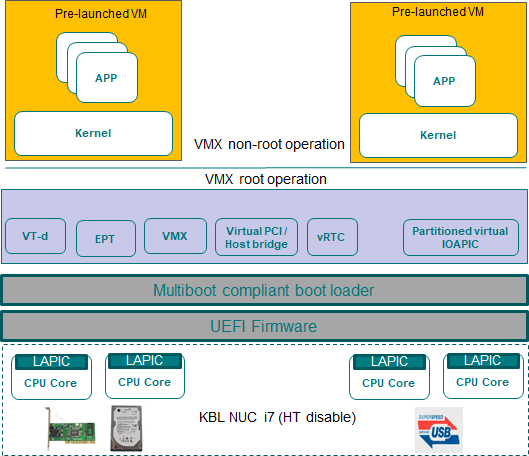
Figure 235 The logical partition scenario on Intel NUC
Prerequisites
- Intel NUC Kit NUC7i7DNHE
- Connecting to the serial port, described in Getting started guide for Intel NUC
- NVMe disk
- SATA disk
- Storage device with USB interface (such as USB Flash or SATA disk connected with a USB3.0 SATA converter etc)
- Disable “Intel Hyper Threading Technology” in the BIOS, to avoid interference from logical cores for the logical partition scenario.
- In the logical partition scenario, two VMs (running Clear Linux) are started by the ACRN hypervisor. Each VM has its own root filesystem. Set up each VM by following the Install Clear Linux OS on bare metal with live server and install Clear Linux OS first on a SATA disk and then again on a storage device with a USB interface. The two pre-launched VMs will mount the root file systems via the SATA controller and the USB controller respectively.
Update kernel image and modules of Pre-launched VM
On your development workstation, clone the ACRN kernel source tree, and build the Linux kernel image that will be used to boot the pre-launched VMs:
$ git clone https://github.com/projectacrn/acrn-kernel.git
Cloning into 'acrn-kernel'...
...
$ cd acrn-kernel
$ cp kernel_config_uos .config
$ make olddefconfig
scripts/kconfig/conf  --olddefconfig Kconfig
#
# configuration written to .config
#
$ make
$ make modules_install INSTALL_MOD_PATH=out/
The last two commands build the bootable kernel image as
arch/x86/boot/bzImage, and loadable kernel modules under the./out/folder. Copy these files to a removable disk for installing on the NUC later.Current ACRN logical partition scenario implementation requires a multi-boot capable bootloader to boot both the ACRN hypervisor and the bootable kernel image built from the previous step. Install Ubuntu OS to the on-board NVMe SSD by following the Ubuntu desktop installation instructions The Ubuntu installer creates 3 disk partitions on the on-board NVMe SSD. By default, the GRUB bootloader is installed on the EFI System Partition (ESP), used to bootstrap the ACRN hypervisor.
After installing the Ubuntu OS, power off the NUC, attach the SATA disk and storage device with USB interface to the NUC. Power on the NUC and make sure it boots the Ubuntu OS from the NVMe SSD. Plug in the removable disk with kernel image into the NUC, then copy the loadable kernel modules built in Step 1 to the
/lib/modules/folder on both the mounted SATA disk and storage device with USB interface. For example, assuming the SATA disk and storage device with USB interface are assigned to/dev/sdaand/dev/sdbrespectively, the following commands set up the partition mode loadable kernel modules onto the root file systems to be loaded by the pre-launched VMs:# Mount the Clear Linux OS root filesystem on the SATA disk $ sudo mount /dev/sda3 /mnt $ sudo cp -r <kernel-modules-folder-built-in-step1>/lib/modules/* /mnt/lib/modules $ sudo umount /mnt # Mount the Clear Linux OS root filesystem on the USB flash disk $ sudo mount /dev/sdb3 /mnt $ sudo cp -r <path-to-kernel-module-folder-built-in-step1>/lib/modules/* /mnt/lib/modules $ sudo umount /mnt
Copy the bootable kernel image to the /boot directory:
$ sudo cp <path-to-kernel-image-built-in-step1>/bzImage /boot/
Update ACRN hypervisor Image
Before building the ACRN hypervisor, you need to figure out the I/O address of the serial port, and the PCI BDF addresses of the SATA controller and the USB controllers on the NUC. Enter the following command to get the I/O addresses of the serial port. The NUC supports one serial port ttyS0. You’ll need to connect the serial port to the development workstation, in order to access the ACRN serial console to switch between pre-launched VMs:
$ dmesg | grep ttyS0
[    0.000000] console [ttyS0] enabled
[    1.562546] 00:01: ttyS0 at I/O 0x3f8 (irq = 4, base_baud = 115200) is
a 16550A
The following command prints detailed information about all PCI buses and devices in the system:
$ sudo lspci -vv
00:14.0 USB controller: Intel Corporation Sunrise Point-LP USB 3.0 xHCI Controller (rev 21) (prog-if 30 [XHCI])
        Subsystem: Intel Corporation Sunrise Point-LP USB 3.0 xHCI Controller
00:17.0 SATA controller: Intel Corporation Sunrise Point-LP SATA Controller [AHCI mode] (rev 21) (prog-if 01 [AHCI 1.0])
        Subsystem: Intel Corporation Sunrise Point-LP SATA Controller [AHCI mode]
00:1f.6 Ethernet controller: Intel Corporation Ethernet Connection I219-LM (rev 21)
        Subsystem: Intel Corporation Ethernet Connection I219-LM
Note
Double check PCI devices BDF defined in the
hypervisor/arch/x86/configs/nuc7i7bnh/pci_devices.hwith the information reported by thelspci -vvcommand.Clone the ACRN source code and configure the build options
Please refer Build ACRN from Source to setup ACRN build environment on your development workstation.
Clone the ACRN source code:
$ git clone https://github.com/projectacrn/acrn-hypervisor.git
$ cd acrn-hypervisor/hypervisor
Configure the build options:
$ make defconfig BOARD=nuc7i7bnh
$ make menuconfig
Updates the following configure item:
- Set ACRN Scenario as “Logical Partition VMs”;
- Set Maximum number of VCPUs per VM as “2”;
- Set Maximum number of PCPU as “4”;
- Clear/Disable “Enable hypervisor relocation”.
We recommend keeping the default values of items not mentioned above.
Check Ubuntu boot loader name
On the current design, logical partition depends on the GRUB boot loader, otherwise, the hypervisor will fail to boot. Double check the default boot loader is GRUB:
$ sudo update-grub -V
The above command output should contain the
GRUBkeyword.Check or update BDF information of PCI devices of each pre-launched VM; Check it in the
hypervisor/arch/x86/configs/nuc7i7bnh/pci_devices.h.Build the ACRN hypervisor and copy the artifact
acrn.32.outto the/bootdirectory:Build ACRN hypervisor:
$ make
Copy
acrn.32.outto a removable disk.Plug in the removable disk into the NUC’s USB port.
Copy the
acrn.32.outfrom removable disk to/bootdirectory.
Update Ubuntu GRUB to Boot hypervisor and Load Kernel Image
Append the following configuration to the
/etc/grub.d/40_customfile:menuentry 'ACRN hypervisor Logical Partition Scenario' --class ubuntu --class gnu-linux --class gnu --class os $menuentry_id_option 'gnulinux-simple-e23c76ae-b06d-4a6e-ad42-46b8eedfd7d3' { recordfail load_video gfxmode $linux_gfx_mode insmod gzio insmod part_gpt insmod ext2 echo 'Loading hypervisor logical partition scenario ...' multiboot --quirk-modules-after-kernel /boot/acrn.32.out module /boot/bzImage XXXXXX }Note
The kernel command line arguments used to boot the pre-launched VMs is located in header file
hypervisor/scenarios/logical_partition/vm_configurations.hand configured byVMx_CONFIG_OS_BOOTARG_*MACROs (where x is the VM id number and*are arguments). The multiboot module paramXXXXXXis the bzImage tag and must exactly match thekernel_mod_tagconfigured in filehypervisor/scenarios/logical_partition/vm_configurations.c.Modify the
/etc/default/grubfile as follows to make the GRUB menu visible when booting:#GRUB_HIDDEN_TIMEOUT=0 GRUB_HIDDEN_TIMEOUT_QUIET=false
Update grub:
$ sudo update-grub
Reboot the NUC. Select the “ACRN hypervisor Logical Partition Scenario” entry to boot the logical partition of the ACRN hypervisor on the NUC’s display. The GRUB loader will boot the hypervisor, and the hypervisor will start two pre-launched VMs automatically.
Logical Partition Scenario Startup Checking
- Use these steps to verify the hypervisor is properly running:
- Login ACRN hypervisor shell from serial console.
- Use the
vm_listcheck pre-launched VMs.
- Use these steps to verify the two pre-launched VMs are running properly:
- Use the
vm_console 0to switch to VM0’s console. - The VM0’s clearlinux OS could boot up and login in.
- Use a
Ctrl-Spacebarto return to the Acrn hypervisor shell. - Use the
vm_console 1to switch to VM1’s console. - The VM1’s clearlinux OS could boot up and login in.
- Use the
Refer to the ACRN hypervisor shell user guide for more information about available commands.