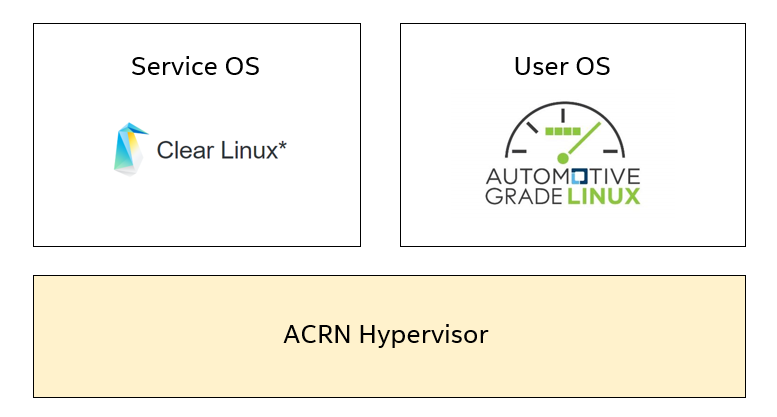
Using AGL as the User OS
This tutorial describes the steps to run Automotive Grade Linux (AGL) as the User OS on ACRN hypervisor and the existing issues we still have. We hope the steps documented in this article will help others reproduce the issues we’re seeing, and provide information for further debugging. We’re using an Apollo Lake-based NUC model NUC6CAYH and other platforms may be used as well.
Introduction to AGL
Automotive Grade Linux is a collaborative open source project that is bringing together automakers, suppliers, and technology companies to accelerate the development and adoption of a fully open software stack for the connected car. With Linux at its core, AGL is developing an open platform from the ground up that can serve as the de facto industry standard to enable rapid development of new features and technologies. For more information about AGL, please visit AGL’s official website.
Steps for using AGL as the UOS
Follow the instructions found in the Getting started guide for Intel NUC to boot “The ACRN Service OS”
In SOS, download the release of AGL from https://download.automotivelinux.org/AGL/release/eel/. We’re using release
eel_5.1.0for our example:$ cd ~ $ wget https://download.automotivelinux.org/AGL/release/eel/5.1.0/intel-corei7-64/deploy/images/intel-corei7-64/agl-demo-platform-crosssdk-intel-corei7-64.wic.xz $ unxz agl-demo-platform-crosssdk-intel-corei7-64.wic.xz
Deploy the UOS kernel modules to UOS virtual disk image
$ sudo losetup -f -P --show ~/agl-demo-platform-crosssdk-intel-corei7-64.wic
$ sudo mount /dev/loop0p2 /mnt
$ sudo cp -r /usr/lib/modules/4.19.0-27.iot-lts2018 /mnt/lib/modules/
$ sudo umount /mnt
$ sync
Note
Follow the instructions in Getting started guide for Intel NUC, the
linux-iot-lts2018kernels and modules will be installed by default after adding the bundlekernel-iot-lts2018. Here the version of modules is4.19.0-27.iot-lts2018.Adjust the
/usr/share/acrn/samples/nuc/launch_uos.shscript to match your installation. These are the couple of lines you need to modify-s 3,virtio-blk,/root/agl-demo-platform-crosssdk-intel-corei7-64.wic \ -k /usr/lib/kernel/default-iot-lts2018 \ -B "root=/dev/vda2 ...
Note
In case you have downloaded a different AGL image or stored the image in another directory, you will need to modify the AGL file name or directory (the
-s 3,virtio-blkargument) to match what you have downloaded above. Likewise, you may need to adjust the kernel file name todefault-iot-lts2018.Start the User OS (UOS)
$ sudo /usr/share/acrn/samples/nuc/launch_uos.sh
Congratulations, you are now watching the User OS booting up!
And you should be able to see the console of AGL:
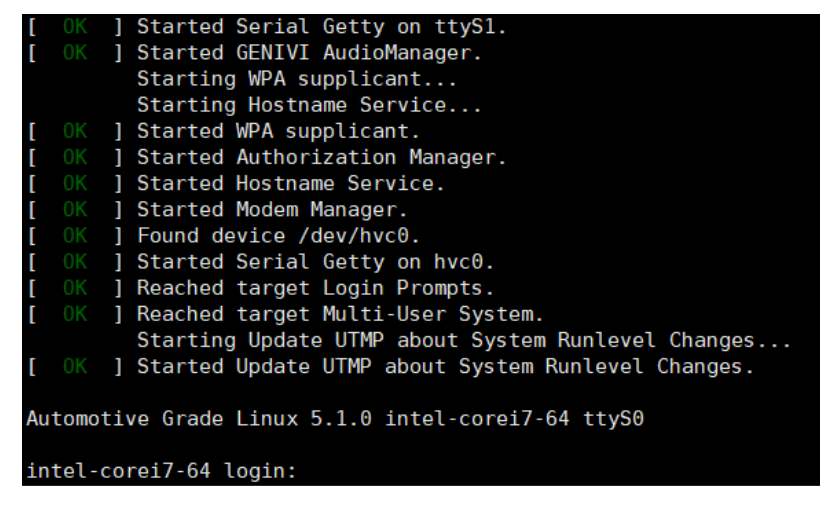
When you see this output on the console, AGL has been successfully loaded and now you can operate on the console.
Enable the AGL display
By following these setup steps, you will get a black screen in AGL.
We provide a workaround for this black screen in the steps below.
By debugging, we identified the problem as an issue with the (not well supported) ivi-shell.so library.
We can light the screen with the weston GUI, as shown below.

To enable weston in AGL, we need to modify weston’s weston.ini configuration file.
$ vim /etc/xdg/weston/weston.ini
Make these changes to weston.ini:
- Comment
ivi-shell.soout - Check the name of output is
HDMI-A-2
After that, set up an environment variable and restart the weston service:
$ export XDG_RUNTIME_DIR=/run/platform/display
$ systemctl restart weston
You should now see the weston GUI in AGL.
Follow up
ACRN Hypervisor is expanding support for more operating systems,
and AGL is an example of this effort. We continue to debug the ivi-shell.so issue,
and investigating why the AGL GUI is not launching as expected.