Running AGL as VMs
This document describes how to run two Automotive Grade Linux (AGL) images as VMs on the ACRN hypervisor. This serves as the baseline for developing the hypervisor version of the AGL CES demo using open-source technologies.
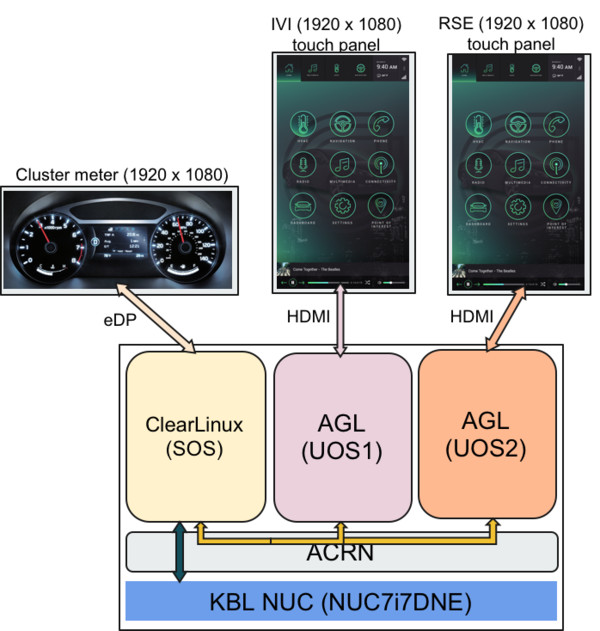
Figure 48 Demo concept
Figure 48 shows the AGL demo system configuration. The hardware is an Intel Kaby Lake NUC and three displays for the cluster meter, the In-Vehicle Infotainment (IVI) system, and the rear seat entertainment (RSE). For software, three VMs run on top of ACRN:
- Clear Linux OS runs as the service OS (Service VM) to control the cluster meter.
- An AGL instance runs as a user OS (User VM) to control the IVI display.
- A second AGL User VM controls the RSE display.
Figure 49 shows the hardware and display images of a running demo:
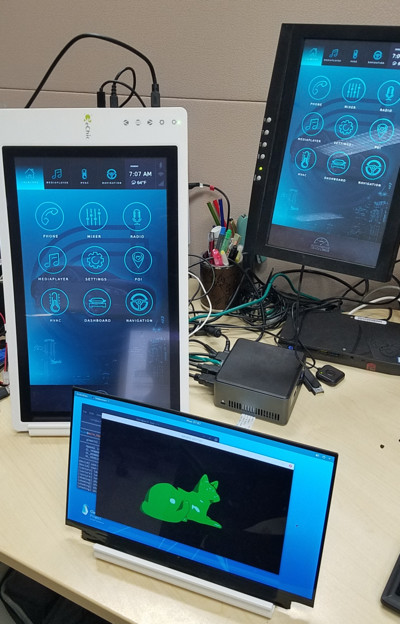
Figure 49 Demo in action
Hardware Setup
The following hardware is used for demo development:
| Name | Link | Notes |
|---|---|---|
| NUC | Kaby Lake NUC7i7DNHE |
|
| eDP display | Sharp LQ125T1JX05 | |
| eDP cable | eDP 40 pin cable | Other eDP pin cables work as well |
| HDMI touch displays | GeChic 1303I | |
| Serial cable | Serial DB9 header cable or RS232 lid |
Connect Hardware
Learn how to connect an eDP display to the NUC using an eDP cable, as shown in Figure 50, by following the NUC specification
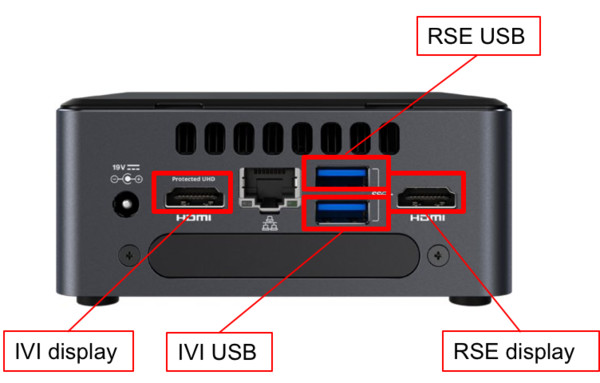
Figure 50 USB an Display cable connections
As shown in Figure 50, connect HDMI cables and USB cables (for touch) to the touch displays for the IVI and RSE. Note that if the USB port for touch is changed, the USB bus-port number in the AGL launch script must be changed accordingly.
Software Setup
The demo setup uses these software components and versions:
| Name | Version | Link |
|---|---|---|
| ACRN hypervisor | 1.3 | ACRN project |
| Clear Linux OS | 31080 | Clear Linux OS installer image |
| AGL | Funky Flounder (6.02) | intel-corei7-x64 image |
| acrn-kernel | revision acrn-2019w39.1-140000p | acrn-kernel |
Service OS
Download the compressed Clear Linux OS installer image from https://download.clearlinux.org/releases/31080/clear/clear-31080-live-server.img.xz and follow the Clear Linux OS installation guide as a starting point for installing the Clear Linux OS onto your platform. Follow the recommended options for choosing an Automatic installation type, and using the platform’s storage as the target device for installation (overwriting the existing data and creating three partitions on the platform’s storage drive).
After installation is complete, boot into the Clear Linux OS, log in as root, and set a password.
The Clear Linux OS is set to automatically update itself. We recommend that you disable this feature to have more control over when the updates happen. Use this command (as root) to disable the autoupdate feature:
# swupd autoupdate --disable
This demo setup uses a specific release version (31080) of Clear Linux OS which has been verified to work with ACRN. In case you unintentionally update or change the Clear Linux OS version, you can fix it again using:
# swupd verify --fix --picky -m 31080
Use acrn_quick_setup.sh to automatically install ACRN:
# sh acrn_quick_setup.sh -s 31080 -i
After installation, the system will automatically start.
Reboot the system, choose ACRN Hypervisor, and launch the Clear Linux OS Service VM. If the EFI boot order is not right, use F10 on boot up to enter the EFI menu and choose ACRN Hypervisor.
Install the graphics UI if necessary. Use only one of the two options listed below (this guide uses the GNOME on Wayland option):
# swupd bundle-add desktop desktop-autostart # GNOME and Weston
or:
# swupd bundle-add software-defined-cockpit # IAS shell for IVI (optional)
Create a new user and allow the user to use sudo:
# useradd <username>
# passwd <username>
# usermod -G wheel -a <username>
Reboot the system:
# reboot
The system will reboot to the graphic interface (GDM). From the login screen, click Setting and choose GNOME on Wayland. Then chose the <username> and enter the password to log in.
Build ACRN kernel for AGL (User VM)
In this demo, we use acrn-kernel as the baseline for AGL development.
Create a workspace, get the kernel source code, and configure kernel settings with:
$ cd workspace
$ git clone https://github.com/projectacrn/acrn-kernel
$ git checkout tags/acrn-2019w39.1-140000p
$ cp kernel_config_uos .config
$ vi .config
$ make olddefconfig
Load the .config for the User VM kernel build, and verify that the following config options are on:
CONFIG_LOCALVERSION="-uos"
CONFIG_SECURITY_SMACK=y
CONFIG_SECURITY_SMACK_BRINGUP=y
CONFIG_DEFAULT_SECURITY_SMACK=y
CONFIG_EXT4_FS=y
CONFIG_EXT4_USE_FOR_EXT2=y
CONFIG_EXT4_FS_POSIX_ACL=y
CONFIG_EXT4_FS_SECURITY=y
CONFIG_CAN=y
CONFIG_CAN_VCAN=y
CONFIG_CAN_SLCAN=y
Build the kernel:
$ make -j 4
$ sudo make modules_install
$ sudo cp arch/x86/boot/bzImage /root/bzImage-4.19.0-uos
Set up AGLs
Download the AGL Funky Flounder image:
$ sudo su
# cd /root
# wget https://download.automotivelinux.org/AGL/release/flounder/6.0.2/intel-corei7-64/deploy/images/intel-corei7-64/agl-demo-platform-crosssdk-intel-corei7-64-20181112133144.rootfs.wic.xz

# unxz agl-demo-platform-crosssdk-intel-corei7-64-20181112133144.rootfs.wic.xz
# cp agl-demo-platform-crosssdk-intel-corei7-64-20181112133144.rootfs.wic agl-ivi.wic
# cp agl-demo-platform-crosssdk-intel-corei7-64-20181112133144.rootfs.wic agl-rse.wic
Set up the AGL images:
# losetup -f -P --show agl-ivi.wic
# mount /dev/loop0p2 /mnt
# cp -r /lib/modules/4.19.0-uos /mnt/lib/modules/
# sync
# umount /mnt
# losetup -f -P --show agl-rse.wic
# mount /dev/loop1p2 /mnt
# cp -r /lib/modules/4.19.0-uos /mnt/lib/modules/
# sync
# umount /mnt
Create the
launch_ivi.shscript for the AGL IVI VM (e.g., with vi) with the following content:#!/bin/bash set -x offline_path="/sys/class/vhm/acrn_vhm" # Check the device file of /dev/acrn_hsm to determine the offline_path if [ -e "/dev/acrn_hsm" ]; then offline_path="/sys/class/acrn/acrn_hsm" fi function launch_clear() { mac=$(cat /sys/class/net/e*/address) vm_name=vm$1 mac_seed=${mac:9:8}-${vm_name} #check if the vm is running or not vm_ps=$(pgrep -a -f acrn-dm) result=$(echo $vm_ps | grep -w "${vm_name}") if [[ "$result" != "" ]]; then echo "$vm_name is running, can't create twice!" exit fi #logger_setting, format: logger_name,level; like following logger_setting="--logger_setting console,level=4;kmsg,level=3" #for memsize setting mem_size=2048M acrn-dm -A -m $mem_size -c $2 -s 0:0,hostbridge \ -s 2,pci-gvt -G "$3" \ -s 3,virtio-blk,/root/agl-ivi.wic \ -s 4,virtio-net,tap0 \ -s 5,virtio-console,@stdio:stdio_port \ -s 6,virtio-hyper_dmabuf \ -s 7,xhci,1-4 \ $logger_setting \ --mac_seed $mac_seed \ -k /root/bzImage-4.19.0-uos \ -B "root=/dev/vda2 rw rootwait maxcpus=$2 nohpet console=tty0 console=hvc0 \ console=ttyS0 no_timer_check ignore_loglevel log_buf_len=16M \ consoleblank=0 tsc=reliable i915.avail_planes_per_pipe=$4 \ i915.enable_hangcheck=0 i915.nuclear_pageflip=1 i915.enable_guc_loading=0 \ i915.enable_guc_submission=0 i915.enable_guc=0" $vm_name } # offline Service VM CPUs except BSP before launch User VM for i in `ls -d /sys/devices/system/cpu/cpu[1-99]`; do online=`cat $i/online` idx=`echo $i | tr -cd "[1-99]"` echo cpu$idx online=$online if [ "$online" = "1" ]; then echo 0 > $i/online # during boot time, cpu hotplug may be disabled by pci_device_probe during a pci module insmod while [ "$online" = "1" ]; do sleep 1 echo 0 > $i/online online=`cat $i/online` done echo $idx > ${offline_path}/offline_cpu fi done launch_clear 1 1 "64 448 8" 0x000F00 aglCreate the
launch_rse.shscript for the AGL RSE VM with this content:#!/bin/bash set -x offline_path="/sys/class/vhm/acrn_vhm" # Check the device file of /dev/acrn_hsm to determine the offline_path if [ -e "/dev/acrn_hsm" ]; then offline_path="/sys/class/acrn/acrn_hsm" fi function launch_clear() { mac=$(cat /sys/class/net/e*/address) vm_name=vm$1 mac_seed=${mac:9:8}-${vm_name} #check if the vm is running or not vm_ps=$(pgrep -a -f acrn-dm) result=$(echo $vm_ps | grep -w "${vm_name}") if [[ "$result" != "" ]]; then echo "$vm_name is running, can't create twice!" exit fi #logger_setting, format: logger_name,level; like following logger_setting="--logger_setting console,level=4;kmsg,level=3" #for memsize setting mem_size=2048M acrn-dm -A -m $mem_size -c $2 -s 0:0,hostbridge -U 495ae2e5-2603-4d64-af76-d4bc5a8ec0e5 \ -s 2,pci-gvt -G "$3" \ -s 5,virtio-console,@stdio:stdio_port \ -s 6,virtio-hyper_dmabuf \ -s 3,virtio-blk,/root/agl-rse.wic \ -s 4,virtio-net,tap0 \ -s 7,xhci,1-5 \ $logger_setting \ --mac_seed $mac_seed \ -k /root/bzImage-4.19.0-uos \ -B "root=/dev/vda2 rw rootwait maxcpus=$2 nohpet console=tty0 console=hvc0 \ console=ttyS0 no_timer_check ignore_loglevel log_buf_len=16M \ consoleblank=0 tsc=reliable i915.avail_planes_per_pipe=$4 \ i915.enable_hangcheck=0 i915.nuclear_pageflip=1 i915.enable_guc_loading=0 \ i915.enable_guc_submission=0 i915.enable_guc=0" $vm_name } # offline Service VM CPUs except BSP before launch User VM for i in `ls -d /sys/devices/system/cpu/cpu[1-99]`; do online=`cat $i/online` idx=`echo $i | tr -cd "[1-99]"` echo cpu$idx online=$online if [ "$online" = "1" ]; then echo 0 > $i/online # during boot time, cpu hotplug may be disabled by pci_device_probe during a pci module insmod while [ "$online" = "1" ]; do sleep 1 echo 0 > $i/online online=`cat $i/online` done echo $idx > ${offline_path}/offline_cpu fi done launch_clear 2 1 "64 448 8" 0x070000 aglLaunch the AGL IVI VM:
# chmod a+x launch_ivi.sh
# ./launch_ivi.sh
Settings for the IVI screen
After booting, the IVI image will be accessible via the console. Login as root, and use an editor to modify
/etc/xdg/weston/weston.inito change the[output]orientation as shown below.[core] shell=ivi-shell.so backend=drm-backend.so require-input=false modules=systemd-notify.so # A display is connected to HDMI-A-1 and needs to be rotated 90 degrees # to have a proper orientation of the homescreen. For example, the 'eGalax' # display used in some instances. [output] name=HDMI-A-1 transform=270 [id-agent] default-id-offset=1000 [ivi-shell] ivi-input-module=ivi-input-controller.so ivi-module=ivi-controller.so id-agent-module=simple-id-agent.so [shell] locking=true panel-position=none
Note
Reboot for the changes to take affect.
Launch the AGL RSE VM
Open a new terminal:
$ sudo su
# cd /root
# chmod a+x launch_rse.sh
# ./launch_rse.sh
Settings for the RSE screen
After booting, the RSE image will be accessible via the console. Login as root, and use an editor to modify
/etc/xdg/weston/weston.inito change the[output]orientation as shown below.[core] shell=ivi-shell.so backend=drm-backend.so require-input=false modules=systemd-notify.so # A display is connected to HDMI-A-3 and needs to be rotated 90 degrees # to have a proper orientation of the homescreen. For example, the 'eGalax' # display used in some instances. [output] name=HDMI-A-3 transform=270 [id-agent] default-id-offset=1000 [ivi-shell] ivi-input-module=ivi-input-controller.so ivi-module=ivi-controller.so id-agent-module=simple-id-agent.so [shell] locking=true panel-position=none
Note
Reboot for the changes to take affect.
You have successfully launched the demo system. It should look similar to Figure 49 at the beginning of this document. AGL as IVI and RSE work independently on top of ACRN and you can interact with them via the mouse.