Using partition mode on UP2
ACRN hypervisor supports partition mode, in which the User OS running in a privileged VM can bypass the ACRN hypervisor and directly access isolated PCI devices. This tutorial provides step by step instructions on how to set up the ACRN hypervisor partition mode on UP2 boards running two privileged VMs as shown in Figure 167:
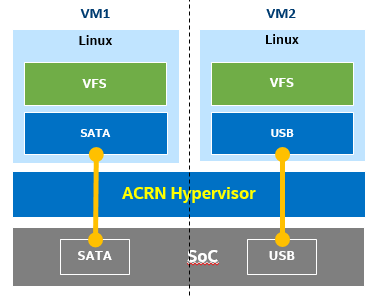
Figure 167 Two privileged VMs running in partition mode
Prerequisites
In this tutorial two Linux privileged VMs are started by the ACRN hypervisor. To set up the Linux root filesystems for each VM, follow the Clear Linux bare metal installation guide to install Clear Linux on a SATA disk and a USB flash disk prior the setup, as the two privileged VMs will mount the root filesystems via the SATA controller and the USB controller respectively.
Build kernel and modules for partition mode UOS
On your development workstation, clone the ACRN kernel source tree, and build the Linux kernel image that will be used to boot the privileged VMs:
$ git clone https://github.com/projectacrn/acrn-kernel.git
Cloning into 'acrn-kernel'...
...
$ cd acrn-kernel
$ cp kernel_config_uos .config

$ make olddefconfig
scripts/kconfig/conf  --olddefconfig Kconfig
#
# configuration written to .config
#

$ make
$ make modules_install INSTALL_MOD_PATH=out/
The last two commands built the bootable kernel image
arch/x86/boot/bzImage, and the loadable kernel modules under the./out/folder. Copy these files to a removable disk for installing on the UP2 board later.Current ACRN partition mode implementation requires a multi-boot capable bootloader to boot both ACRN hypervisor and the bootable kernel image built from the previous step. You could install Ubuntu OS to the UP2 board by following this Ubuntu tutorial. The Ubuntu installer creates 3 disk partitions on the on-board eMMC memory. By default, the GRUB bootloader is installed on the ESP (EFI System Partition) partition, which will be used to bootstrap the partition mode ACRN hypervisor.
After installing the Ubuntu OS, power off the UP2 board, attach the SATA disk and the USB flash disk to the board. Power on the board and make sure it boots the Ubuntu OS from the eMMC, then copy the loadable kernel modules built in Step 1 to the
/lib/modules/folder on both the mounted SATA disk and USB disk. For example, assuming the SATA disk and USB flash disk are assigned to/dev/sdaand/dev/sdbrespectively, the following commands set up the partition mode loadable kernel modules onto the root filesystems to be loaded by the privileged VMs:# Mount the Clear Linux root filesystem on the SATA disk $ sudo mount /dev/sda3 /mnt $ sudo cp -r <kernel-modules-folder-built-in-step1>/lib/modules/* /mnt/lib/modules $ sudo umount /mnt # Mount the Clear Linux root filesystem on the USB flash disk $ sudo mount /dev/sdb3 /mnt $ sudo cp -r <path-to-kernel-module-folder-built-in-step1>/lib/modules/* /mnt/lib/modules $ sudo umount /mnt
Copy the bootable kernel image to the
/bootdirectory:$ sudo cp <path-to-kernel-image-built-in-step1>/bzImage /boot/
Enable partition mode in ACRN hypervisor
Before building the ACRN hypervisor, you need to figure out the I/O address of the serial port, and the PCI BAR addresses of the SATA controller and the USB controller on your UP2 board.
Enter the following command to get the I/O addresses of the serial ports. UP2 boards support two serial ports. The addresses from the command output represent the I/O addresses of the serial port of the 10-pin side connector and the 40-pin expansion header respectively. You will need to connect the serial port to the development host, in order to access the ACRN serial console to switch between privileged VMs.
$ dmesg | grep ttyS
[   10.552369] dw-apb-uart.8: ttyS4 at MMIO 0x91524000 (irq = 4, base_baud = 115200) is a 16550A
[   10.552568] serial serial0: tty port ttyS4 registered
[   10.572344] dw-apb-uart.9: ttyS5 at MMIO 0x91522000 (irq = 5, base_baud = 115200) is a 16550A
[   10.572545] serial serial1: tty port ttyS5 registered
The following command prints detailed information about all PCI buses and devices in the system. Look up the PCI BAR addresses of the SATA controller and the USB controller, record these addresses (highlighted below) for editing the source code later.
$ sudo lspci -vv
...
00:12.0 SATA controller: Intel Corporation Device 5ae3 (rev 0b) (prog-if 01 [AHCI 1.0])
    Subsystem: Intel Corporation Device 7270
    Control: I/O+ Mem+ BusMaster+ SpecCycle- MemWINV- VGASnoop- ParErr- Stepping- SERR- FastB2B- DisINTx+
    Status: Cap+ 66MHz+ UDF- FastB2B+ ParErr- DEVSEL=medium >TAbort- <TAbort- <MAbort- >SERR- <PERR- INTx-
    Latency: 0
    Interrupt: pin A routed to IRQ 123
    Region 0: Memory at 91514000 (32-bit, non-prefetchable) [size=8K]
    Region 1: Memory at 91537000 (32-bit, non-prefetchable) [size=256]
    Region 2: I/O ports at f090 [size=8]
    Region 3: I/O ports at f080 [size=4]
    Region 4: I/O ports at f060 [size=32]
    Region 5: Memory at 91536000 (32-bit, non-prefetchable) [size=2K]
...
00:15.0 USB controller: Intel Corporation Device 5aa8 (rev 0b) (prog-if 30 [XHCI])
    Subsystem: Intel Corporation Device 7270
    Control: I/O- Mem+ BusMaster+ SpecCycle- MemWINV- VGASnoop- ParErr- Stepping- SERR- FastB2B- DisINTx+
    Status: Cap+ 66MHz- UDF- FastB2B+ ParErr- DEVSEL=medium >TAbort- <TAbort- <MAbort- >SERR- <PERR- INTx-
    Latency: 0
    Interrupt: pin A routed to IRQ 122
    Region 0: Memory at 91500000 (64-bit, non-prefetchable) [size=64K]
Clone the ACRN source code and configure the build options with
make menuconfigcommand:$ git clone https://github.com/projectacrn/acrn-hypervisor.git $ cd acrn-hypervisor/hypervisor $ make menuconfig
Set the
Hypervisor modeoption toPartition mode, and depending on the serial port you are using, enter its MMIO address to the configuration menu as shown in this screenshot. Finally, save the configuration.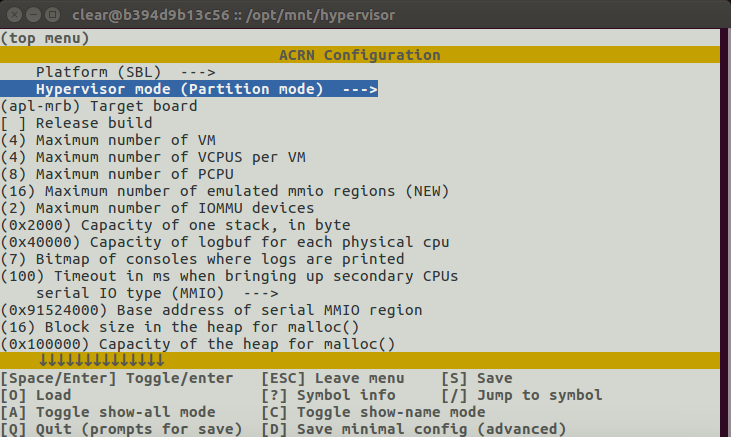
Configure the PCI device info for each VM
PCI devices that are available to the privileged VMs are hardcoded in the source file
hypervisor/partition/apl-mrb/vm_description.c. You need to review and modify thevpci_vdev_array1andvpci_vdev_array2structures in the source code to match the PCI BAR addresses of the SATA controller and the USB controller noted in step 1:... static struct vpci_vdev_array vpci_vdev_array1 = { .num_pci_vdev = 2, .vpci_vdev_list = { {/*vdev 0: hostbridge */ .vbdf.bits = {.b = 0x00U, .d = 0x00U, .f = 0x0U}, .ops = &pci_ops_vdev_hostbridge, .bar = {}, .pdev = { .bdf.bits = {.b = 0x00U, .d = 0x00U, .f = 0x0U}, } }, {/*vdev 1: SATA controller*/ .vbdf.bits = {.b = 0x00U, .d = 0x01U, .f = 0x0U}, .ops = &pci_ops_vdev_pt, .bar = { [0] = { .base = 0UL, .size = 0x2000UL, .type = PCIBAR_MEM32 }, [1] = { .base = 0UL, .size = 0x1000UL, .type = PCIBAR_MEM32 }, [5] = { .base = 0UL, .size = 0x1000UL, .type = PCIBAR_MEM32 }, }, .pdev = { .bdf.bits = {.b = 0x00U, .d = 0x12U, .f = 0x0U}, .bar = { [0] = { .base = 0x91514000UL, .size = 0x2000UL, .type = PCIBAR_MEM32 }, [1] = { .base = 0x91537000UL, .size = 0x100UL, .type = PCIBAR_MEM32 }, [5] = { .base = 0x91536000UL, .size = 0x800UL, .type = PCIBAR_MEM32 }, } ... static struct vpci_vdev_array vpci_vdev_array2 = { .num_pci_vdev = 3, ... {/*vdev 1: USB controller*/ .vbdf.bits = {.b = 0x00U, .d = 0x01U, .f = 0x0U}, .ops = &pci_ops_vdev_pt, .bar = { [0] = { .base = 0UL, .size = 0x10000UL, .type = PCIBAR_MEM32 }, }, .pdev = { .bdf.bits = {.b = 0x00U, .d = 0x15U, .f = 0x0U}, .bar = { [0] = { .base = 0x91500000UL, .size = 0x10000UL, .type = PCIBAR_MEM64 }, } ...Optionally, configure the
.bootargskernel command line argumentsThe kernel command line arguments used to boot the privileged VMs are hardcoded as
/dev/sda3to meet the Clear Linux automatic installation. In case you plan to use your customized root filesystem, you may optionally edit theroot=parameter specified in the.bootargsfield of the.vm_desc_arraystructure, to instruct the Linux kernel to mount the right disk partition:... /* Virtual Machine descriptions */ .vm_desc_array = { { /* Internal variable, MUSTBE init to -1 */ .vm_hw_num_cores = VM1_NUM_CPUS, .vm_pcpu_ids = &VM1_CPUS[0], ... .bootargs = "root=/dev/sda3 rw rootwait noxsave maxcpus=2 nohpet console=hvc0 \ console=ttyS2 no_timer_check ignore_loglevel log_buf_len=16M \ consoleblank=0 tsc=reliable xapic_phys", .vpci_vdev_array = &vpci_vdev_array1, .mptable = &mptable_vm1, }, { /* Internal variable, MUSTBE init to -1 */ .vm_hw_num_cores = VM2_NUM_CPUS, .vm_pcpu_ids = &VM2_CPUS[0], ... .bootargs = "root=/dev/sda3 rw rootwait noxsave maxcpus=2 nohpet console=hvc0 \ console=ttyS2 no_timer_check ignore_loglevel log_buf_len=16M \ consoleblank=0 tsc=reliable xapic_phys", .vpci_vdev_array = &vpci_vdev_array2, .mptable = &mptable_vm2, .lapic_pt = true, }, }Build the ACRN hypervisor and copy the artifact
acrn.32.outto the/bootdirectory:$ make PLATFORM=sbl ... $ sudo cp build/acrn.32.out /boot
Modify the
/etc/grub.d/40_customfile to create a new GRUB entry that will multi-boot the ACRN hypervisor and the UOS kernel imageAppend the following configuration to the
/etc/grub.d/40_customfile:menuentry 'ACRN Partition Mode' --class ubuntu --class gnu-linux --class gnu --class os $menuentry_id_option 'gnulinux-simple-e23c76ae-b06d-4a6e-ad42-46b8eedfd7d3' { recordfail load_video gfxmode $linux_gfx_mode insmod gzio insmod part_gpt insmod ext2 echo 'Loading partition mode hypervisor ...' multiboot /boot/acrn.32.out module /boot/bzImage }Modify the
/etc/default/grubfile as follows to make the GRUB menu visible when booting:#GRUB_HIDDEN_TIMEOUT=0 GRUB_HIDDEN_TIMEOUT_QUIET=false
Re-generate the GRUB configuration file and reboot the UP2 board. Select the
ACRN Partition Modeentry to boot the partition mode of the ACRN hypervisor, the hypervisor will start the privileged VMs automatically.$ sudo update-grub
 Ubuntu
 Advanced options for Ubuntu
 System setup
*ACRN Partition Mode
Switch between privileged VMs
Connect the serial port on the UP2 board to the development workstation.
If you set the MMIO address of the serial port right while building the
ACRN hypervisor, you should see the output from the ACRN serial console as below.
You could then log in to the privileged VMs by sos_console command,
and press CTRL+Space keys to return to the ACRN serial console.
ACRN Hypervisor
calibrate_tsc, tsc_khz=1094400
[21017289us][cpu=0][sev=2][seq=1]:HV version 0.3-unstable-2018-11-08 12:41:24-ef974d1a-dirty DBG (daily tag:acrn-2018w45.3-140000p) build by clear, start time 20997424us
[21034127us][cpu=0][sev=2][seq=2]:API version 1.0
[21039218us][cpu=0][sev=2][seq=3]:Detect processor: Intel(R) Pentium(R) CPU N4200 @ 1.10GHz
[21048422us][cpu=0][sev=2][seq=4]:hardware support HV
[21053897us][cpu=0][sev=1][seq=5]:SECURITY WARNING!!!!!!
[21059672us][cpu=0][sev=1][seq=6]:Please apply the latest CPU uCode patch!
[21074487us][cpu=0][sev=2][seq=28]:Start VM1
[21074488us][cpu=3][sev=2][seq=29]:Start VM2
[21885195us][cpu=0][sev=3][seq=34]:vlapic: Start Secondary VCPU1 for VM[1]...
[21889889us][cpu=3][sev=3][seq=35]:vlapic: Start Secondary VCPU1 for VM[2]...
ACRN:\>
ACRN:\>sos_console 1

----- Entering Guest 1 Shell -----
[    1.997439] systemd[1]: Listening on Network Service Netlink Socket.
[  OK  ] Listening on Network Service Netlink Socket.
[    1.999347] systemd[1]: Created slice system-serial\x2dgetty.slice.
[  OK  ] Created slice system-serial\x2dgetty.slice.
[  OK  ] Listening on Journal Socket (/dev/log).
...
clr-932c8a3012ec4dc6af53790b7afbf6ba login: root
Password:
root@clr-932c8a3012ec4dc6af53790b7afbf6ba ~ # lspci
00:00.0 Host bridge: Intel Corporation Celeron N3350/Pentium N4200/Atom E3900 Series Host Bridge (rev 0b)
00:01.0 SATA controller: Intel Corporation Celeron N3350/Pentium N4200/Atom E3900 Series SATA AHCI Controller (rev 0b)
root@clr-932c8a3012ec4dc6af53790b7afbf6ba ~ #

 ---Entering ACRN SHELL---
ACRN:\>sos_console 2

----- Entering Guest 2 Shell -----
[    1.490122] usb 1-4: new full-speed USB device number 2 using xhci_hcd
[    1.621311] usb 1-4: not running at top speed; connect to a high speed hub
[    1.627824] usb 1-4: New USB device found, idVendor=058f, idProduct=6387, bcdDevice= 1.01
[    1.628438] usb 1-4: New USB device strings: Mfr=1, Product=2, SerialNumber=3
...
clr-2e8082cd4fc24d57a3c2d3db43368d36 login: root
Password:
root@clr-2e8082cd4fc24d57a3c2d3db43368d36 ~ # lspci
00:00.0 Host bridge: Intel Corporation Celeron N3350/Pentium N4200/Atom E3900 Series Host Bridge (rev 0b)
00:01.0 USB controller: Intel Corporation Celeron N3350/Pentium N4200/Atom E3900 Series USB xHCI (rev 0b)
00:02.0 Ethernet controller: Realtek Semiconductor Co., Ltd. RTL8111/8168/8411 PCI Express Gigabit Ethernet Controller (rev 0c)
root@clr-2e8082cd4fc24d57a3c2d3db43368d36 ~ #